How to Build an Amazon Price Tracker with Python
If you want to monitor Amazon prices without manually refreshing product pages every day, you need an automated solution. Manual price tracking can introduce errors and cause you to miss deals, since Amazon changes prices multiple times per day on many products.
This guide walks you through building a fully functional Amazon price tracker with Python. You'll learn how to scrape product data, store price history, set up price-drop alerts, and handle technical challenges such as rate limiting and IP bans.
What Is an Amazon Price Tracker?
An Amazon price tracker is a script or application that monitors product prices over time. It connects to Amazon product pages, extracts the current price, saves that data, and optionally notifies you when prices drop below a threshold you set.
Existing tools like Keepa or CamelCamelCamel do the job, but third-party trackers may limit automation and customization. Some tools provide raw data via paid APIs, but you may still prefer a custom tracker for full control over storage, alerts, and integrations.
With a custom Python tracker, you can monitor unlimited products, run it on your own schedule, integrate with your existing tools, and build features that those services don't offer.
Prerequisites
Before we dive into creating the tracker, make sure you have the following installed on your machine:
- Python 3.8 or higher: Download it from python.org if you haven't already, then verify your installation by running python --version in your terminal.
- pip (Python package manager): This comes bundled with Python installations, and you'll use it to install the required libraries.
- A code editor: VS Code, PyCharm, or even a basic text editor will work.
- Basic Python knowledge: You should understand variables, functions, loops, and how to run Python scripts.
Building an Amazon Price Tracker: Step-by-Step
Use this guide to build a simple Amazon price tracker in Python. You’ll start with a one-URL scraper, then add price history, email alerts, and scheduling. After that, you’ll harden it against blocks and generate a basic chart so you can see price movement over time.
Step 1: Set Up Your Project Environment
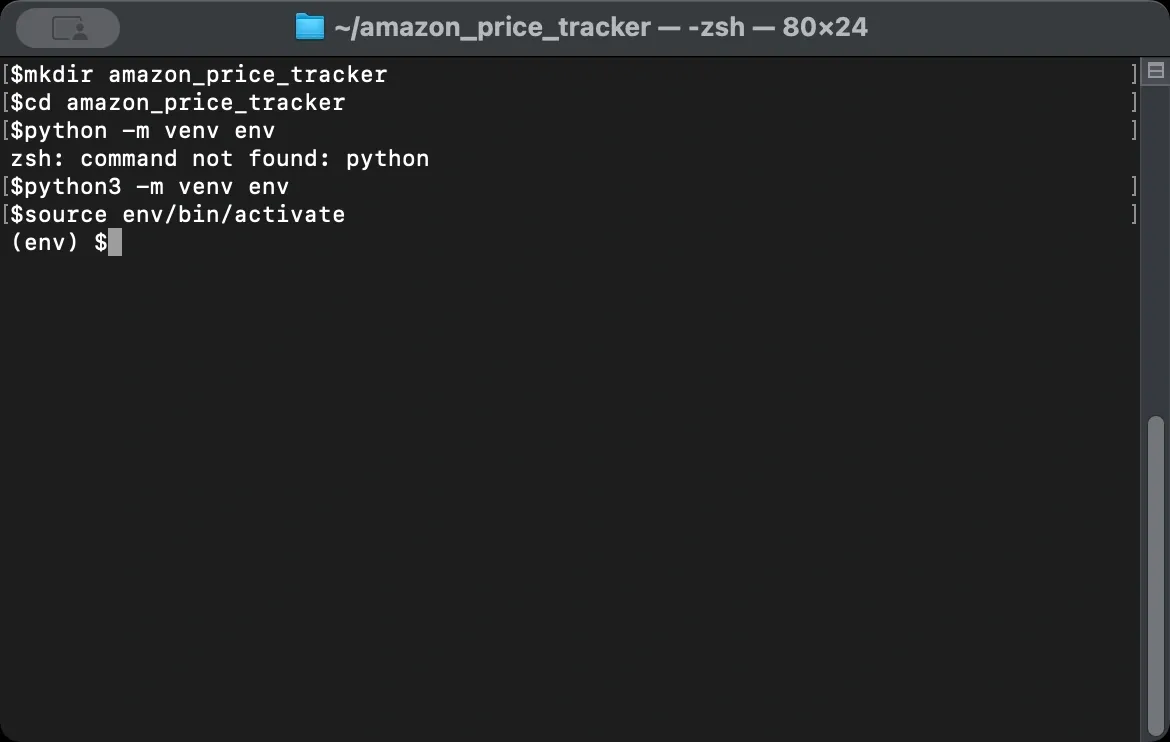
A clean project environment keeps your dependencies isolated and your scraper portable. You don't want system-wide packages interfering with your project, and you don't want your scraper breaking when you update something unrelated. Start by creating a dedicated folder for your price tracker.
Next, create a virtual environment inside that folder. This isolates each package you install from your system Python, preventing version conflicts and making the project easier to share or rebuild later.
After creating it, activate the virtual environment. You should see (venv) appear at the beginning of your terminal prompt, confirming that every package you install from this point goes only into this environment.
Now install the libraries your tracker needs.
Each library serves a specific purpose in your scraper:
- requests sends HTTP requests to fetch web pages. When your scraper asks for an Amazon product page, requests handles the network call and returns the HTML content from Amazon's server.
- BeautifulSoup parses HTML and extracts data from it. Raw HTML is just text, but BeautifulSoup turns that text into a searchable structure, letting you find specific elements like product titles, prices, and ratings without writing complex string manipulation code.
- pandas handles data storage and manipulation. It organizes your scraped prices into rows and columns, making it simple to save data to CSV files, calculate statistics, or compare prices over time.
- schedule automates running your tracker at set intervals. It runs continuously in your terminal session. To run it in the background, use a process manager (system service / Task Scheduler / cron / Docker).
Once done, create a file called tracker.py in your project folder. This will be your main script.
Step 2: Understand Amazon's Page Structure
Before writing any extraction code, you need to understand how Amazon structures its product pages. Your scraper finds data by looking for specific HTML elements, so you need to know exactly where Amazon puts the information you want.
Open any Amazon product page in your browser, then right-click on the price and select Inspect to open Developer Tools. This shows you the HTML underlying what you see on screen.
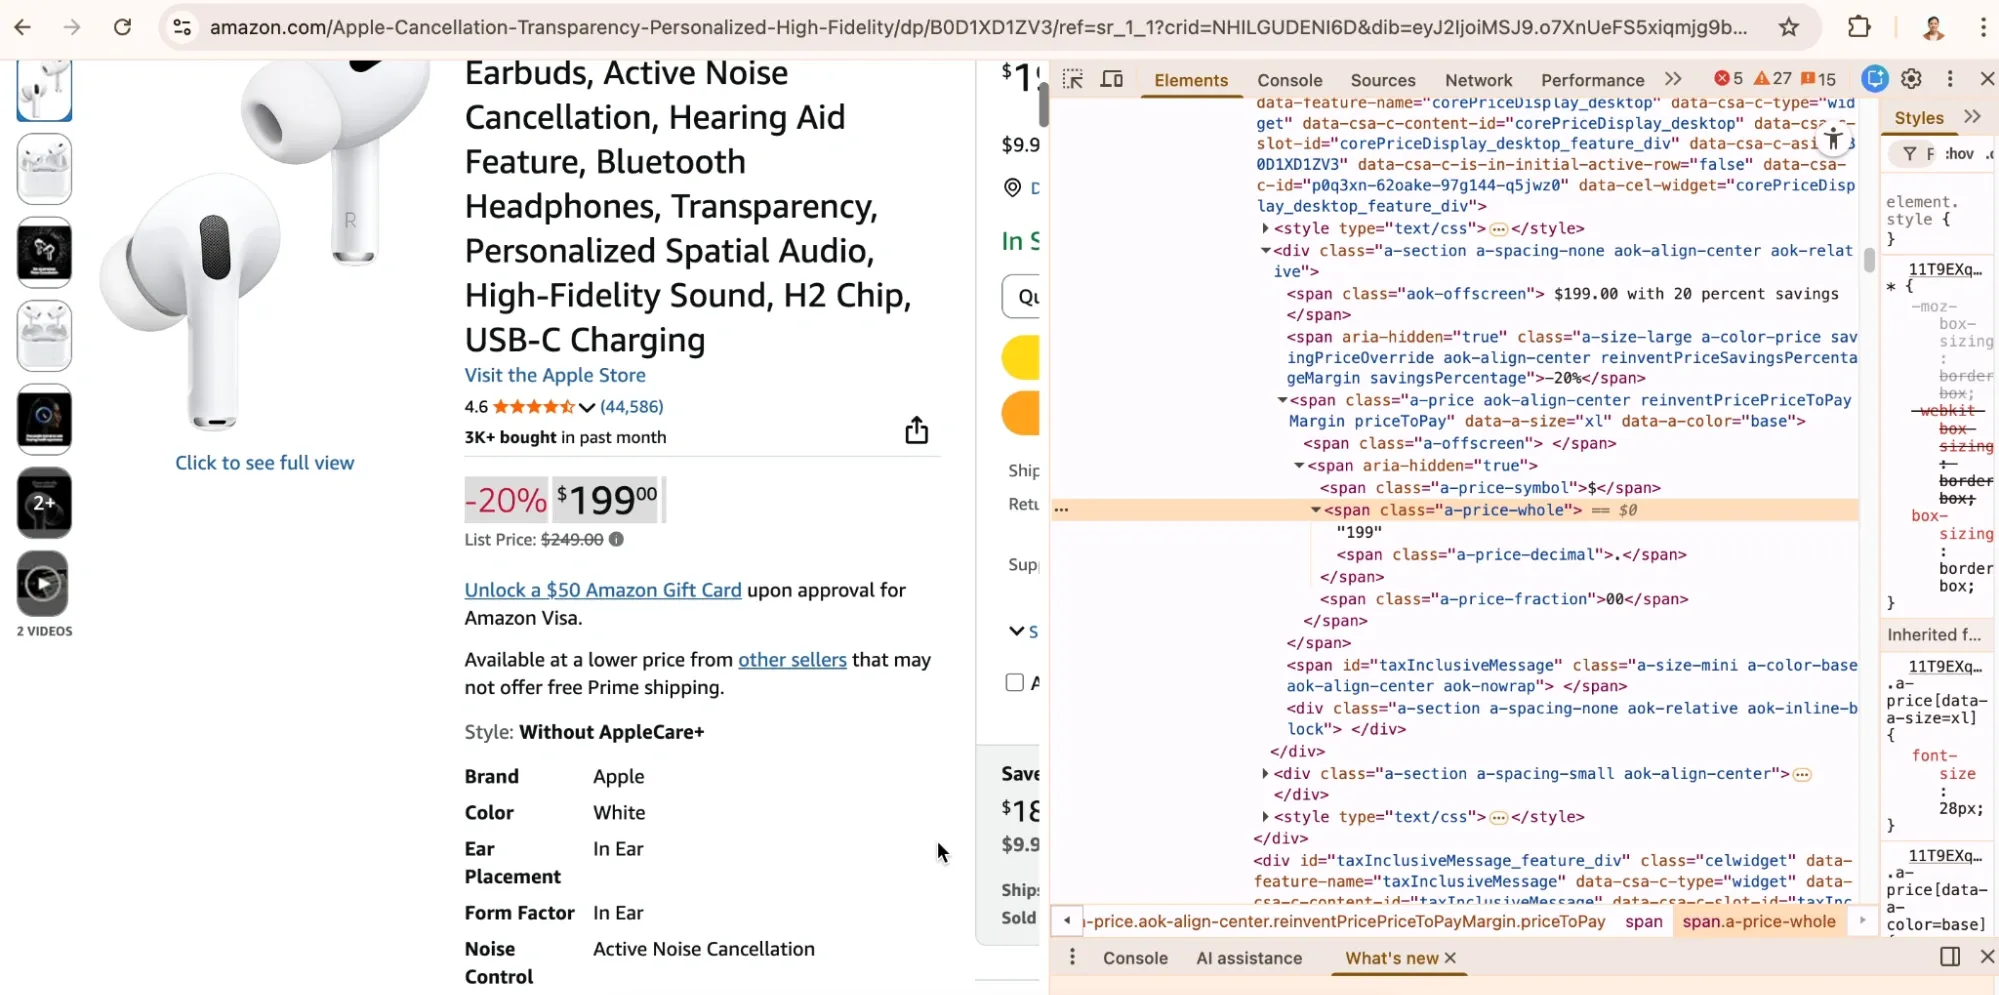
Product prices typically appear in elements with specific class names or IDs. Amazon uses classes like a-price-whole for the dollar amount and a-price-fraction for cents. The product title usually sits in a span element with the ID productTitle.
Spend a few minutes inspecting different product pages before you start coding. Look at how prices display for items on sale versus regular prices, and check if the title structure stays consistent.
Note: Amazon’s HTML changes sometimes. A selector that works today may stop working later, and different categories can use different layouts.
This is why good error handling becomes essential when your tracker runs unattended. Your script needs to handle missing elements gracefully rather than crashing when Amazon moves something around.
If you want a quick walkthrough with examples, you can also reference our guide on scraping Amazon product information.
Step 3: Build the Basic Scraper
Note: The following steps explain each component of the tracker. If you want to skip ahead, the complete script is in Step 10. Otherwise, follow along to understand how each piece works.
With your environment ready and the page structure understood, you can write the core scraping function. This function takes a product URL, fetches the page, and extracts the price and title.
However, the first challenge is making your request look legitimate. Amazon might block requests that don't include realistic browser headers, and a raw request with no headers often triggers blocks or returns different content than what you see in a browser.
That’s why, including a User-Agent header that identifies your request as coming from a real browser may help. Also, the Accept-Language header makes your scraper match normal browser traffic. In some setups, Amazon may return a currency different from what you see in your browser, so the example includes a simple USD preference cookie.
If you want to match your own browser exactly, open DevTools in Chrome, go to the Network tab, click any request, and find the User-Agent under Request Headers. You can also read our BeautifulSoup web scraping guide for additional reference if you want a deeper refresher on parsing HTML and selecting elements with BeautifulSoup.

Now write the main scraping function. It sends a GET request to Amazon, parses the HTML response, and extracts the title and price.
Instead of manually stitching together the “whole” and “fraction” spans (which can vary by layout and locale), this version prefers parsing a full formatted price string (often found in a-offscreen), then falls back to a few other common price locations.
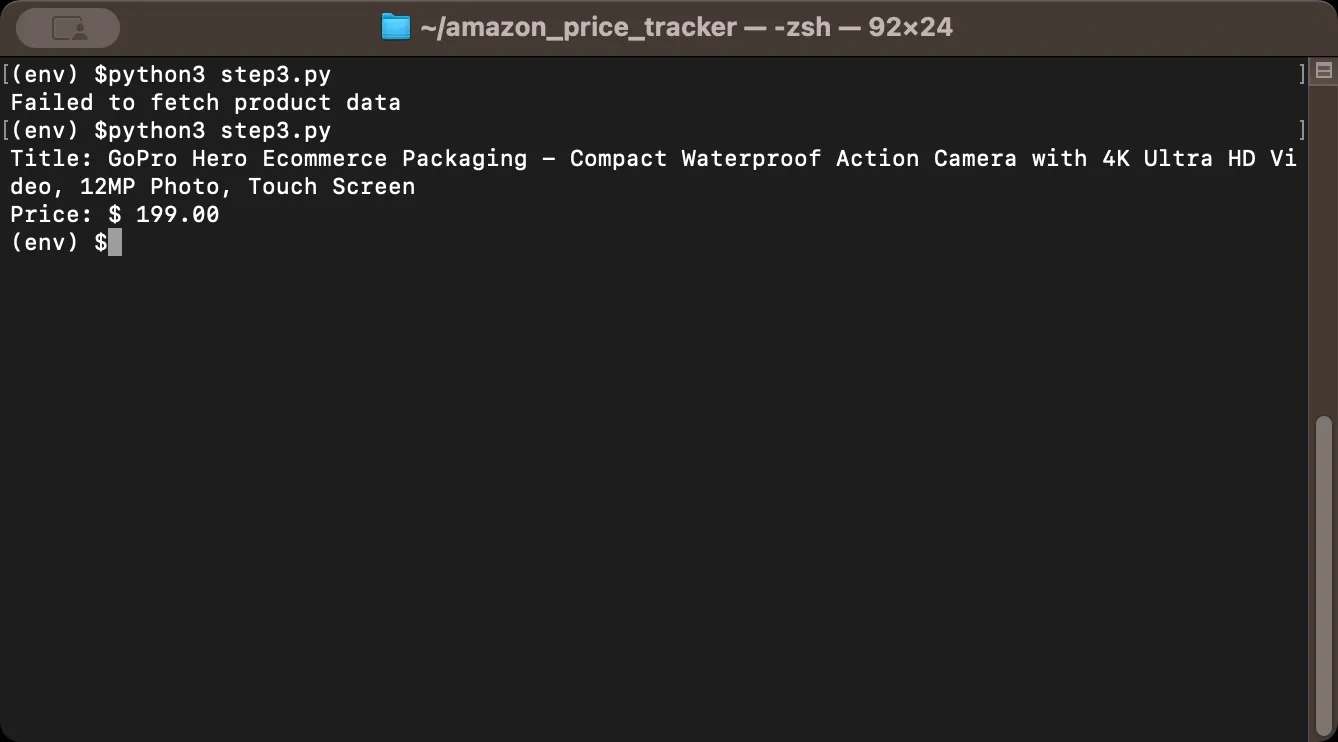
Finally, test your scraper with a single product to confirm it works. For this example, we'll extract data from the GoPro camera listing. When you copy a product URL from Amazon, it usually looks like this:
Most of that URL is tracking parameters and search data. The only part you need is the 10-character code after /dp/. That's the ASIN (Amazon Standard Identification Number), a unique identifier for every product. In this case, the ASIN is B0FCTZ1GLY.
Once you have the ASIN, rebuild the URL into a clean format:
This shorter URL is more stable and works the same way. Now run the script and check the output. If you see the product title and price printed correctly, your basic scraper works. If you get None values or errors, double-check your selectors against the actual page HTML.
Step 4: Store Price History
Scraping prices once isn't useful. The value comes from tracking changes over time, so you need to store each price reading with a timestamp. This lets you see trends, identify patterns, and know when prices hit their lowest point.
pandas makes data storage straightforward, and you'll save prices to a CSV file, which is simple to work with and opens in any spreadsheet application.
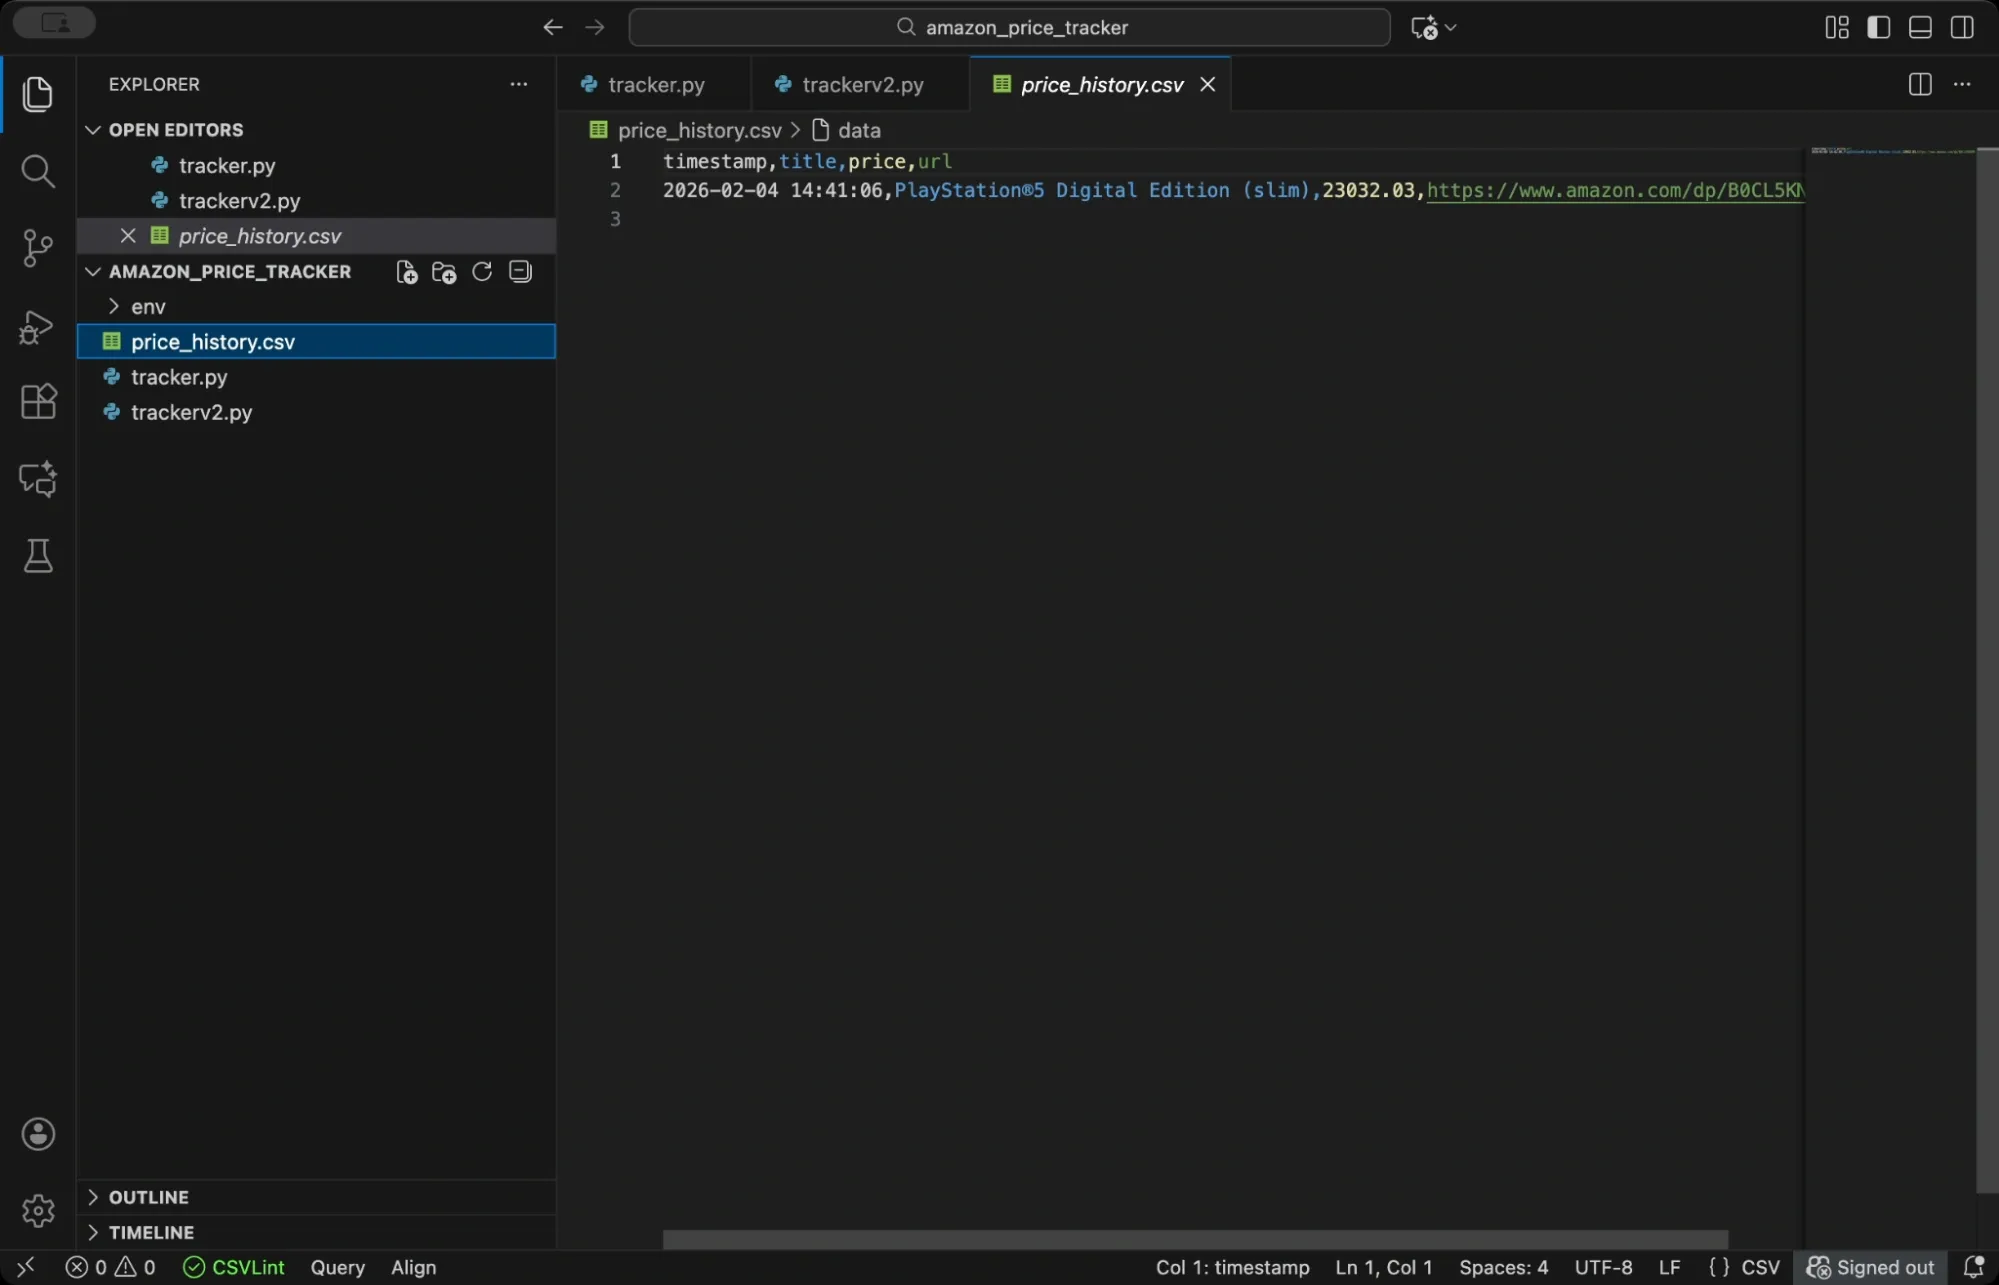
This function checks if your CSV file already exists. If it does, the function loads the existing data and appends the new price reading. If not, it creates a fresh DataFrame. Either way, it saves everything back to the CSV file.
Each row in your CSV will contain a timestamp, the product title, the current price, and the URL. Over time, this file becomes your price history database.
For larger projects or when tracking hundreds of products, consider using a proper database instead of CSV. SQLite works well for single-user applications because it stores everything in a single file and requires no server setup. PostgreSQL or MongoDB handle concurrent access better if you're building something more robust.
Step 5: Add Price Drop Alerts
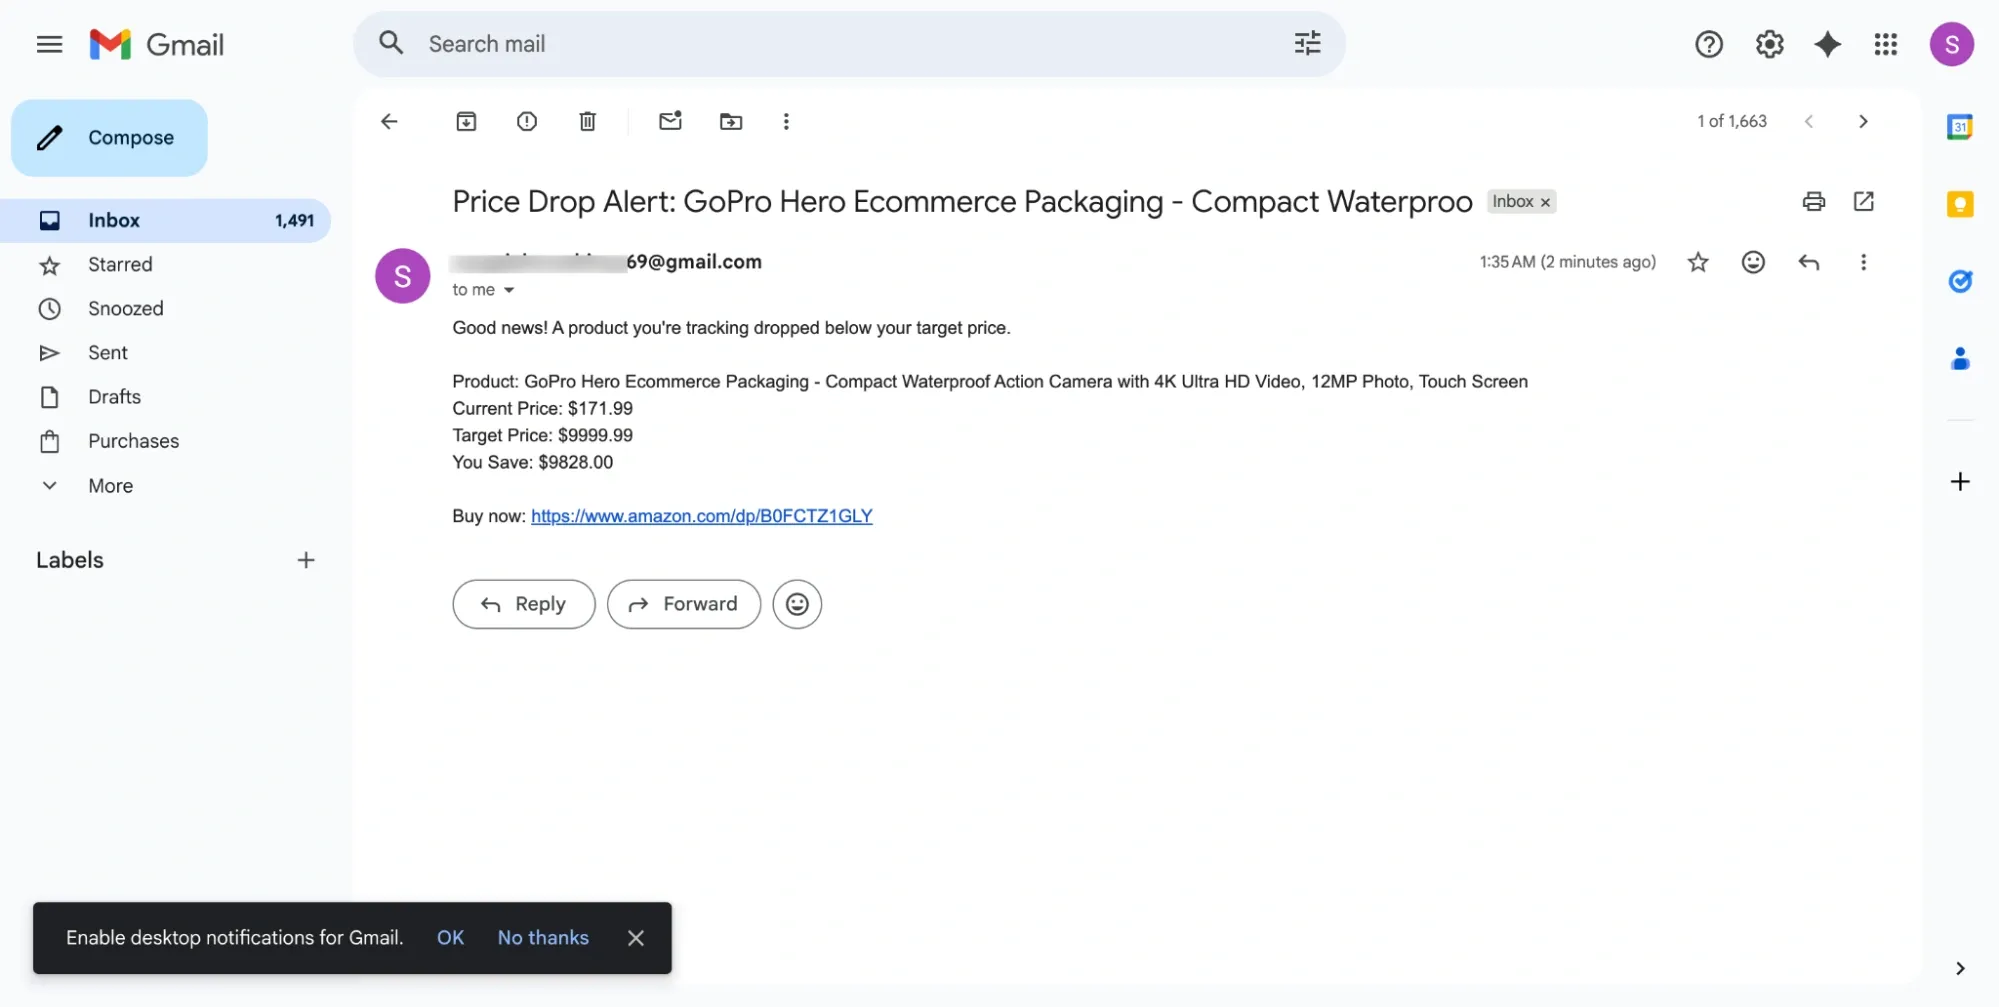
The real value of a price tracker comes from alerts. You want to know immediately when a product drops below your target price, not discover it days later when the deal has expired.
Python's built-in smtplib library lets you send emails directly from your script, and you'll configure it to connect to Gmail's SMTP server and send yourself a notification when prices drop. This step uses Decimal for price math, so comparisons and savings stay consistent.
For testing, you can set a very high target price so the alert triggers on the first run. Once you confirm emails work, set the target back to your real threshold.
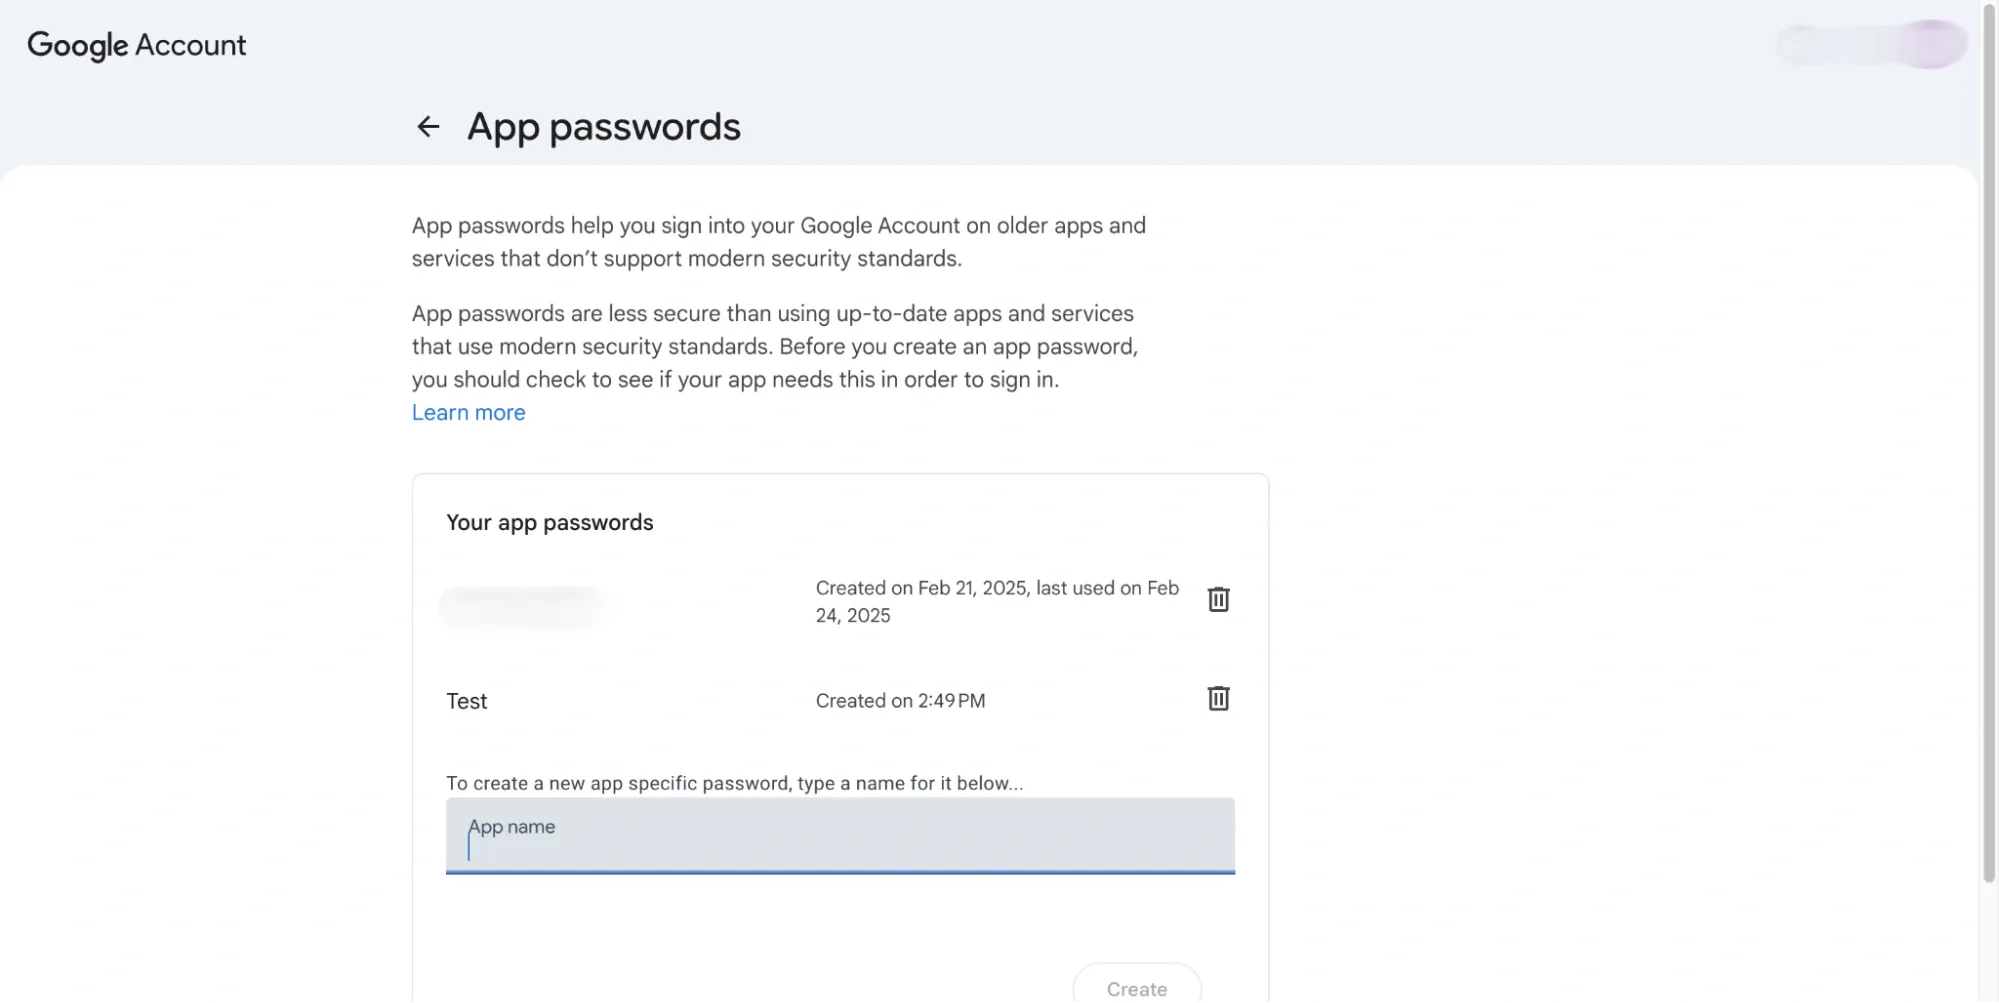
A few notes on the email setup. Gmail requires you to use an App Password rather than your regular password if you have two-factor authentication enabled. Create one in your Google Account security settings under App passwords.
Store credentials in environment variables rather than hardcoding them in your script, since hardcoded passwords are a security risk, especially if you ever share your code.
Now create a function that combines price checking with alerting. This function fetches the current price, saves it to your history file, and sends an alert if the price is at or below your target. The return value tells you whether an alert was triggered, which is useful for logging.
If you see “Could not fetch price,” Amazon may be returning a block page or a different layout, so inspect the HTML and adjust selectors if needed.
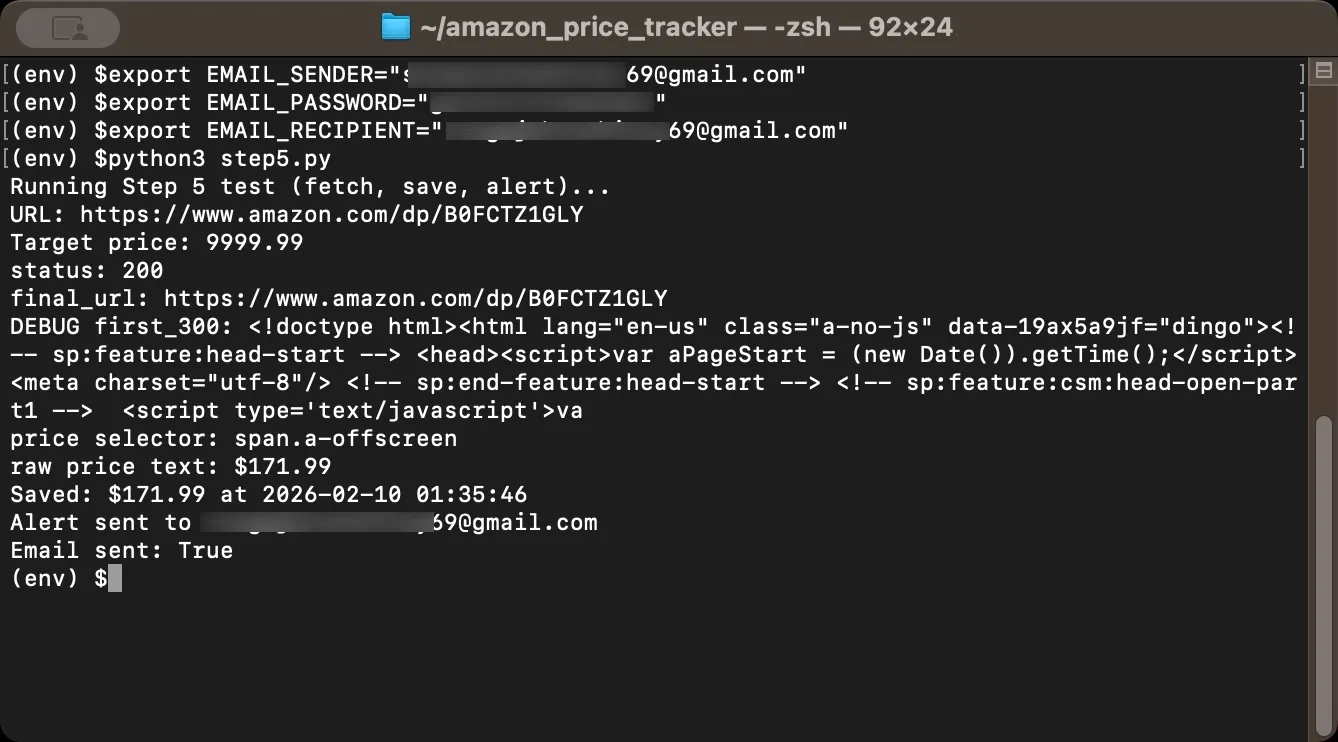
And, before you run the script, set the environment variables in the same Terminal session. If you don’t, os.environ.get(...) returns None, and the alert code will skip sending email. If you open a new terminal window, you’ll need to set them again. On macOS/Linux you can set them with export as shown below.
Use a Gmail App Password for EMAIL_PASSWORD. If Google displays it with spaces, retype the spaces manually or remove spaces entirely so you don’t paste hidden characters. Here’s an example for demonstration purposes.
Step 6: Automate the Tracker
Running your script manually every few hours defeats the purpose of building a tracker. Use the schedule library to check prices automatically at regular intervals, and set it to run every six hours or so. Why not every minute?
Two reasons. First, most product prices don't change that frequently, so checking once or twice per day catches the meaningful changes without wasting resources. Second, frequent requests might increase your chances of getting blocked since Amazon monitors request patterns, and hammering their servers every minute looks suspicious.
If you’re testing alerts, you can temporarily set a high target price so an email triggers on the first run. After you confirm alerts work, set the target back to your real threshold.
The random delay between products serves the same purpose. If you check 10 products in rapid succession with exactly two seconds between each request, that pattern is obviously automated.
Adding randomness makes your traffic look more like a human clicking through products at their own pace. In practice, you'll find that spacing out requests and varying the timing significantly reduces the number of blocks you encounter.
Step 7: Handle Anti-Bot Measures
Amazon may block automated requests depending on request rate, IP reputation, and page layout. If your tracker starts returning missing titles/prices or unexpected HTML, slow down your request pace, rotate headers, and add retries.
Rate limiting is common. If you send too many requests in a short period, Amazon can throttle or temporarily block your IP. Spacing out requests with random delays helps, which you already added in Step 6, but you may need longer delays if you're tracking many products.
CAPTCHAs can appear when Amazon suspects automation. If your scraper hits one, it usually won’t be able to proceed until you solve it manually. Avoiding CAPTCHAs is mostly about request pacing, consistent headers, and IP reputation.
IP bans can happen after repeated suspicious activity. When that happens, requests may start returning block pages even for normal browsing from that IP, at least for a while.
To reduce blocks, rotate User-Agent strings, add jitter between requests, and include retry logic with backoff. When you get throttled or served an interstitial (commonly 429 or 503), wait longer before retrying.
How to use this in your tracker?
Inside your get_product_data() function, replace the direct requests.get(...) call with:
Step 8: Use Proxies for Reliable Scraping
For serious price tracking, especially when monitoring many products, you may need proxies. Proxies route your requests through different IP addresses, which makes it harder for Amazon to link repeated requests to one source and block you.
Two common options are residential and datacenter proxies.
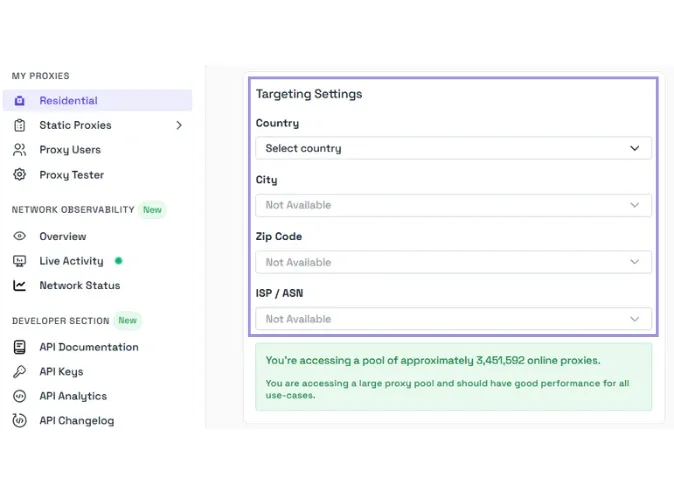
- Residential proxies use real IP addresses assigned by Internet Service Providers (ISPs) to home users. These look like normal consumer traffic, so they tend to last longer on heavily protected sites. They usually cost more than datacenter proxies.
- Datacenter proxies are faster and cheaper, but Amazon can recognize many datacenter IP ranges and block them more aggressively. They can still work for lighter tracking, but you may see more failures when you scale up.
Here’s an example that shows proxy integration in a way that stays consistent with the request retry logic and the price parsing you added earlier:
When configuring proxy rotation, the goal is to spread requests across IPs so you don’t hammer the same one repeatedly. Try not to send too many requests from the same IP in a short period. If a proxy starts failing often, remove it from the rotation and move on to the next one.
Our residential and ISP proxies are designed to reduce blocks and improve success rates for scraping tasks like price tracking, but your results will also depend on how your scraper behaves. We support HTTP/1 and HTTP/2 across Residential, ISP, and Datacenter proxies. HTTP/3 is available on Residential proxies only. We provide stable connections for automated data collection workflows.
Step 9: Visualize Price History
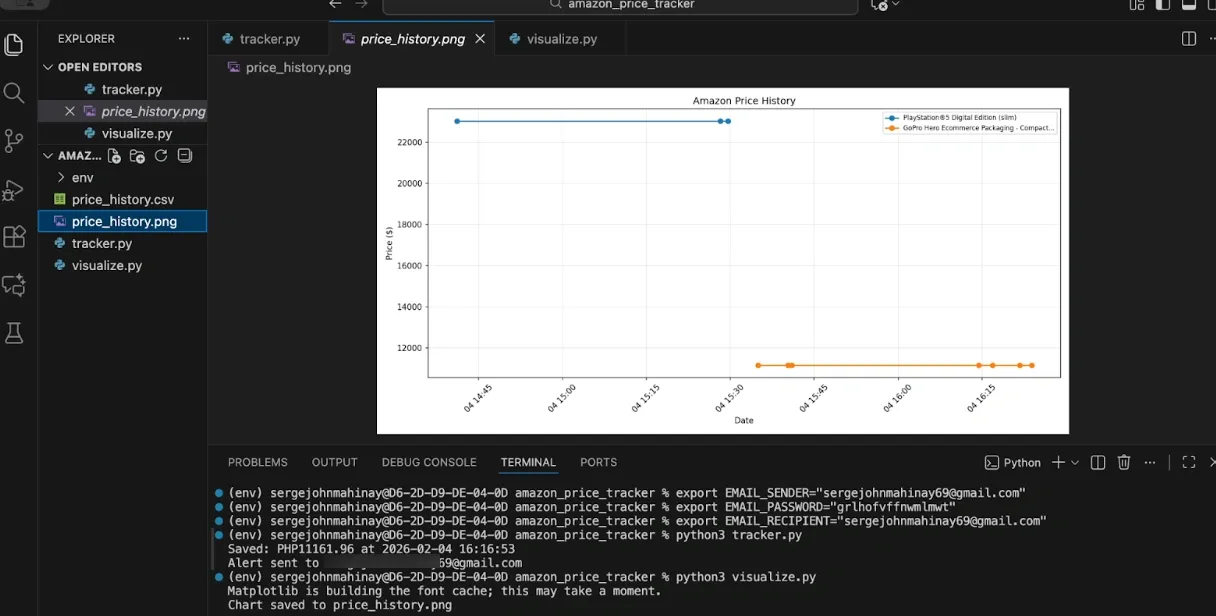
Once you've collected price data over time, visualization helps you spot trends and patterns. A chart shows you at a glance whether prices are trending up, down, or holding steady, and it makes the data actionable. matplotlib creates simple charts from your price history CSV.
To generate those charts, create a new file named visualize.py in your project folder and feel free to use this example script.
Run this function periodically to generate updated charts. You can also calculate statistics to supplement the visual data. These statistics tell you whether the current price is a good deal relative to historical data. For example, if the current price equals the lowest recorded price, that's a strong buy signal.
Step 10: Put It All Together
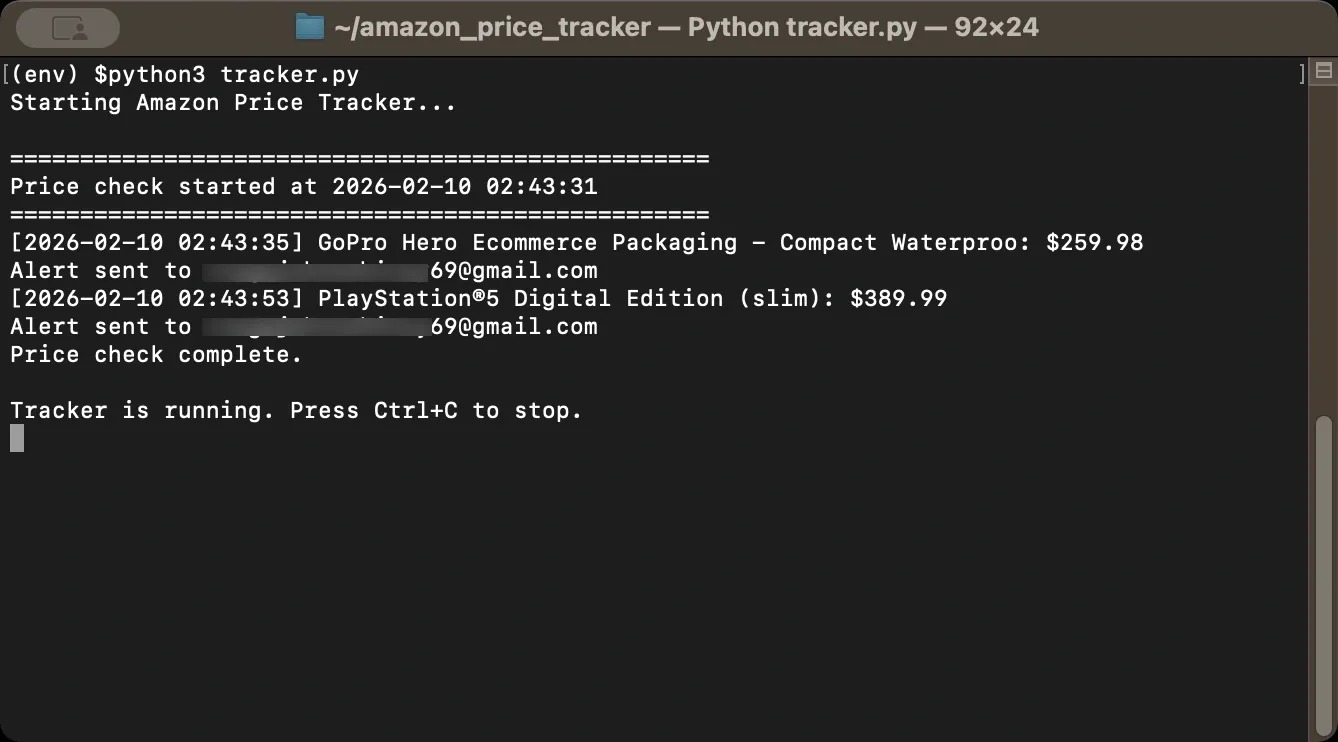
Here's the complete tracker script combining everything covered above. Save this as tracker.py and customize the product list and email settings for your needs. The script includes all imports, configuration options, helper functions, main scraping logic, email alerts, scheduling, and CSV export.
Want to try it yourself? Here's complete Amazon price tracker script
Run the script with python tracker.py. And the script will keep running as long as the process is running (i.e., in your terminal session). To run it in the background, use Task Scheduler / cron / systemd / Docker.

Troubleshooting Common Issues
Amazon scraping fails in a few common ways, and the error message usually tells you what happened. Check the response you got back first (status code and a short HTML snippet), then adjust your request pattern or parsing based on what you see.
- "Request failed" or timeout errors: Amazon might be blocking your IP. Wait a few hours before trying again, and if the problem persists, try a different network or use a proxy.
- Price returns None: Amazon's page structure varies by product category and region. Inspect the actual HTML returned by your request and update your selectors accordingly. Some products display prices differently when logged in versus logged out.
- 403 Forbidden errors: Your User-Agent or headers look suspicious. Update your User-Agent strings to match current browser versions and make sure you're including all necessary headers.
- CAPTCHAs appearing: You're making requests too quickly or too predictably. Increase delays between requests, add more randomization, and consider using residential proxies if the problem continues.
- Script stops after a while: Add comprehensive error handling so one failed request doesn't crash your entire tracker. Wrap your main loop in try-except blocks and log errors instead of letting them propagate.
Wrapping Up
You now have the building blocks for a functional Amazon price tracker. The basic version scrapes prices and stores history. Add email alerts to get notified of price drops, and use proxies to scale up and avoid blocks.
A few tips to keep your tracker running smoothly. Start small with just a few products before scaling up, and monitor your success rate to adjust request timing if blocks increase. Keep your User-Agent strings updated as browsers release new versions, and back up your price history data regularly. For production use with many products, residential proxies become essential for maintaining consistent success rates.
Always review and follow the terms of service and legal requirements that apply to your use case. Scrape responsibly, respect rate limits, and avoid overwhelming servers with excessive requests.