Beautiful Soup Web Scraping: A Step-by-Step Guide
If you need to pull product prices, headlines, or contact details from websites, doing it manually isn't practical. Copying and pasting data from dozens of pages takes hours, and the results are prone to errors.
Web scraping solves this problem by automating the extraction process using scripts that fetch and parse web pages. While Beautiful Soup is one of the most beginner-friendly Python libraries for this, you’ll want to know how it works in action and how it might help with your scraping needs.
That’s why, in this guide, we'll walk you through key things that you need to know about web scraping with Beautiful Soup. We’ll cover setting up your environment, inspecting page structures, writing your first scraper, and more.
By the end, you'll have a working scraper and the knowledge to tackle your own projects.
What Is Beautiful Soup?
Beautiful Soup is a Python library designed for parsing HTML and XML documents. It was created by Leonard Richardson. The library takes its name from the Beautiful Soup poem in Alice’s Adventures in Wonderland and references the term “tag soup,” which describes poorly structured HTML.
Beautiful Soup handles this broken markup gracefully, which makes it a reliable choice even when the HTML isn't perfect. Likewise, it's also important to understand what Beautiful Soup does and what it doesn't.
The library parses HTML content that you've already retrieved. But it doesn't fetch web pages on its own. For that, you'll use the requests library, which sends HTTP requests and retrieves the raw HTML. Think of it this way: requests get the page, and Beautiful Soup reads it.
Here's why Beautiful Soup remains popular among beginners and experienced developers alike:
- Lightweight: No complex setup or dependencies required.
- Forgiving parser: Handles broken or inconsistent HTML without crashing.
- Pythonic API: Methods like find() and find_all() are intuitive and easy to remember.
However, Beautiful Soup isn't the right tool for every job. The table below helps you decide when to use it versus other options.
| Tool | Type | Best For | Handles JavaScript? | Learning Curve |
|---|---|---|---|---|
| Beautiful Soup | HTML/XML Parser | Static pages, quick scraping tasks | No | Easy |
| Selenium | Browser Automation Engine | Dynamic, JavaScript-heavy pages | Yes | Moderate |
| Scrapy | Crawling Framework (Parser + Engine) | Large-scale crawling projects | Not by default (requires external rendering) | Steeper |
For most static websites where the content loads directly in the HTML, Beautiful Soup is the fastest way to get started.
Step-by-Step Guide to Web Scraping with Beautiful Soup
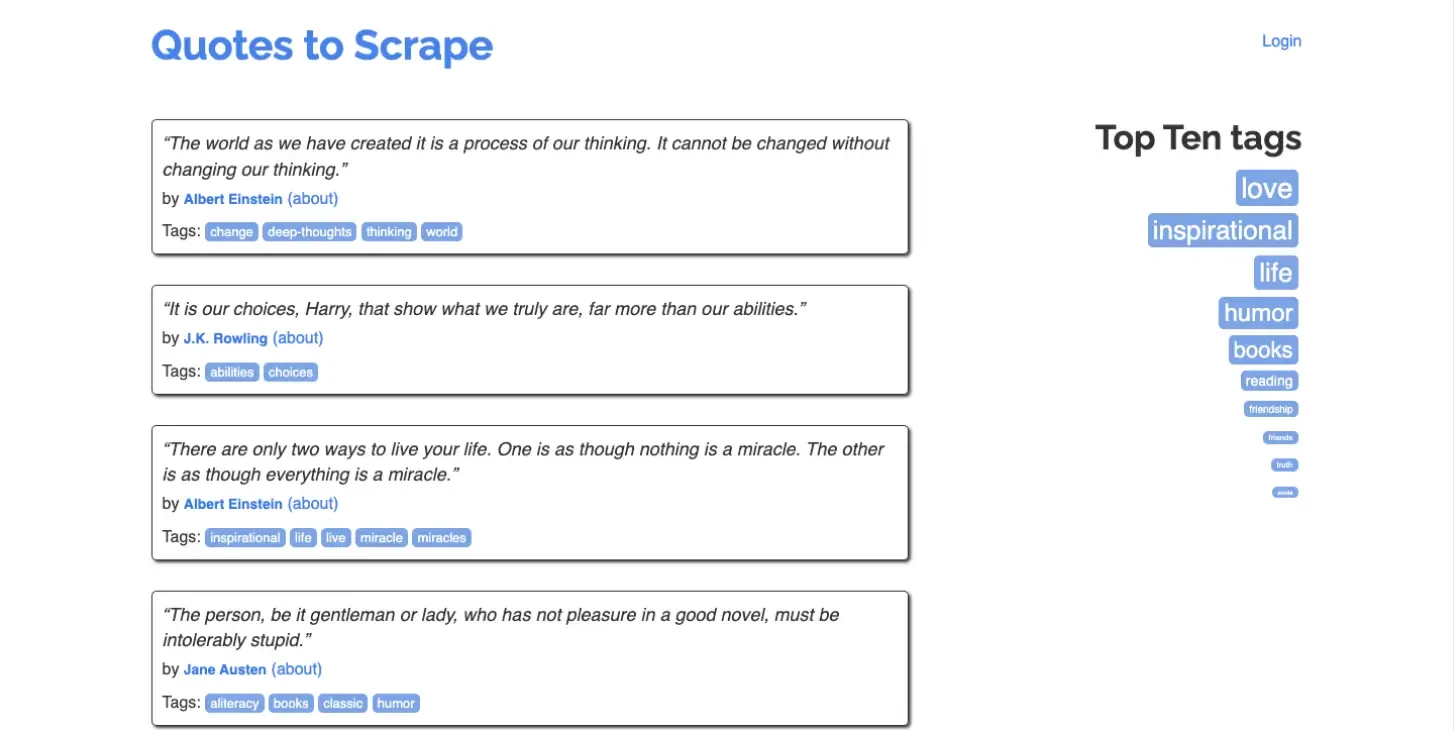
Now that you’ve had a background idea of what beautiful soup is, let’s see how it’s used in practice. We'll use Quotes to Scrape as our practice website because it's a simple site designed specifically for learning web scraping. And it may help us do our experiment without worrying about getting blocked.
Step 1: Set Up Your Environment
Before writing any code, you'll need a few things in place:
- Python 3.7 or higher is installed on your machine
- Basic understanding of Python syntax (variables, loops, functions)
- A code editor such as VS Code or PyCharm
- Access to a terminal or command prompt.
We recommend creating a virtual environment to isolate your project dependencies. This prevents conflicts with other Python projects on your system.
Follow these steps to set up your environment:
1. Start by creating a project folder. In our case, we named the folder 'scraper_env'. You can name it anything you want, but for demonstration purposes, let's stick with it so you can easily follow along.

2. Open your terminal and first navigate to your project folder by typing: "cd scraper_env". Once inside the folder, create the virtual environment using the following command:
3. Next, activate the virtual environment.
4. Verify that you've successfully set up your environment. If you're using a Mac, you should see "(scraper_env)" right before you type a new command. If you're on Windows, it's identical as long as you used the proper script provided.
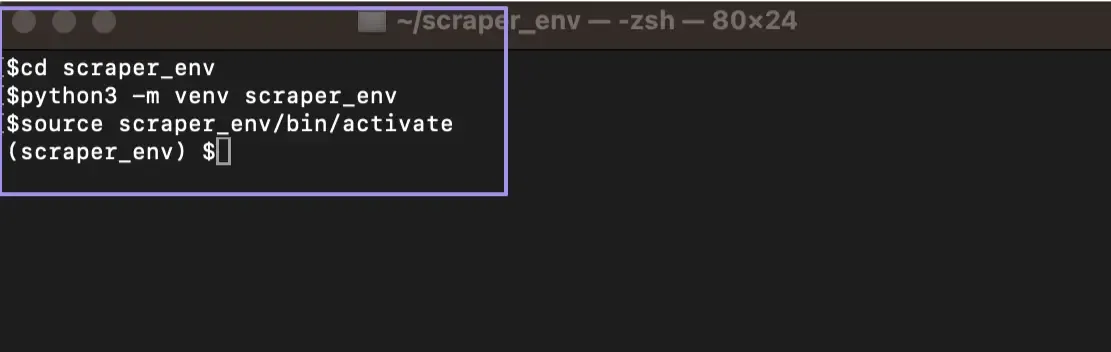
5. Finally, install the required libraries:
While Beautiful Soup is the main library we cover in this guide, you might wonder why we also need to install requests and lxml. As mentioned earlier, Beautiful Soup only parses HTML. It does not download web pages.
The requests library handles that part by sending HTTP requests and retrieving the raw HTML from the server. It’s one of the key libraries we need to have for a working scraping project.
The lxml parser is optional but recommended. It improves how that HTML gets processed. It parses pages faster than the built-in parser and works better with large or complex documents.
Together, requests fetches the page, Beautiful Soup reads it, and lxml speeds up the parsing process. With these installed, you are ready to start scraping.
Step 2: Inspect the Page Structure
Every scraping project starts with inspecting the target page. You need to understand how the data is structured in the HTML before writing any code.
Here's how to inspect a page:
1. Start by opening the target website in Chrome or Firefox. As mentioned earlier, we’ll use the Quotes to Scrape page.
2. Right-click on the element you want to scrape (for example, a quote). Then, select "Inspect" from the context menu to open Developer Tools.
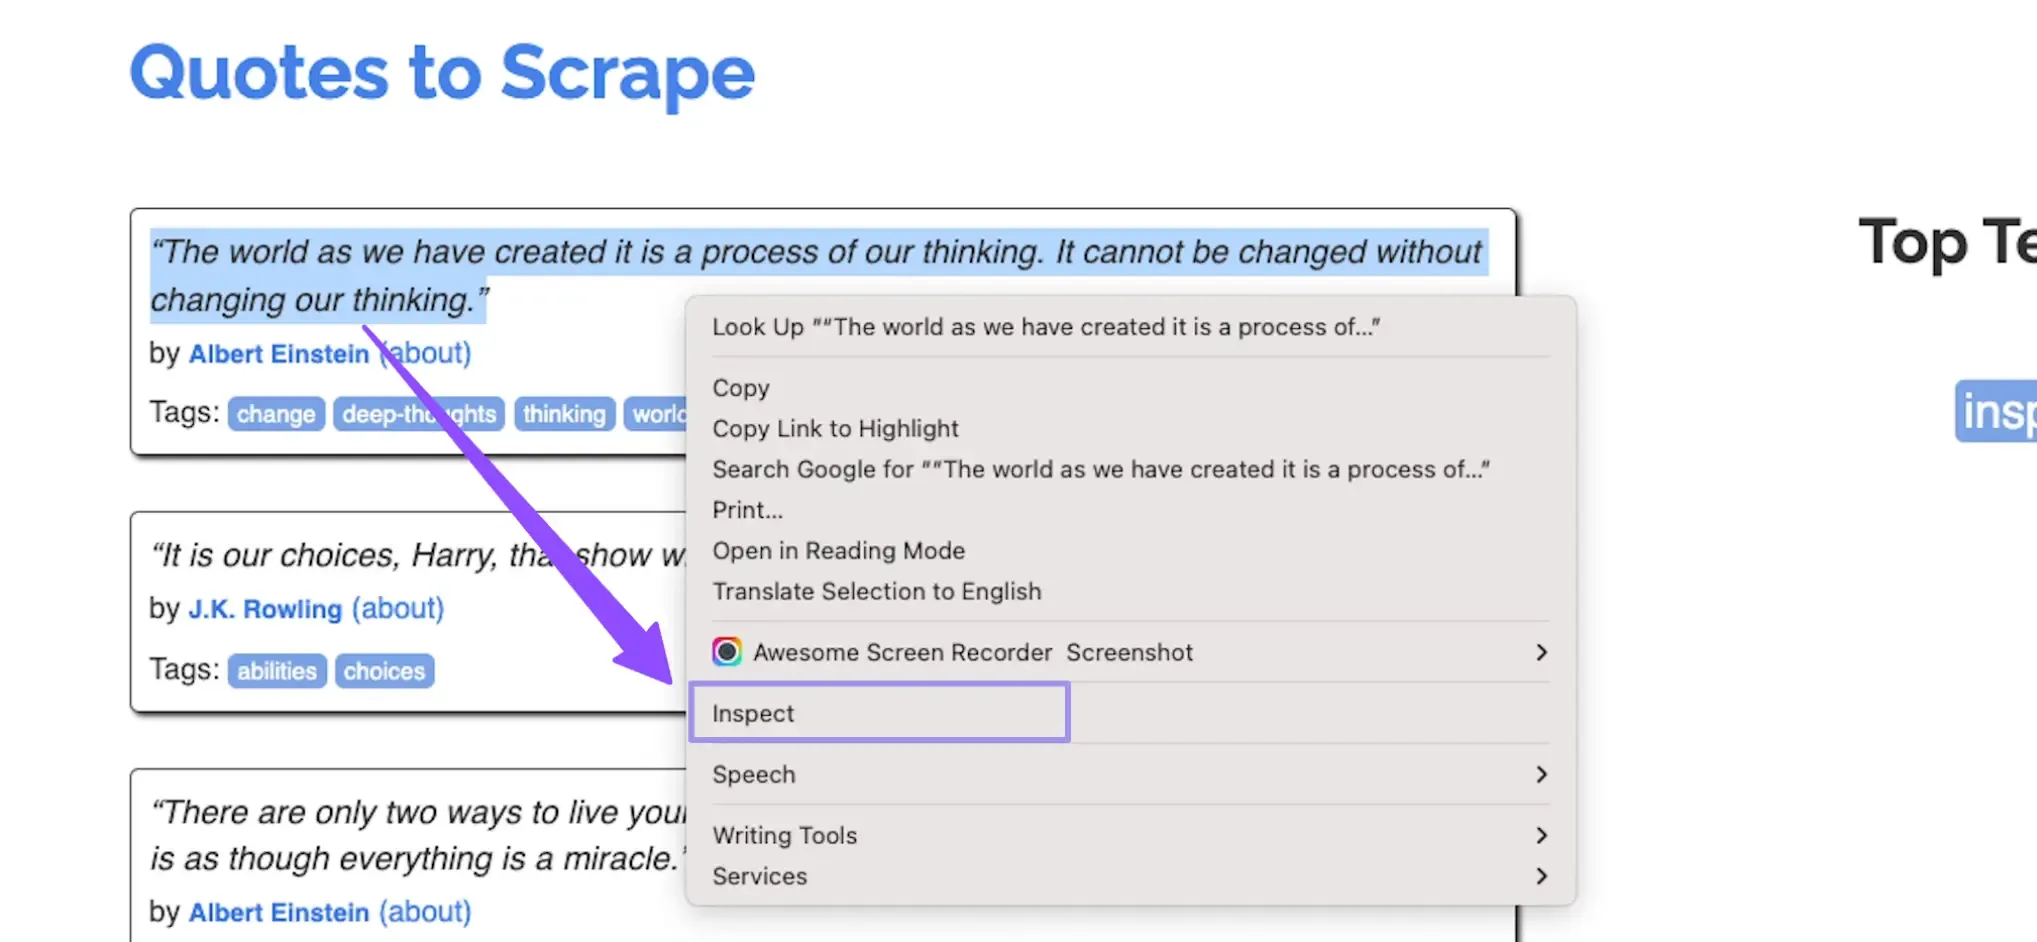
3. Next, look at the Elements tab. Find the tag name and class of the element.
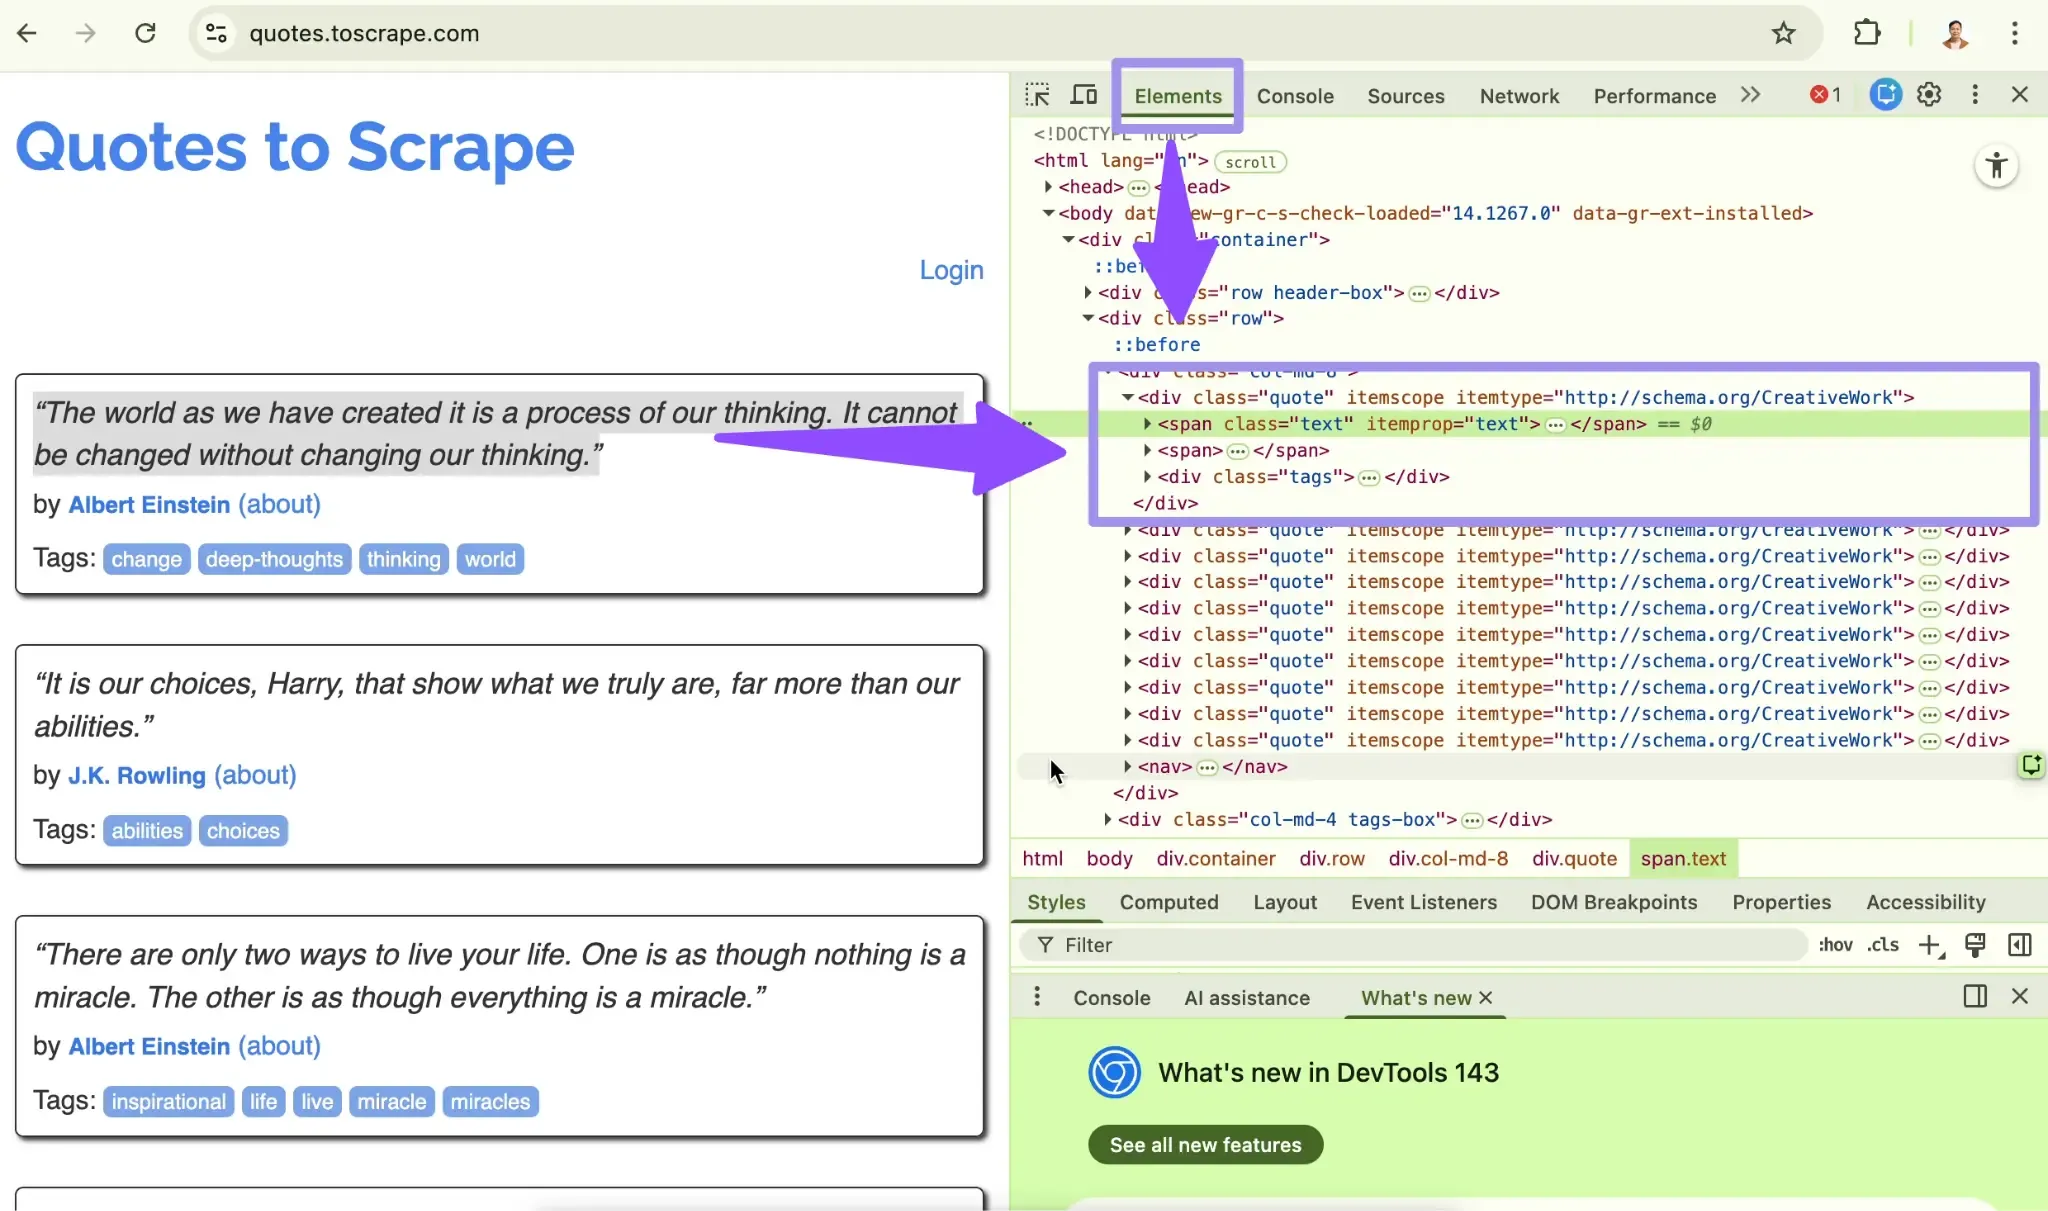
4. Finally, check if similar items share the same class. If they do, you can extract all of them at once later instead of handling each item individually.
When you inspect a quote on Quotes to Scrape, you'll see something like this:
Notice that each quote sits inside a div with the class quote. The text is in a span with class text, and the author is in a small tag with class author. These patterns are what you'll target in your code.
Tip: Hovering over elements in DevTools highlights them on the page. This makes it easier to confirm you've found the right element.
Step 3: Send an HTTP Request
With the page structure understood, the next step is fetching the HTML content. You can think of this step as opening a page in your browser. However, instead of Chrome or Firefox requesting the page, your Python script does it for you and receives the HTML source.
The requests library handles this by sending an HTTP GET request to the URL and returning a response object that contains the page data and status information.
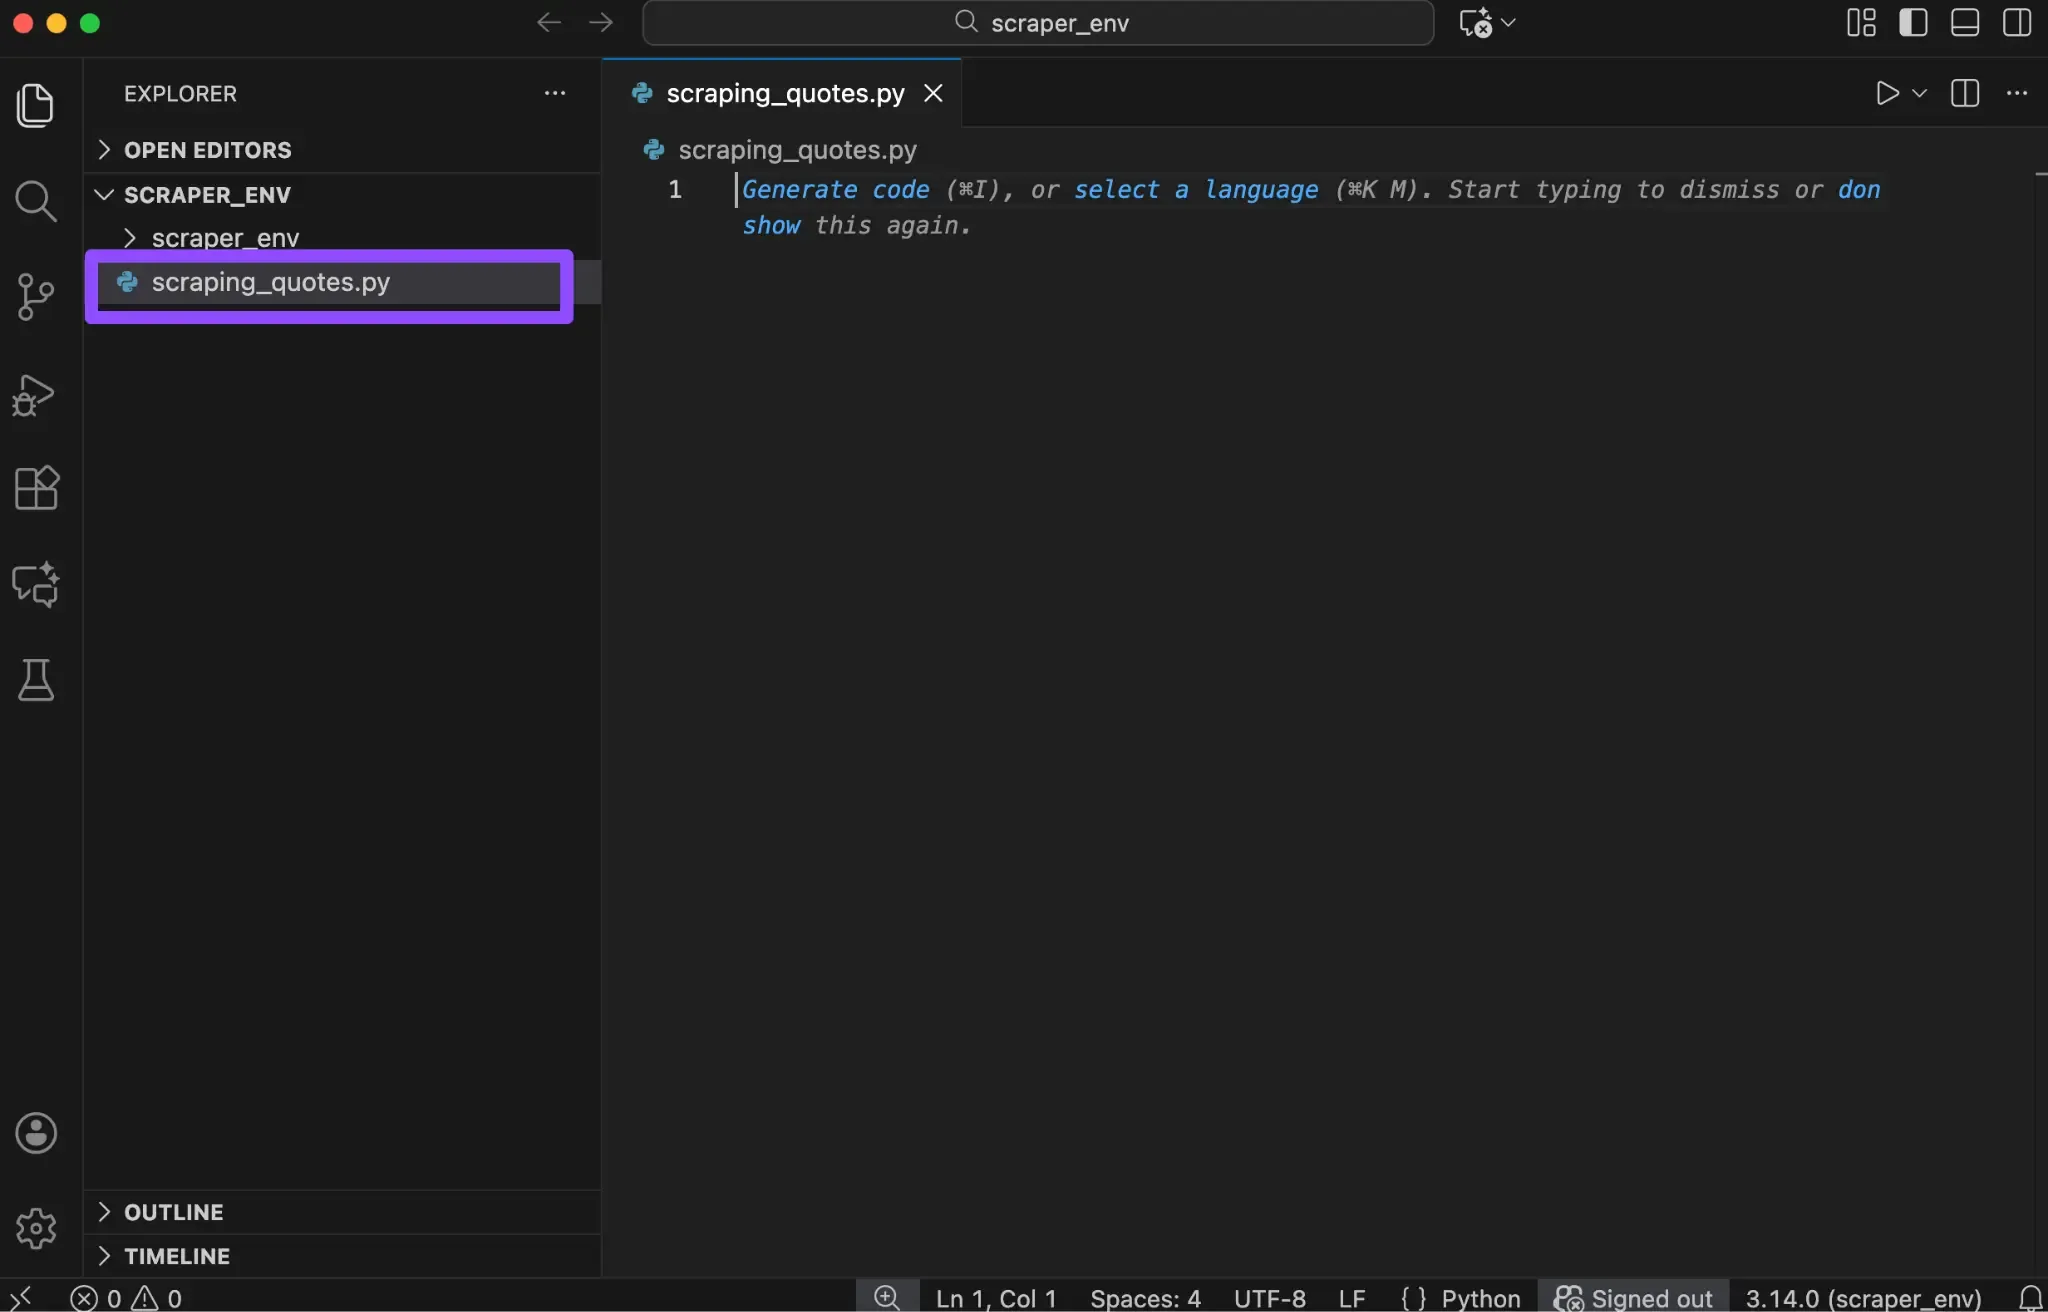
Now, to make that concept into reality, open your project folder in your favorite code editor and create a new Python file. Here, we named it "scraping_quotes.py".
Once you have it ready, paste the following code into the file:
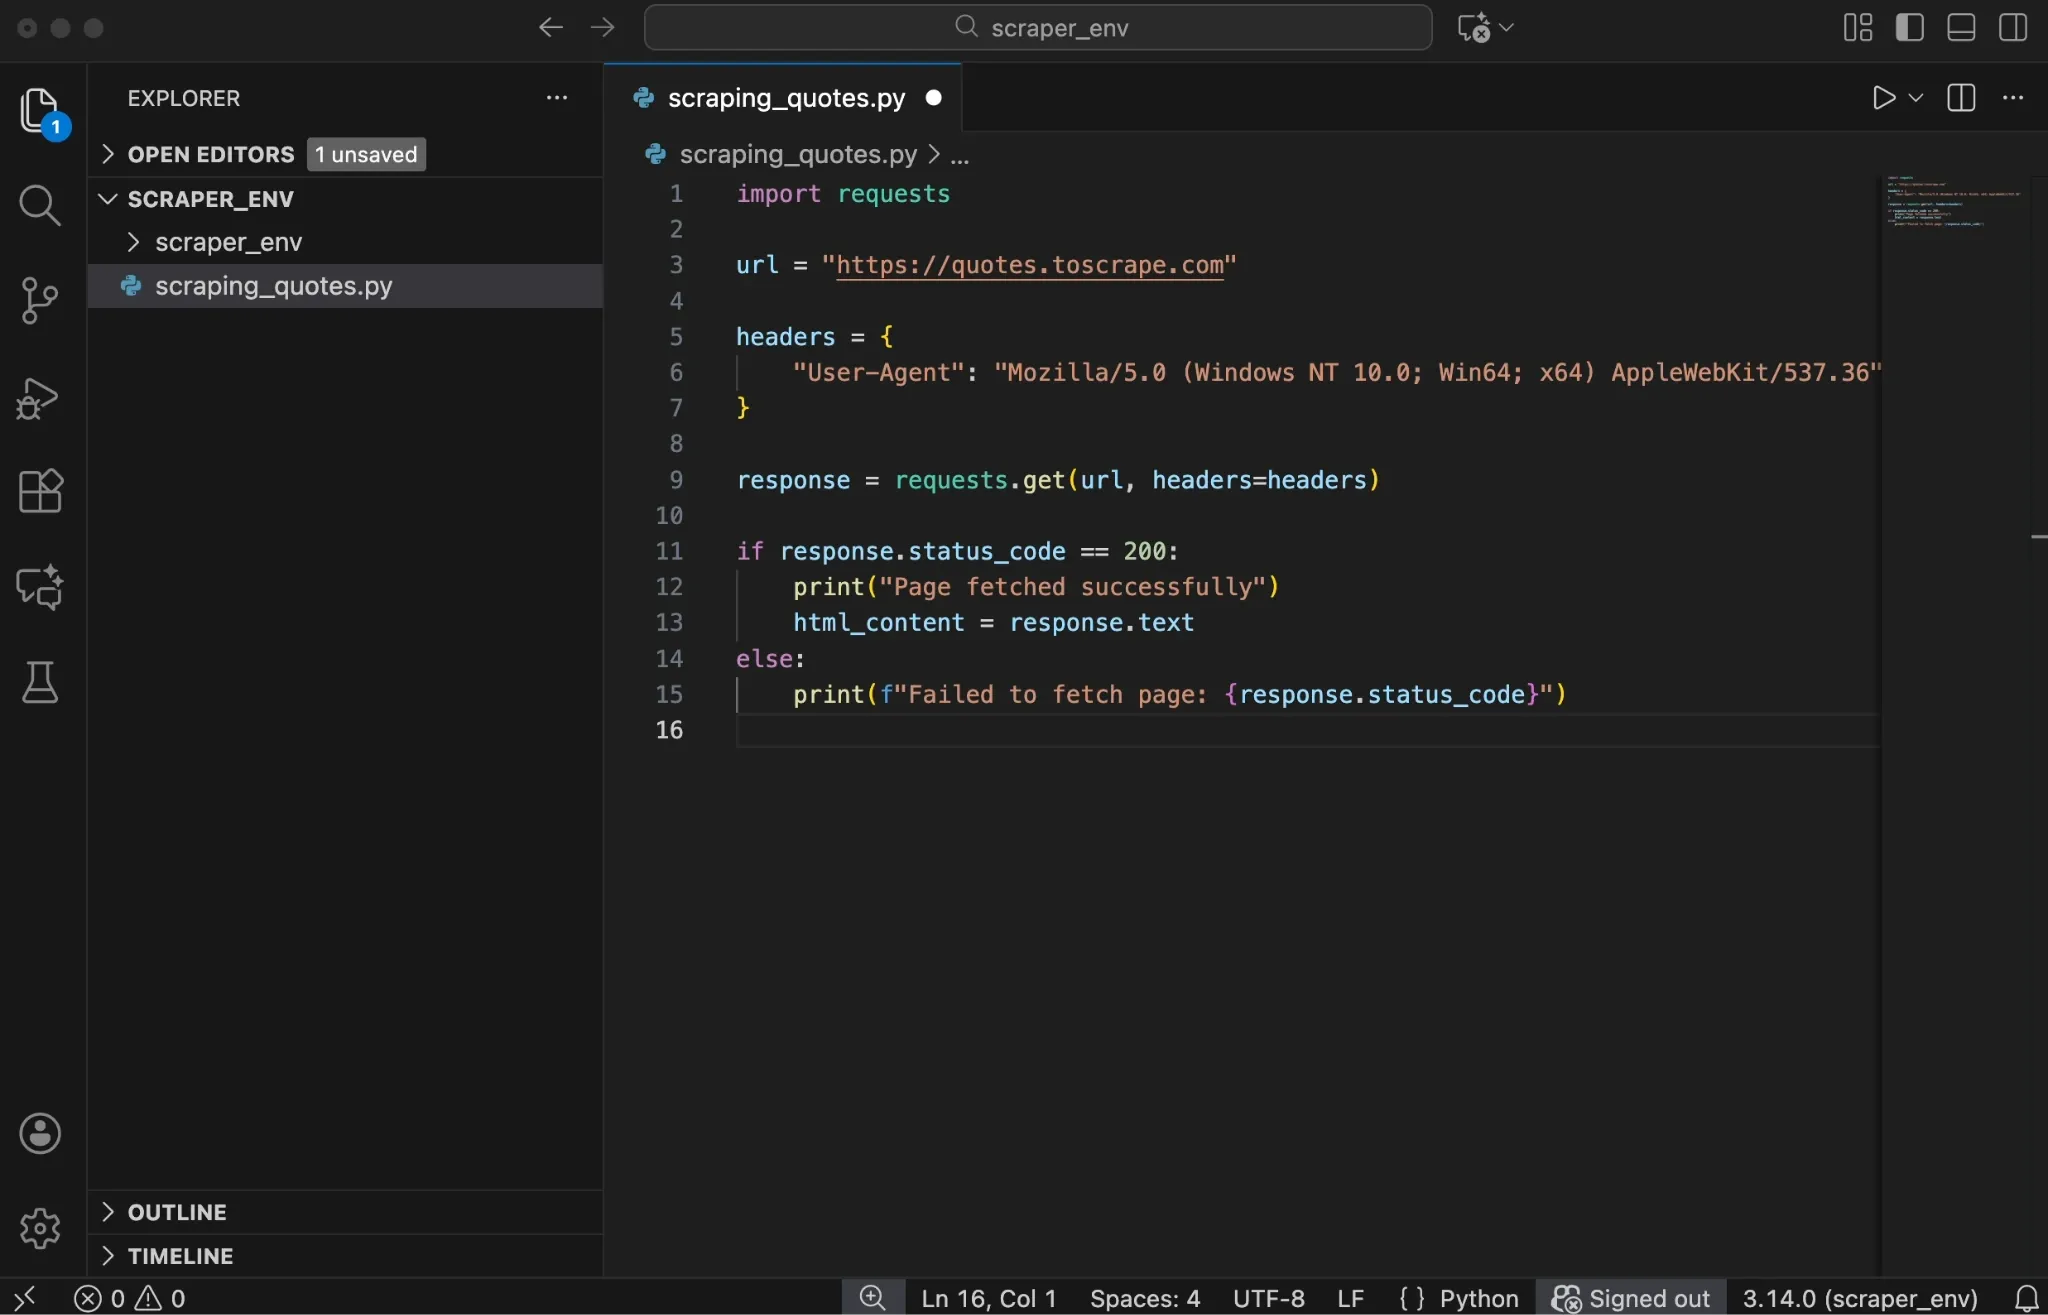
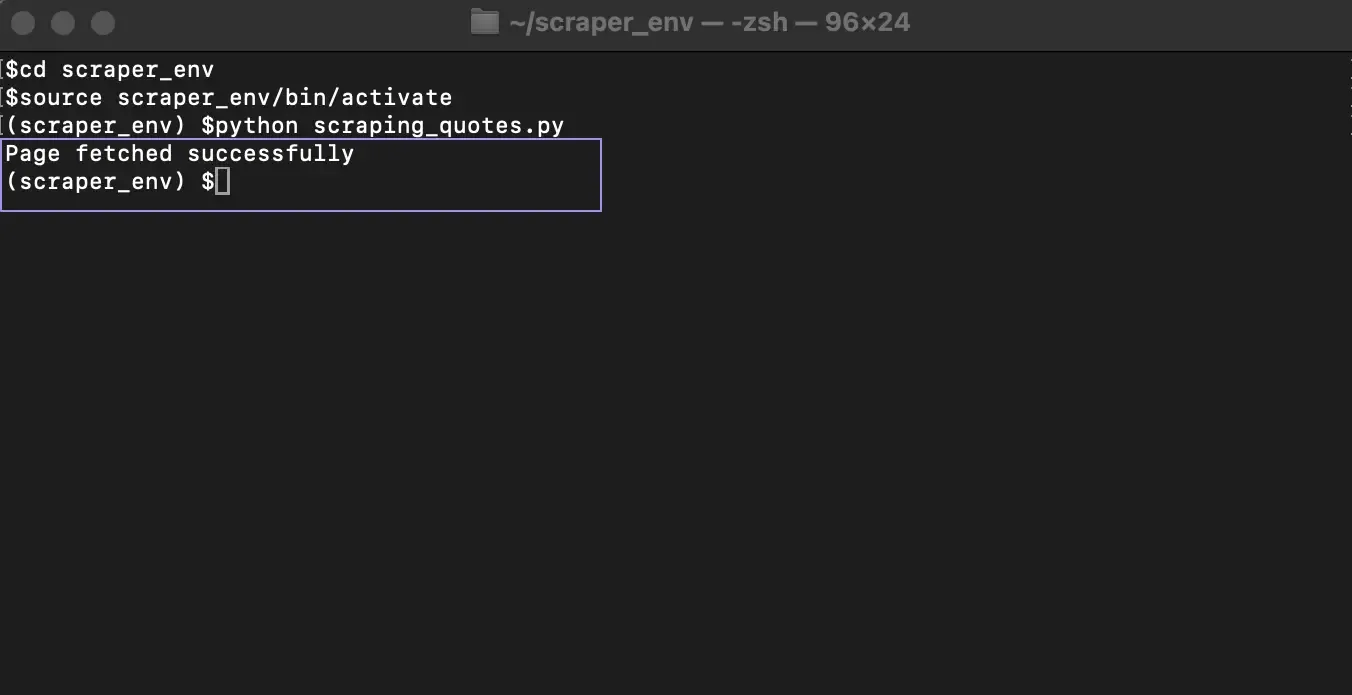
Now run the script from your terminal:
Or, on some systems:
If everything works correctly, the terminal prints “Page fetched successfully.” This confirms that your script reached the website and the server returned a valid response.
Behind the scenes, several things happen:
- requests.get() sends a GET request to the URL.
- The server responds with a status code and the page content.
- response.status_code tells you whether the request succeeded.
- response.text stores the full HTML source as a string.
A status code of 200 means the request succeeded and the page loaded correctly. Codes in the 400 or 500 range indicate client or server errors, which means the page was not retrieved as expected.
In addition, the headers dictionary plays an important role here. It includes a User-Agent string, which tells the website what type of client is making the request. While Requests includes a default User-Agent, some sites flag it as automated, so using a realistic browser User-Agent can help in some cases.
Step 4: Parse the HTML Content
At this point, your script has successfully fetched the page and stored the raw HTML in response.text. While this HTML contains all the data you need, it is still just a long string of text. You cannot search or extract elements from it in a practical way yet.
This is where Beautiful Soup comes in. Parsing converts the raw HTML string into a structured object that mirrors the page's HTML tree. Once parsed, you can move through elements, search by tags or classes, and extract specific pieces of data.
Add the following code below your request logic:
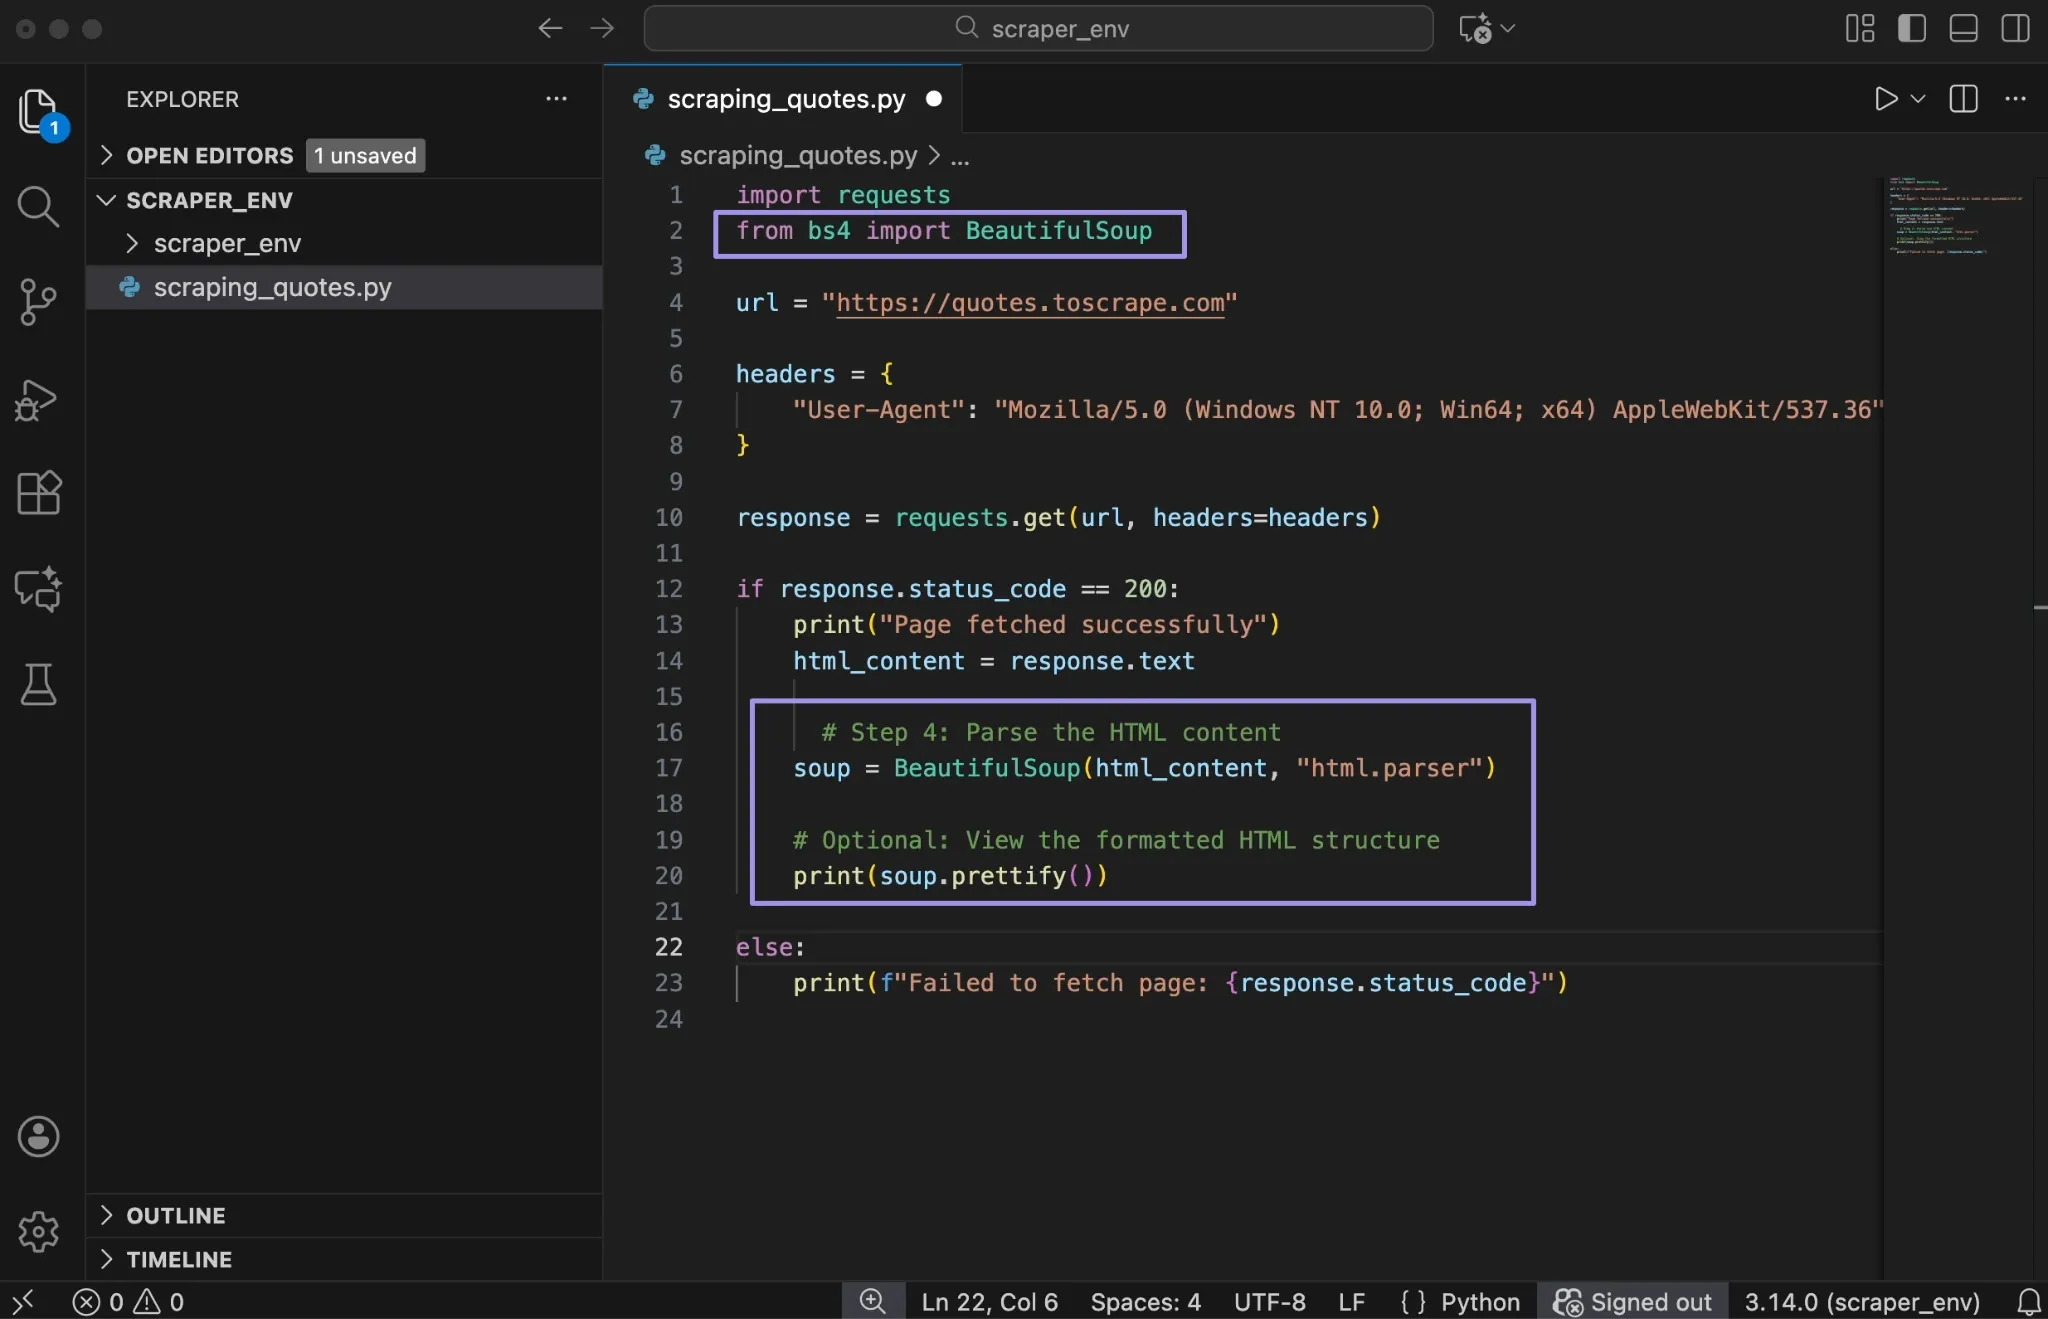
The BeautifulSoup constructor takes two arguments. The first is the HTML content you want to parse, which comes directly from response.text. The second is the parser that tells Beautiful Soup how to read and interpret the HTML.
In this example, we are using html.parser, which is built into Python. It works well for most beginner projects and doesn’t require any additional installation. When the code runs, Beautiful Soup processes the HTML and builds a nested object that represents the structure of the page.
On top of that, the prettify() method prints the HTML with proper indentation. This is useful for debugging when you need to understand the document structure.
For larger projects or faster parsing, consider using lxml instead.
| Parser | Speed | Notes |
|---|---|---|
| html.parser | Moderate | Built-in, no extra install needed |
| lxml | Fast | Requires pip install lxml |
| html5lib | Slow | Most lenient with broken HTML |
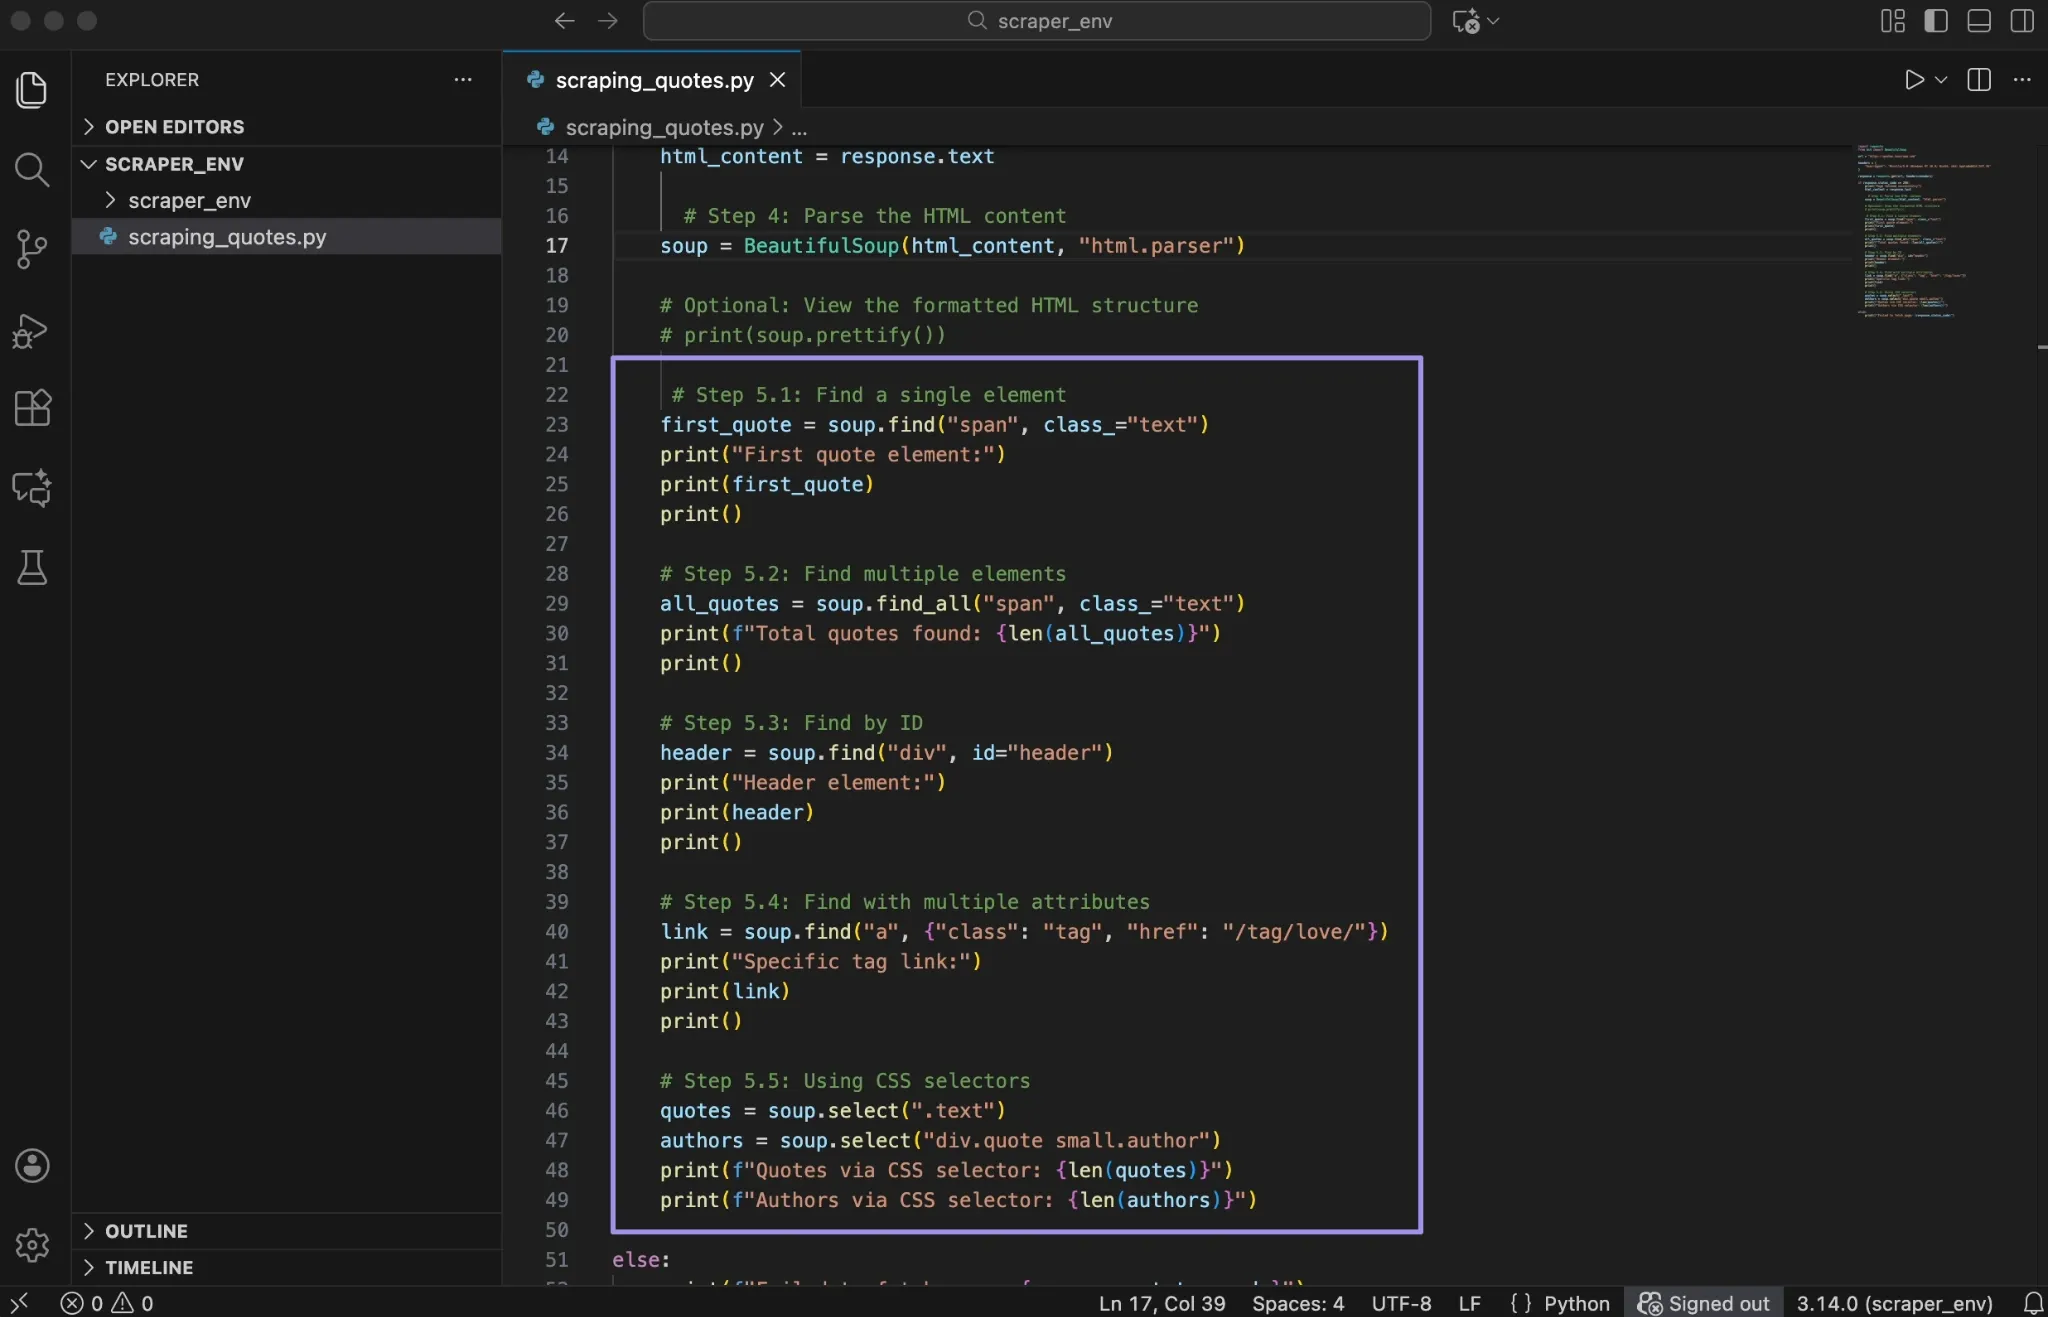
Step 5: Find the Elements You Need
Now that the HTML is parsed, you can start locating the specific elements you want to extract. At this stage, the page is no longer a raw string. It is a structured object that you can search, filter, and navigate.
Beautiful Soup provides several ways to find elements, but most scraping tasks rely on two core methods: find() and find_all(). These methods search through the parsed HTML tree and return elements that match your criteria.
Finding single elements:
Use find() when you only need the first matching element.
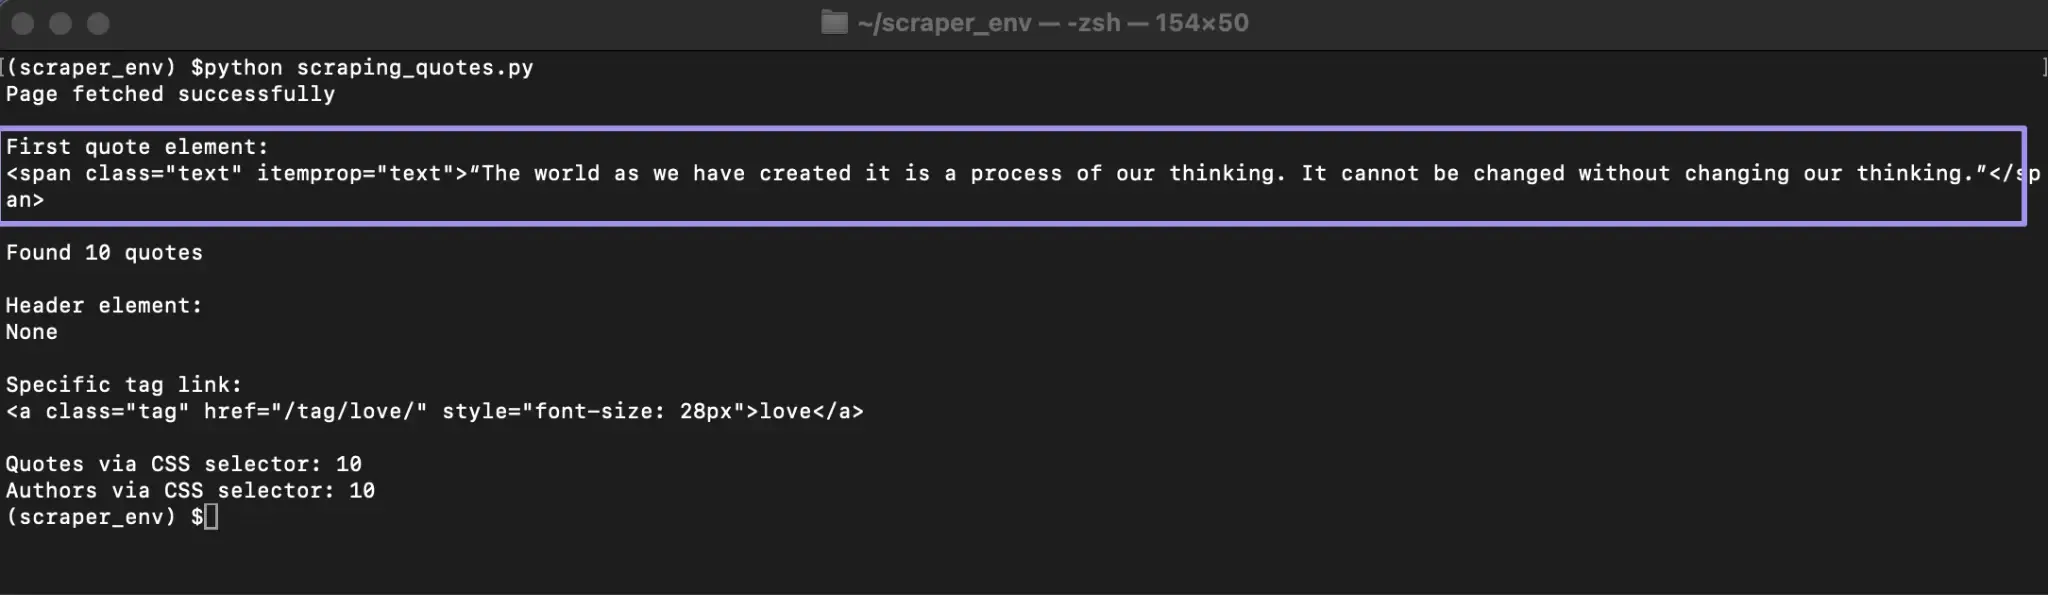
This searches for the first <span> element with the class text. If a match exists, Beautiful Soup returns the full HTML tag. If no element matches, it returns None.
Printing the result helps you confirm that the selector works and shows exactly which element was matched.
Finding multiple elements:
When a page contains repeated items, such as quotes, product cards, or listings, use find_all().
This returns a list of all matching elements. If nothing matches, the list is empty. This makes it safe to loop through results later without crashing your script.
Finding by ID:
If an element has a unique id attribute, it is often the most reliable way to locate it.
IDs usually appear on major layout elements, such as headers or navigation containers, which makes them useful anchors in a page.
Finding with multiple attributes:
You can narrow your search by matching more than one attribute.
This approach helps when class names repeat across different elements and you need a more specific match.
Using CSS selectors:
For more complex queries, CSS selectors offer additional flexibility:
CSS selectors allow you to target elements based on hierarchy and structure. This is useful when elements do not have unique identifiers but follow consistent patterns.
Here's a quick reference for choosing the right method:
| Method | Returns | Use When |
|---|---|---|
| find() | First match or None | You need one element |
| find_all() | List (may be empty) | You need multiple elements |
| select_one() |
First match or None |
CSS selector for one element |
| select() | List | CSS selector for multiple elements |
Note: The find() method returns None if no element matches. Always check that an element exists before trying to access its attributes or text.
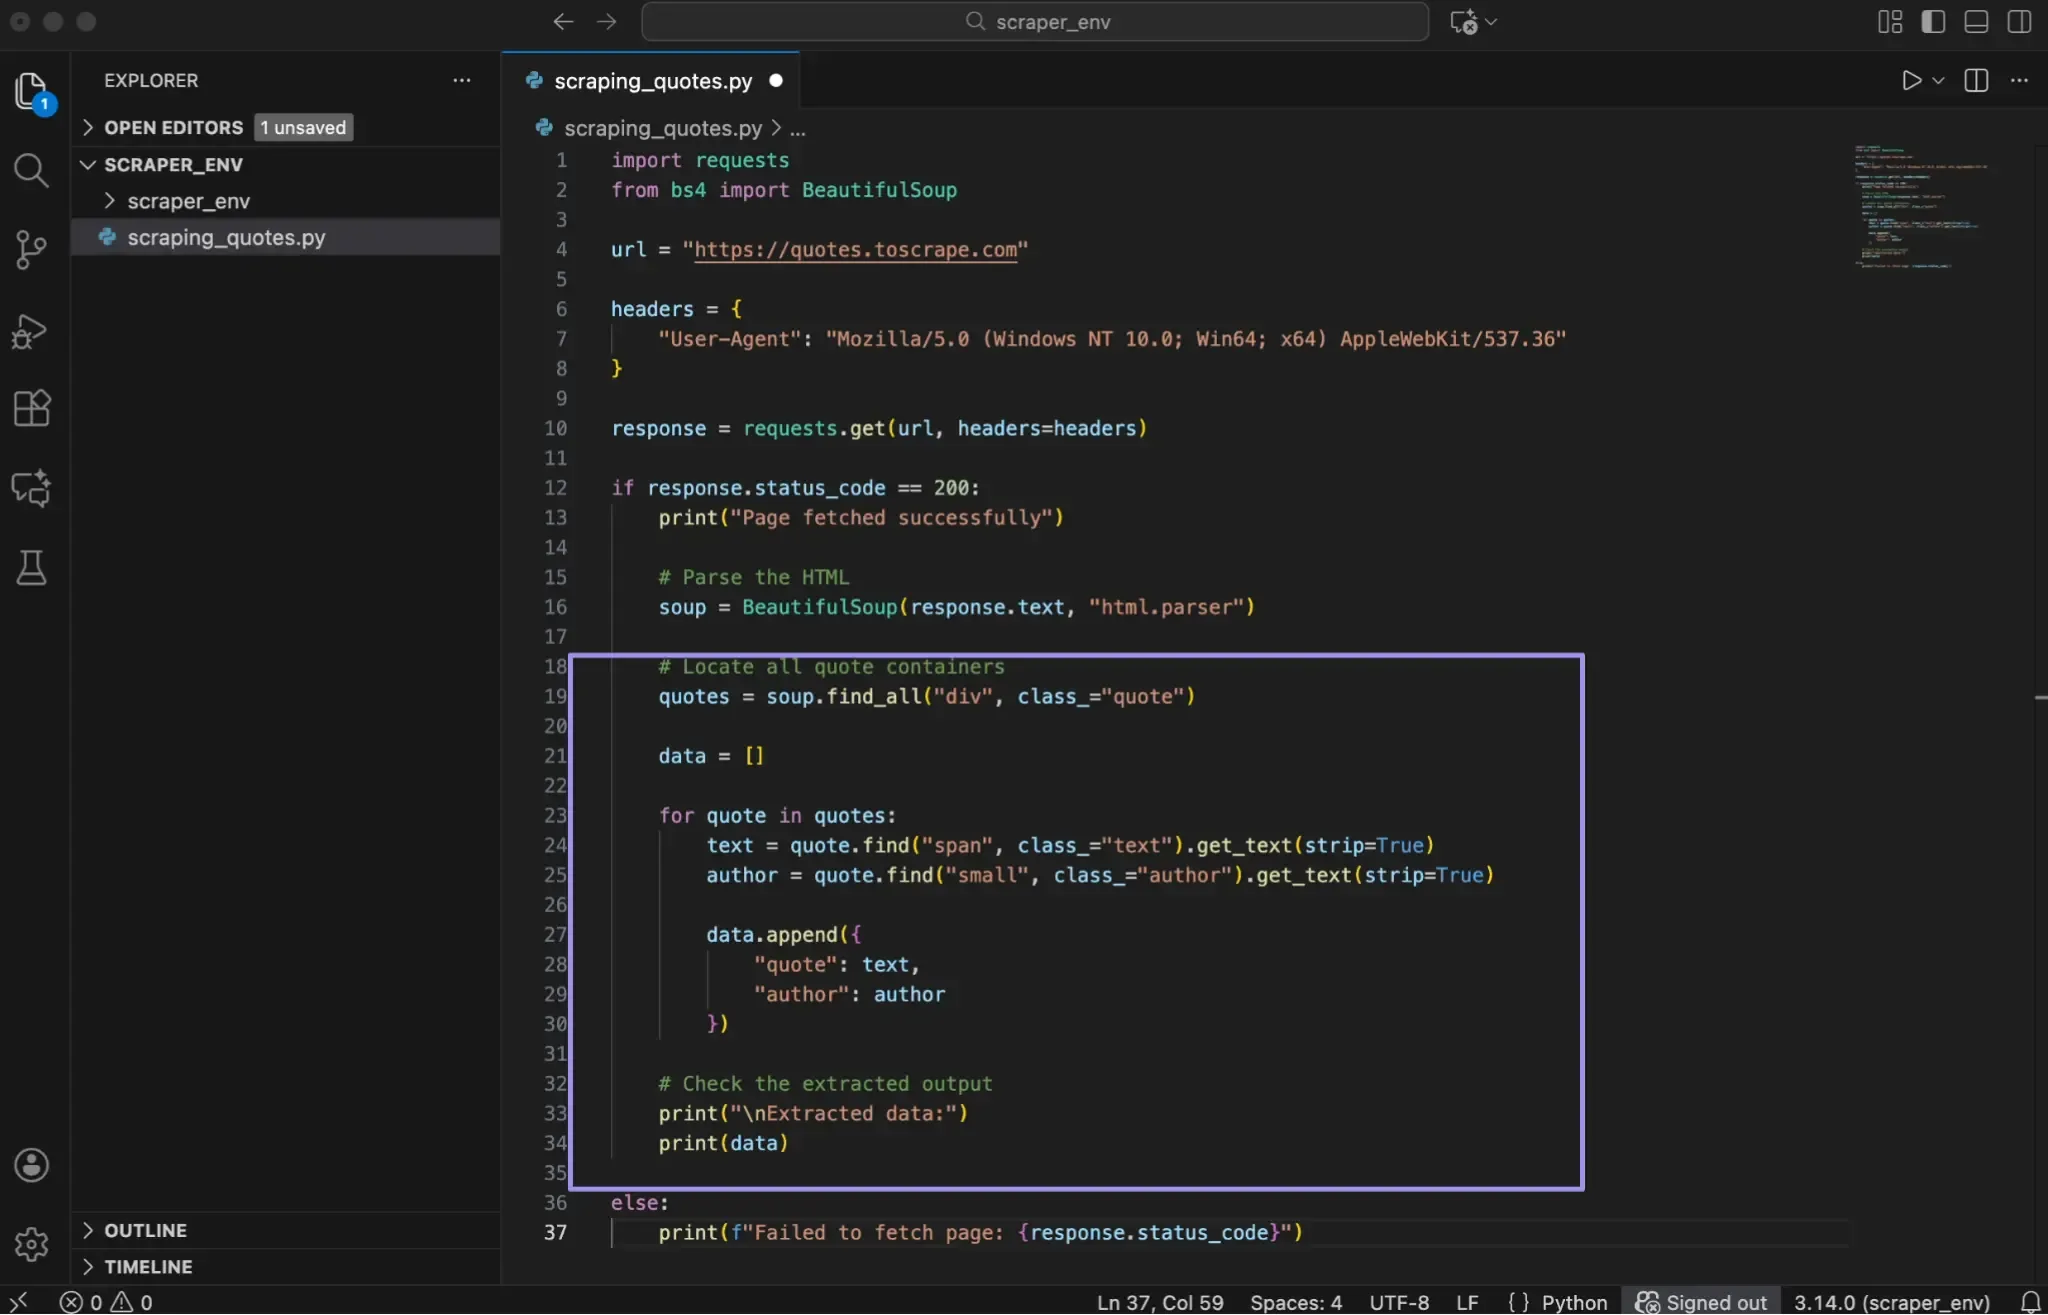
Step 6: Extract the Data
After locating the elements you need, the next step is extracting the actual values from them. Up to this point, Beautiful Soup has been working with HTML tags. Extraction turns those tags into plain text and fields you can store and reuse.
In our Quotes to Scrape example, each quote block contains two key pieces of information: the quote text and the author name.
Extracting text:
To pull visible text from an element, use the get_text() method.
The get_text() method returns only the readable text inside the tag and ignores the HTML markup. The strip=True parameter removes extra whitespace at the beginning and end of the string, which keeps the output clean.
Extracting attributes:
Some information lives inside HTML attributes, such as links.
Using .get() is the safer option when reading attributes. If the attribute does not exist, it returns None instead of causing an error. This helps prevent crashes when the page structure changes or when an element is missing an expected attribute.
Extracting repeated data:
Most scraping tasks involve repeated elements. On this page, each quote follows the same structure, which makes looping straightforward.
Here's a complete example that extracts all quotes and authors from the page:
Here’s what this loop does:
- find_all() collects every quote container on the page
- Each container is processed one at a time
- Nested find() calls locate the text and author elements inside each quote
- Extracted values are stored in a dictionary
- Each dictionary is added to a list
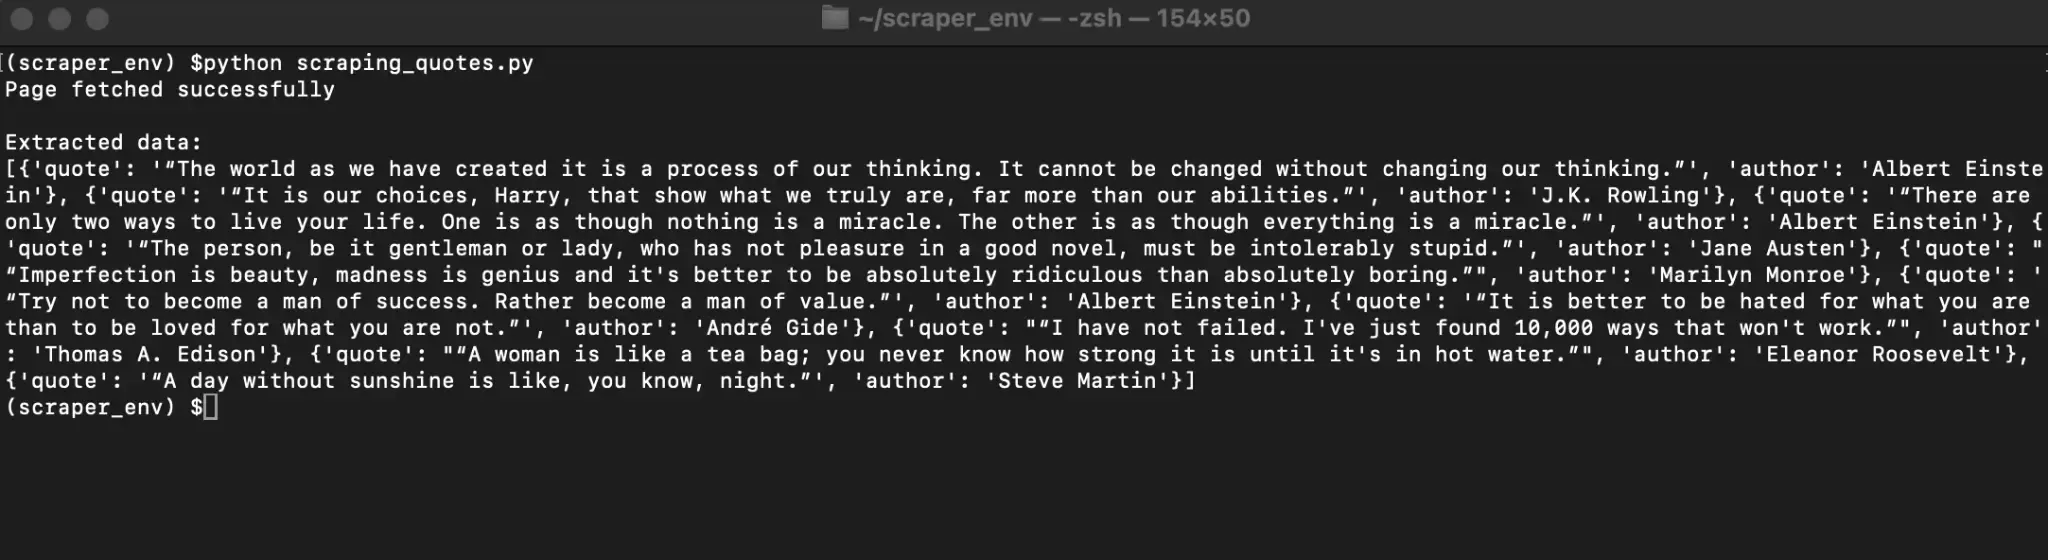
This list of dictionaries represents your extracted data in a structured format that is easy to work with.
Checking the output:
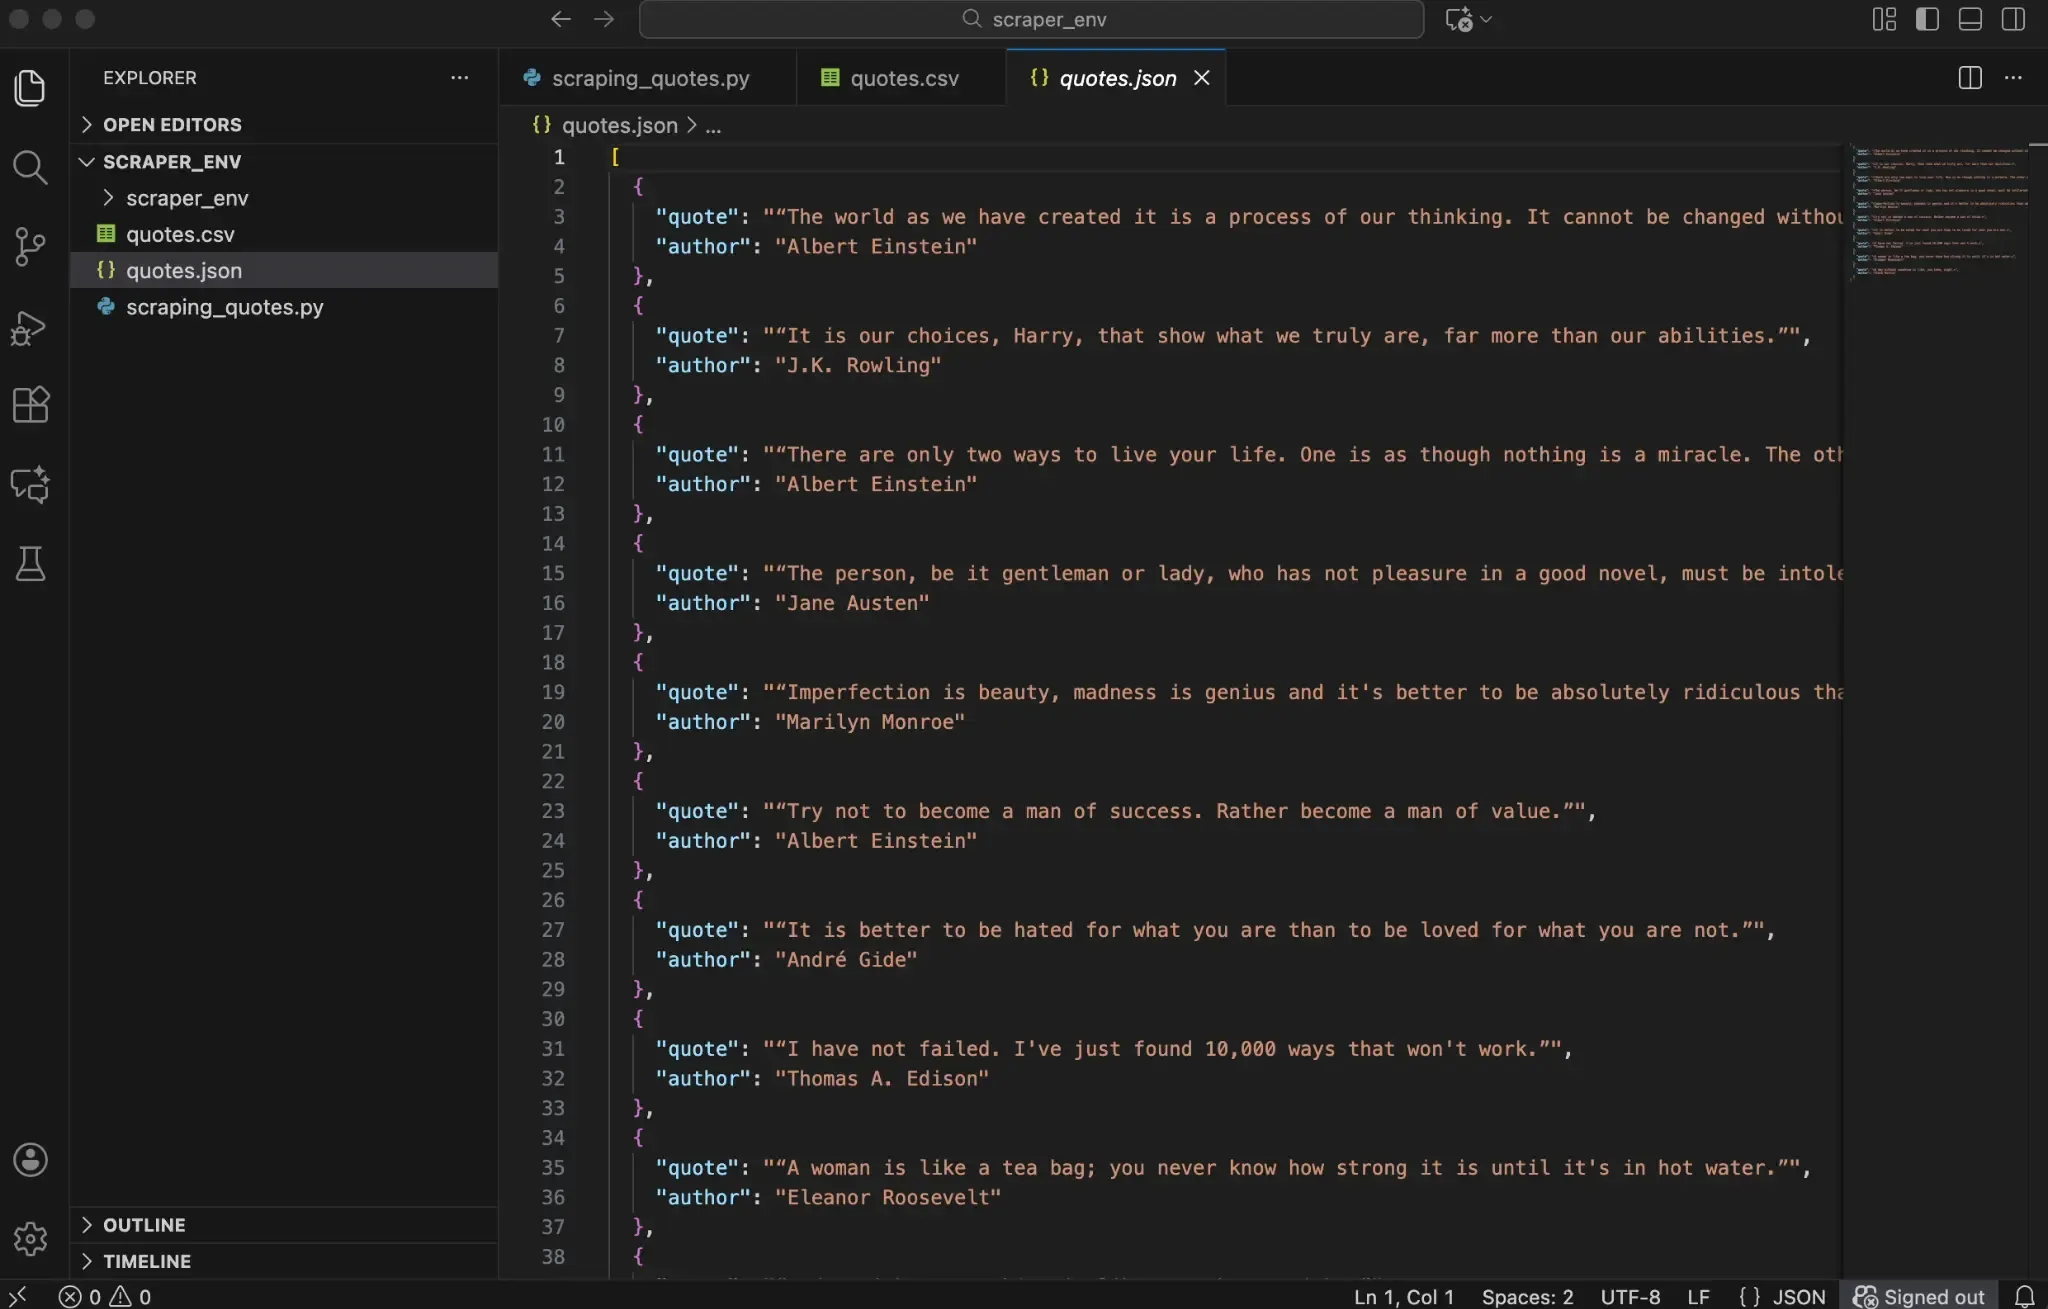
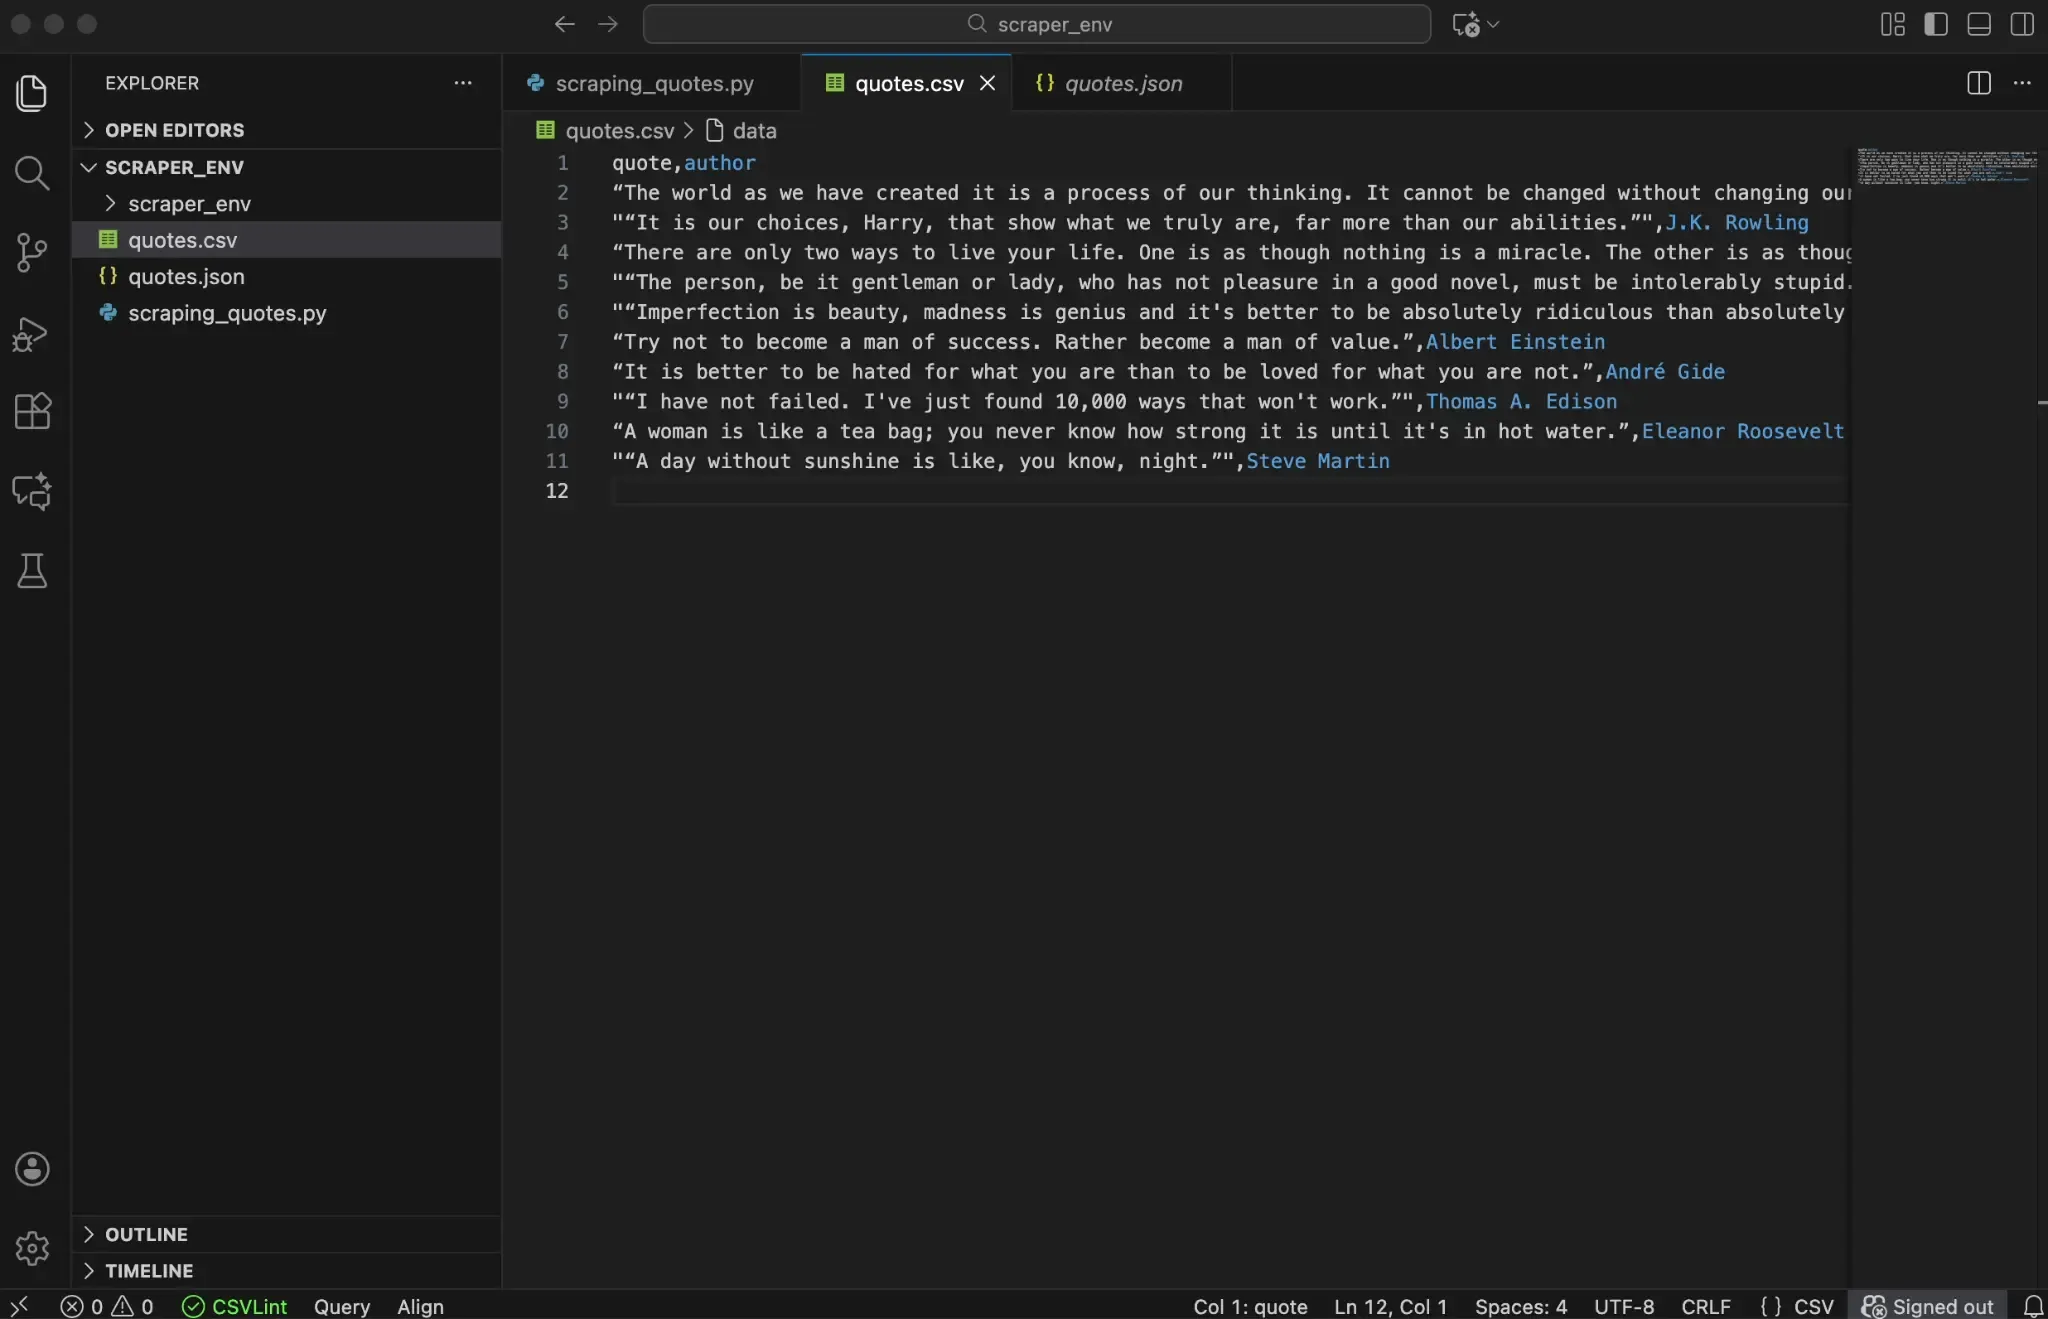
Step 7: Store the Extracted Data
The final step is saving your extracted data to a file .CSV and JSON are the most common formats, and Python has built-in modules for both.
Saving to CSV:
Saving to JSON:
Always specify encoding="utf-8" when opening files. This prevents character encoding issues with special characters or non-English text.
CSV works well for tabular data that you'll open in Excel or import into a database. JSON is better for nested structures or when you need to preserve data types.
Putting everything together
Up to this point, you've built the scraper one step at a time. Each section focused on a single responsibility: fetching the page, parsing HTML, locating elements, extracting values, and saving the results.
To make it easier to review and reuse, it helps to look at the entire script as one complete workflow. This is the exact version of our scraping_quotes.py that ties together everything covered in Steps 3 through 7.
Access the full script through the attached link.
When you run the script, it automatically creates two files: quotes.csv and quotes.json. These files contain the data you scraped from the Quotes to Scrape page.
What to Do When Beautiful Soup Returns Empty Results
You've written your scraper, but find_all() returns an empty list. Before assuming your code is wrong, check whether the page uses JavaScript to load content.
Beautiful Soup parses static HTML. It can't execute JavaScript. If a website loads data dynamically after the initial page load, the content won't appear in the HTML that requests retrieves. You'll see an empty container or placeholder text instead of the actual data.
How to check: Use View Page Source (shortcut depends on browser). For example, Firefox uses Ctrl+U (Windows/Linux) and Cmd+U (macOS). In Chrome on macOS, it’s typically Cmd+Option+U. If the data isn't visible in the source but appears on the rendered page, JavaScript is loading it.
The solution: Use Selenium to render the page first, then pass the HTML to Beautiful Soup.
Selenium controls a real browser, so JavaScript runs just like it would for a regular visitor.
How to Avoid Getting Blocked While Scraping
Websites protect themselves from scrapers using various detection methods. They monitor IP addresses, request patterns, headers, and behaviour. If your scraper looks suspicious, you'll start seeing error codes such as 403 errors, CAPTCHAs, or empty responses.
Follow these practices to reduce your chances of getting blocked:
- Check robots.txt before scraping to understand the site's rules
- Add 1 to 2 second delays between requests
- Set a realistic User-Agent header
- Handle errors gracefully with try/except blocks
- Rotate IPs using proxies for larger scraping tasks
- Review and follow the site’s Terms of Service and applicable laws.
Adding delays between requests:
Using proxies:
For projects involving many requests or sites with stricter protections, routing traffic through proxies can improve your success rate.
At Ping Proxies, we offer residential and ISP proxies designed to reduce blocks while keeping your scraper running smoothly. Residential proxies use IP addresses from real devices, so they look like regular users to target websites.
That said, proxies work best when combined with good scraping practices. They're not a replacement for proper delays, headers, and respectful behavior.
Common Issues and How to Fix Them
Even with careful preparation, you'll run into errors. Below are the most common issues you'll encounter when scraping with Beautiful Soup.
AttributeError: 'NoneType' Has No Attribute 'text'
This error appears when you try to extract text from an element that doesn't exist. Your find() method returned None because no element matched your selector.
How to fix it: Open DevTools and inspect the element again. Confirm the tag name and class are exactly what your code expects. Always check that an element exists before accessing its properties.
403 Forbidden Response
A 403 status code means the server refused your request. The website detected something suspicious and blocked it.
How to fix it: Add a realistic User-Agent header. If you're still getting blocked, the site may be flagging your IP address. Adding delays between requests helps, and for persistent blocks, routing traffic through proxies distributes your requests across multiple IPs.
Garbled or Strange Characters in Output
When your extracted text shows symbols like "’" instead of apostrophes, you're dealing with an encoding mismatch.
How to fix it: Set the response encoding before accessing response.text. Requests tries to guess the encoding automatically, but the guess can be wrong. Check the page's Content-Type header or meta charset tag for the declared encoding. If none is declared, response.apparent_encoding can help by guessing based on the content. When saving data, always use encoding="utf-8".
Timeout Errors
Timeout errors occur when the server takes too long to respond.
How to fix it: Use timeout explicitly, and consider a tuple like timeout=(3, 15) (connect timeout, read timeout). Note that Requests’ timeout is not a total “whole request” stopwatch; it’s about how long it waits for socket operations (connect / data read).
Wrapping Up: Where to Go from Here
You've learned the complete workflow for web scraping with Beautiful Soup: fetching pages with requests, parsing HTML, locating elements, extracting data, and saving results. These fundamentals apply to nearly any static website you'll encounter.
For your next steps, try scraping a simple site, such as a blog or news page. For a bigger challenge, you can try scraping images, use a scraping sandbox like Books to Scrape or Scrape This Site, or work with a website you have permission to scrape.
Practice finding different element types and handling edge cases. Once you're comfortable, explore Selenium for JavaScript-heavy sites or Scrapy for efficiently crawling thousands of pages.
If you're scaling up your scraping projects and running into blocks, our residential proxies can help keep your scraper running reliably while you focus on extracting the data you need.