How to Find a Proxy Server Address (PC, iOS, & Android)?

When a website fails to load, or network traffic behaves unexpectedly, even after basic checks, one of the first technical details to verify is the proxy server address and the port used by the device. They determine how requests are routed. Besides, they’re required for both troubleshooting and manual setup.
In most cases, proxy server information is stored in the operating system or the browser's network settings. As such, locating it can be confusing, especially if the configuration was set automatically or hasn’t been accessed before.
This guide explains where proxy server addresses are typically located and how to find them across common devices and platforms. Each section provides clear instructions to help you retrieve the correct details and confirm that your proxy configuration is accurate.
Find Proxy Server Address on Your Computer
If your computer is connected to any proxy server, the information is already stored in your system settings. Let’s find out how to find a proxy server address on Windows and macOS.
Windows
Windows can have two proxy configurations: the system/WinINet proxy (used by many desktop apps) and a separate WinHTTP proxy (often used by background services and some apps). Here’s how to find proxy details in Windows.
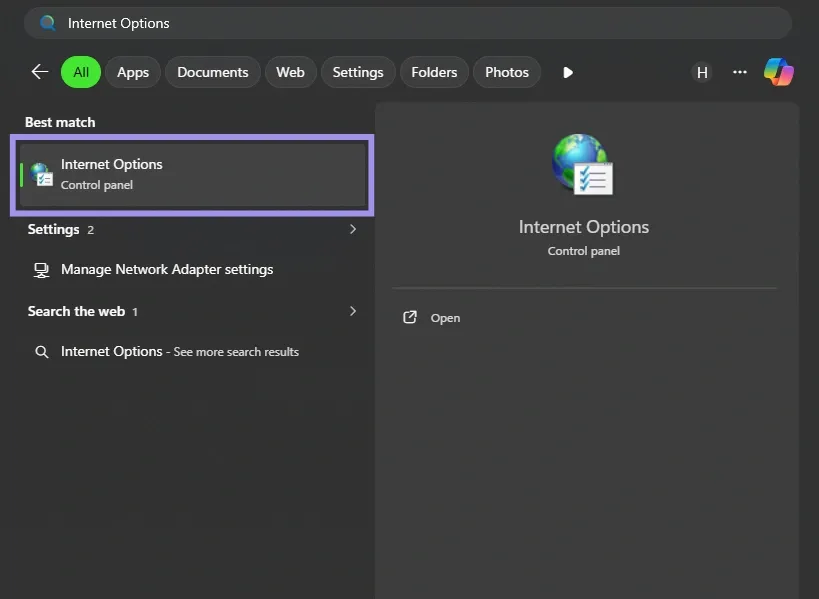
1. Open Windows search and look for Internet Options. Click on the first result.
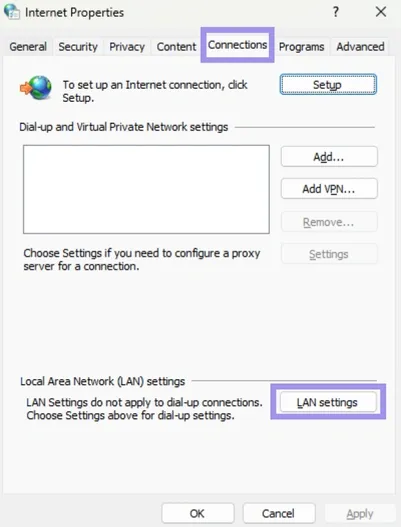
2. After Internet Options is loaded, navigate to the Connections tab and click on it, followed by LAN settings.
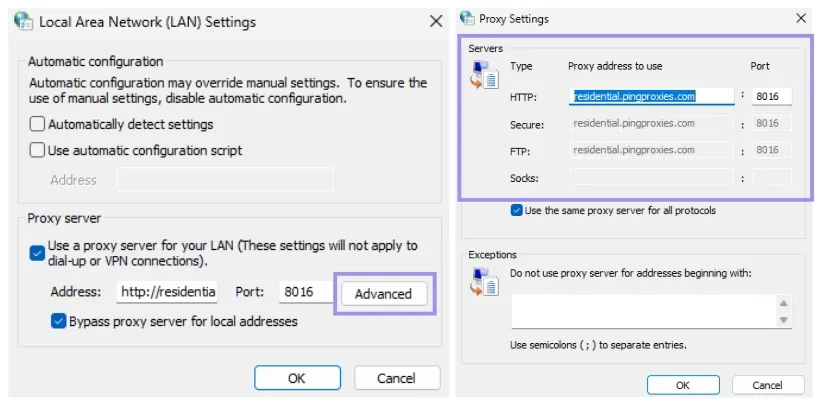
3. If you have connected to a proxy, you’ll find a proxy server address and a port number.
If you’re managing proxies through Windows settings, under Automatic proxy setup, you may see "Automatically detect settings" without an associated URL. If your network relies on a PAC (setup script), you’ll see a script address under Use setup script.
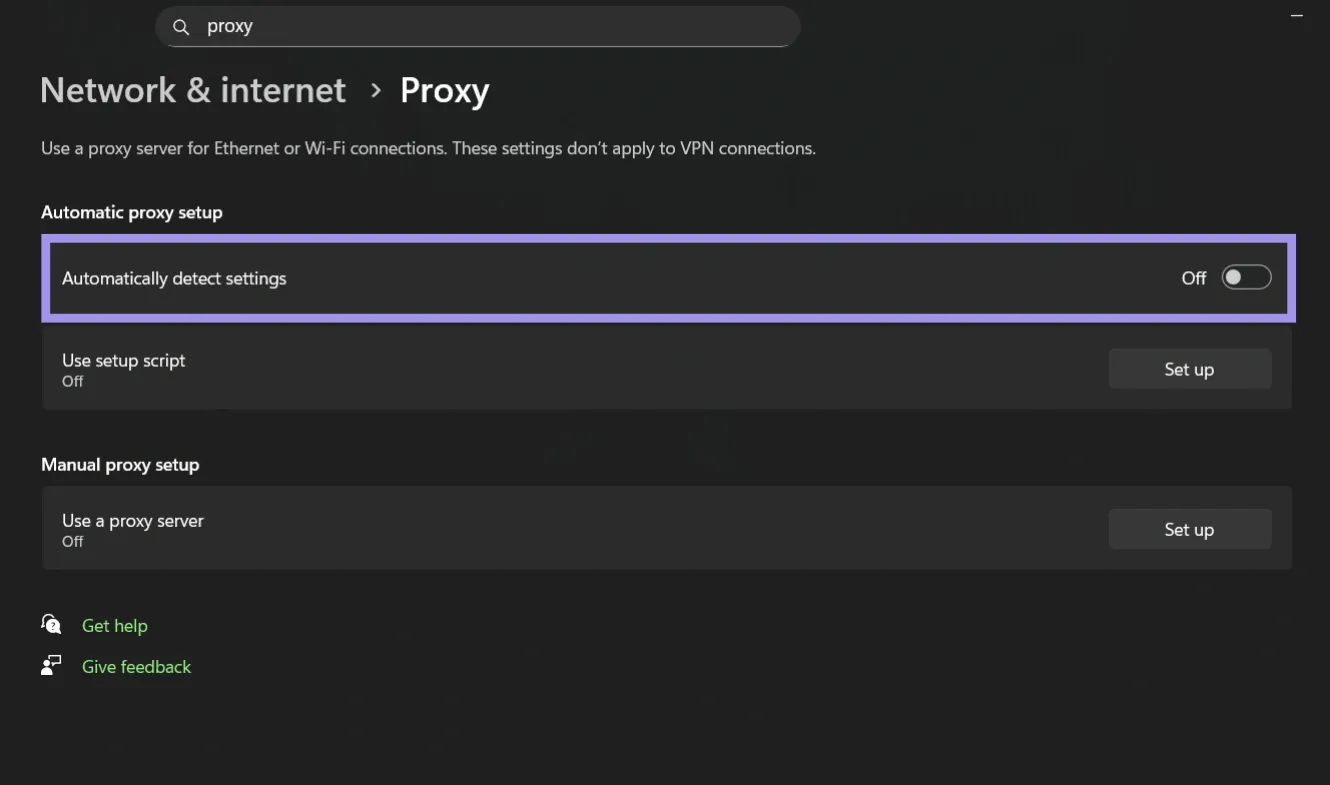
Under Automatic proxy setup, you may see "Automatically detect settings" without an associated URL. If your network relies on a PAC (setup script), you’ll see a script address under Use setup script.
When both options are disabled, no system/WinINet proxy is configured in Windows Settings, but some apps/services may still use their own proxy settings (or a separately configured WinHTTP proxy).
macOS
macOS binds proxy configurations to specific Network Services (like Wi-Fi or Ethernet) rather than the OS as a whole. While these settings apply system-wide to all apps on that connection, changing your network can instantly swap or deactivate the active proxy.
Here are the steps to find a proxy server address on macOS.
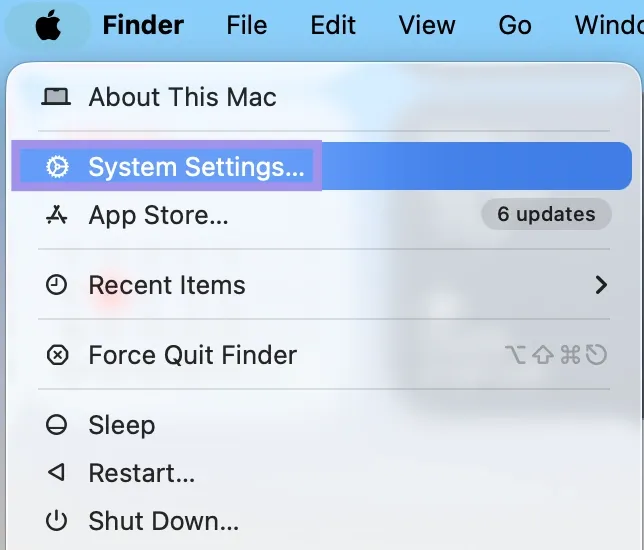
1. Click the Apple logo from the menu bar, followed by System Settings.
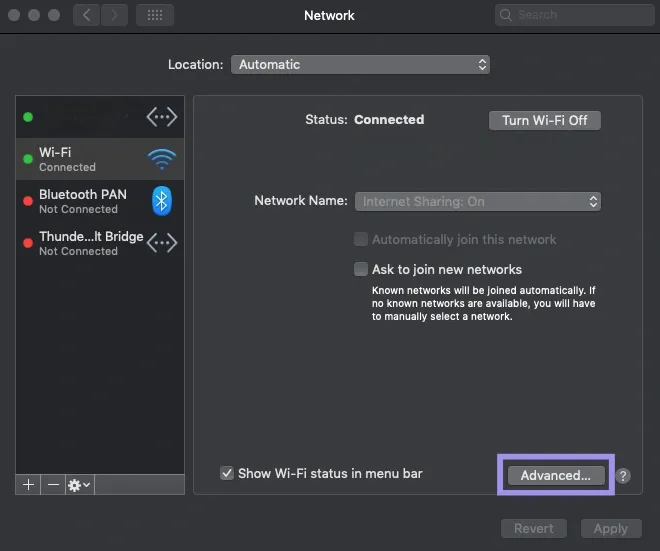
2. Next, click Wi-Fi, then Advanced to open Wi-Fi-related options.
3. Find Proxies and click on it. Select the proxy type you need (HTTP, HTTPS, or SOCKS). If you’re connected to a proxy, you will find the proxy details, which include the proxy server address.
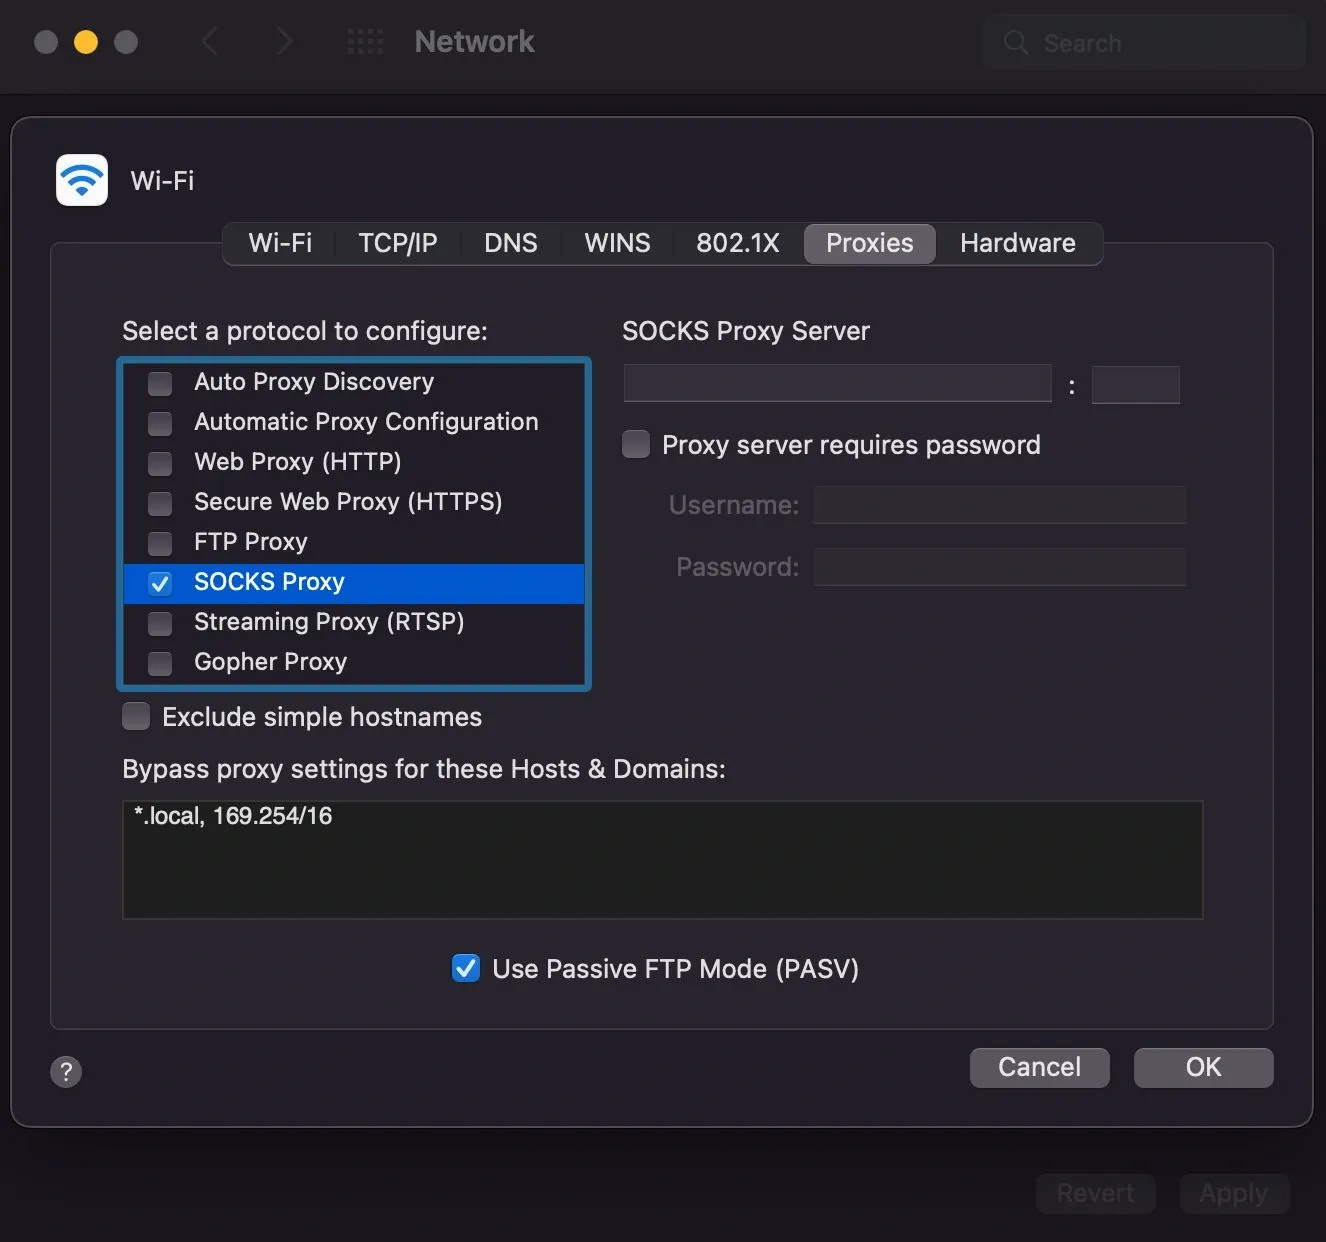
Note: If Automatic Proxy Configuration is already on, you will see a URL pointing to a PAC file. You can open the PAC URL to view the script, and look for rules that return values like PROXY host:port or SOCKS host:port. However, many PAC files use logic, so the proxy used may depend on the destination.
Find Proxy Server Address in the Browser
For demonstration purposes, we’re using the Chrome browser. It doesn’t automatically handle proxy settings (some browsers, like Firefox has built-in proxy settings). Instead, it relies on the underlying operating system’s network configuration.
In other words, the location and the behavior of proxy settings vary depending on whether you’re using Windows or macOS.
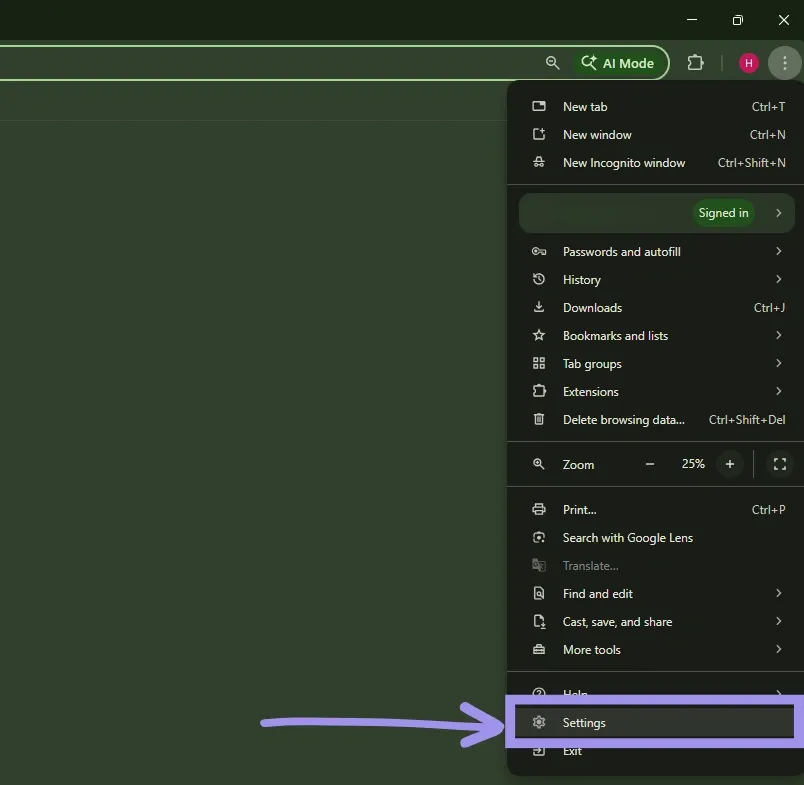
1. Click the three-dot menu in the top-right corner. From the available options, select Settings
2. Next, use the search bar at the top and type Proxy and click on “Open your computer’s proxy settings.”
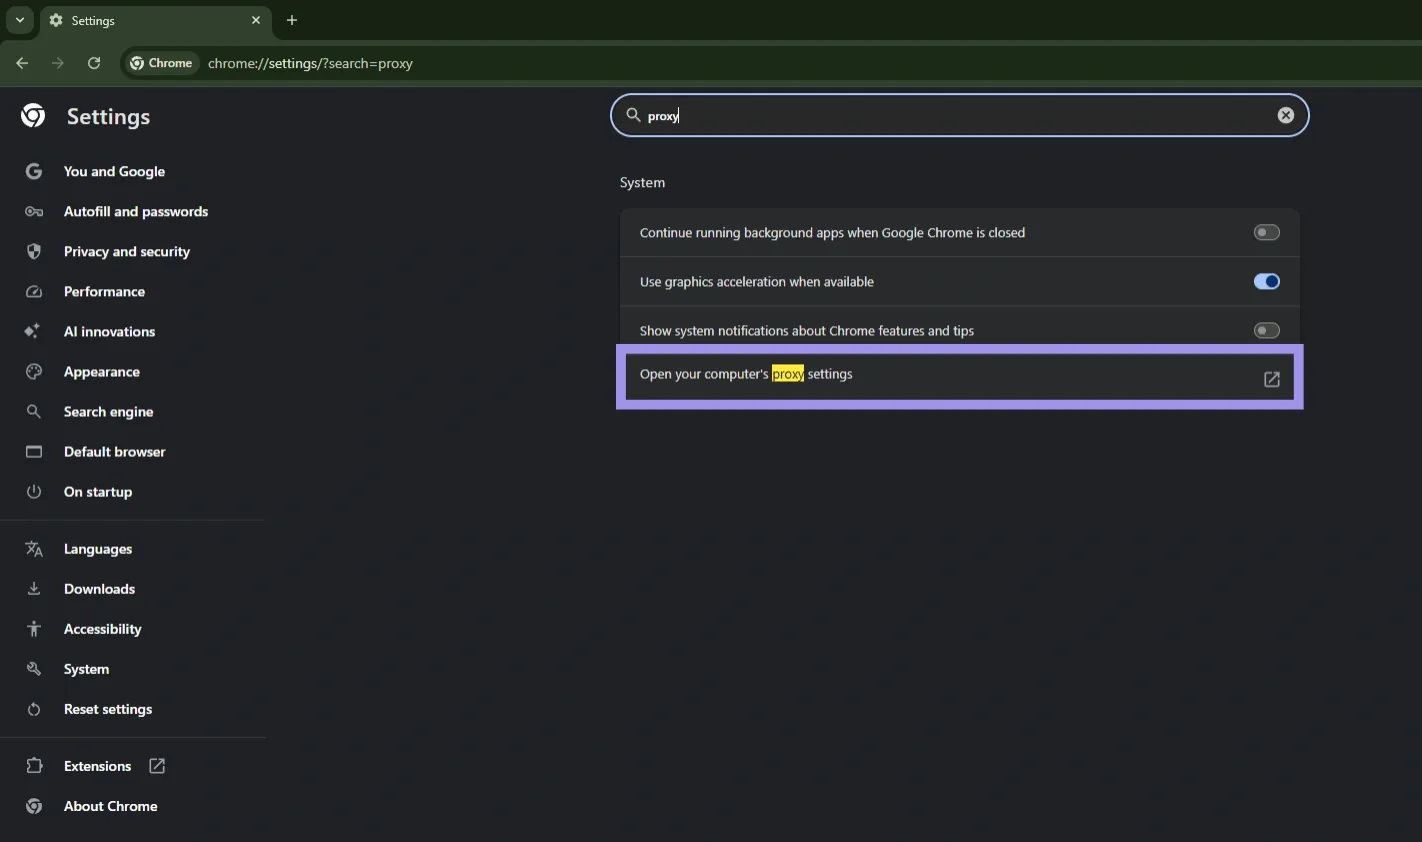
This is when you’ll be redirected to your system’s proxy settings page. From here, the steps differ based on your operating system.
Finding a Proxy Server on Mobile Devices
On most mobile operating systems, proxy settings are applied on a per-Wi-Fi network basis. That’s why proxy details are typically visible only when a Wi-Fi connection is selected.
Proxy configurations for cellular or mobile data are uncommon and are usually managed by carriers, APN settings, or enterprise profiles rather than through standard device menus. So, make sure you’re connected to Wi-Fi before you start looking.
On iOS (iPhone & iPad)
On iOS, proxies are usually configured per Wi-Fi network in Settings, or via cellular APN (Access Point Name) profiles. In managed environments, proxies can also be enforced via configuration profiles/device management.
Unlike Android, iOS provides superior native support for HTTP proxy authentication, allowing one to enter credentials directly in the network menu.
Here’s how to check for a proxy server address:
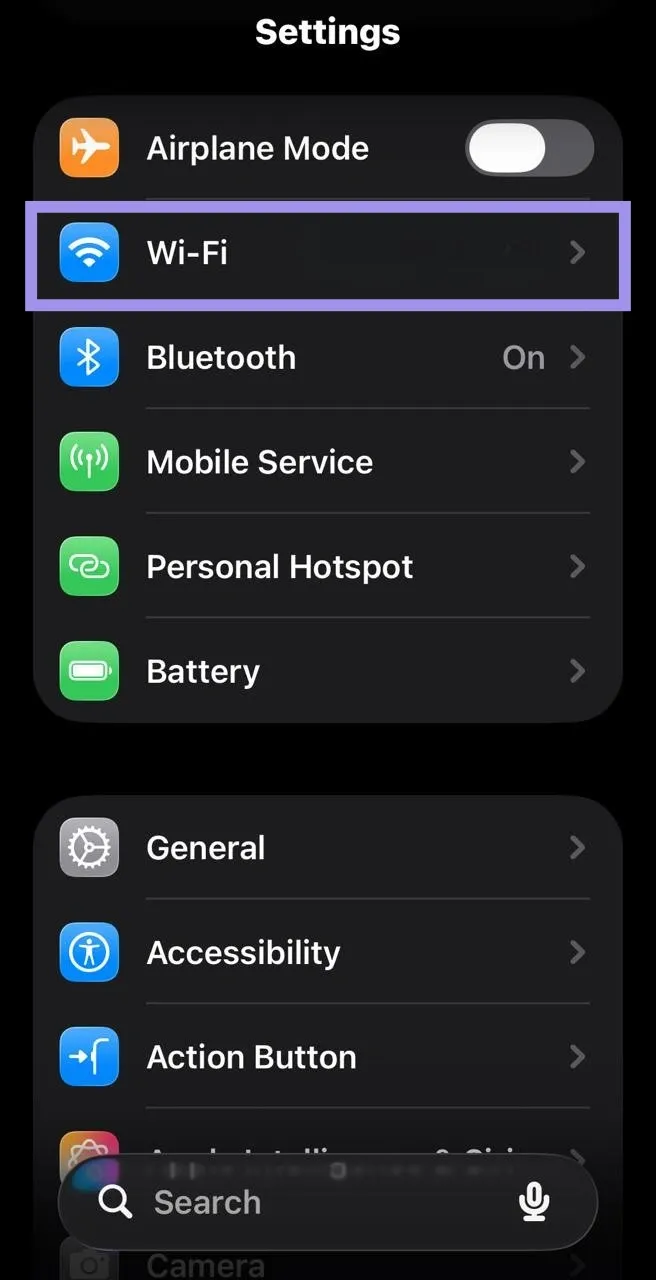
1. Start by opening Settings, then tap on Wi-Fi.
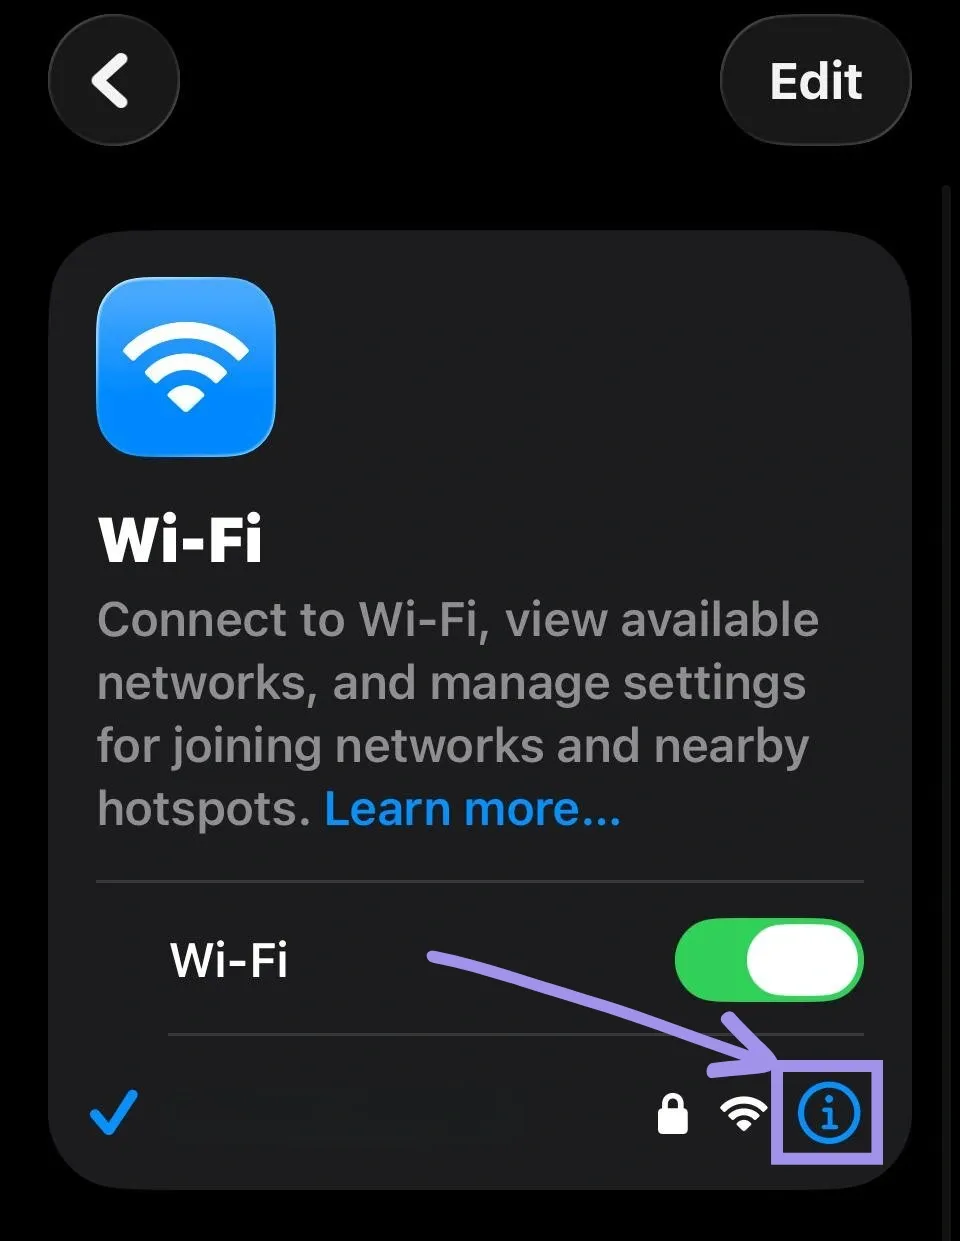
2. From the available connected Wi-Fi networks, tap the i icon next to the Wi-Fi network to which the proxy is connected.
3. Doing so opens several options associated with the Wi-Fi network. Navigate to HTTP Proxy, then tap Configure Proxy.
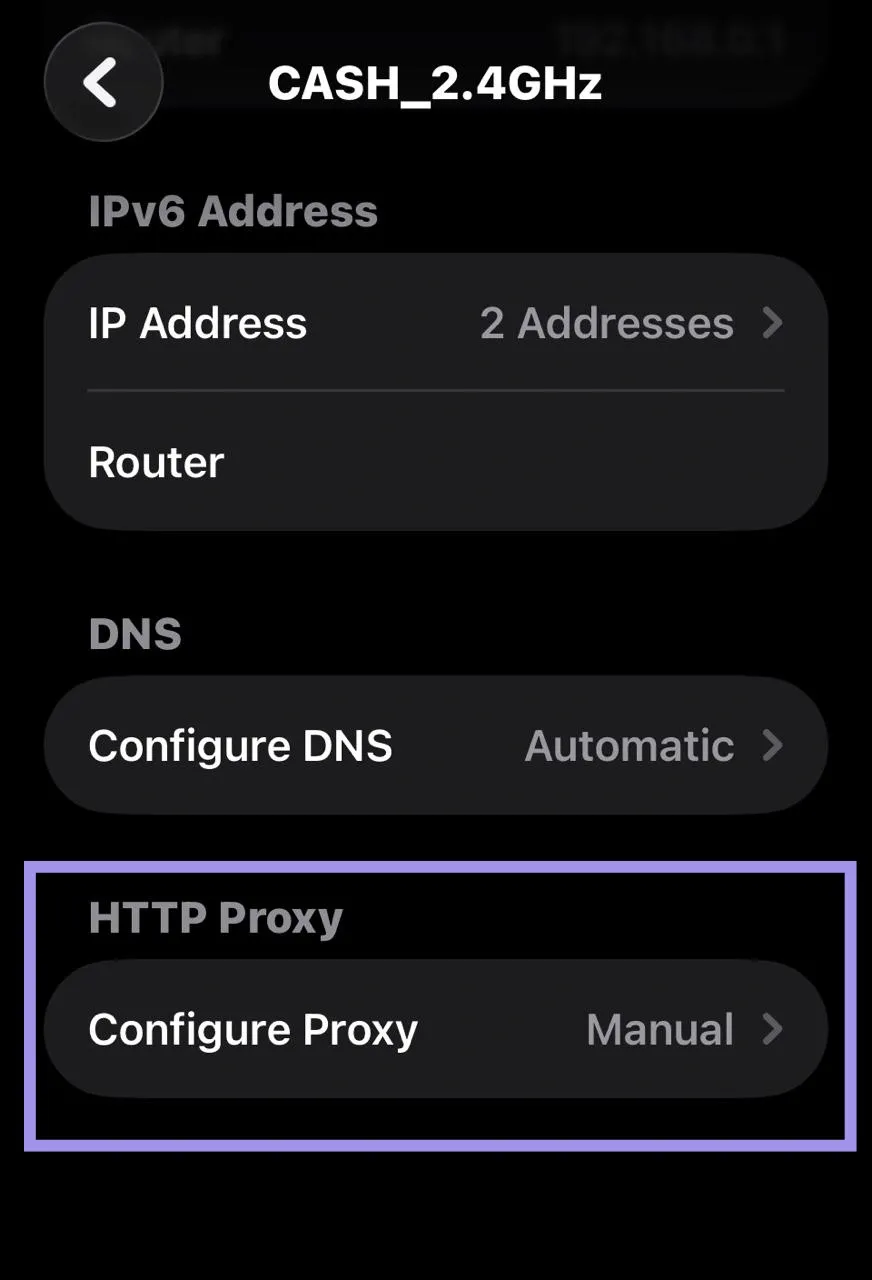
4. If connected, you will find the proxy server address along with other proxy-related information.
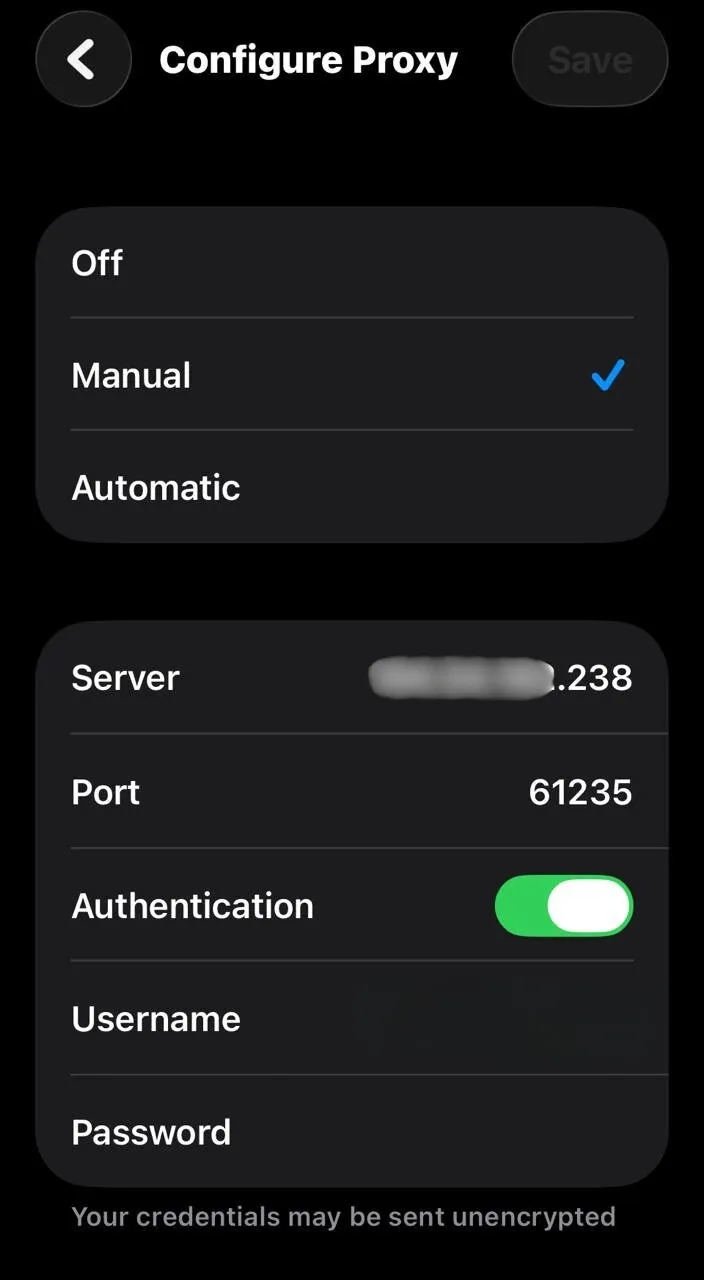
Note: If Configure Proxy is set to Automatic, you’ll typically see a PAC URL (not a server/port). However, if it’s Off, no proxy is configured for that Wi-Fi network.
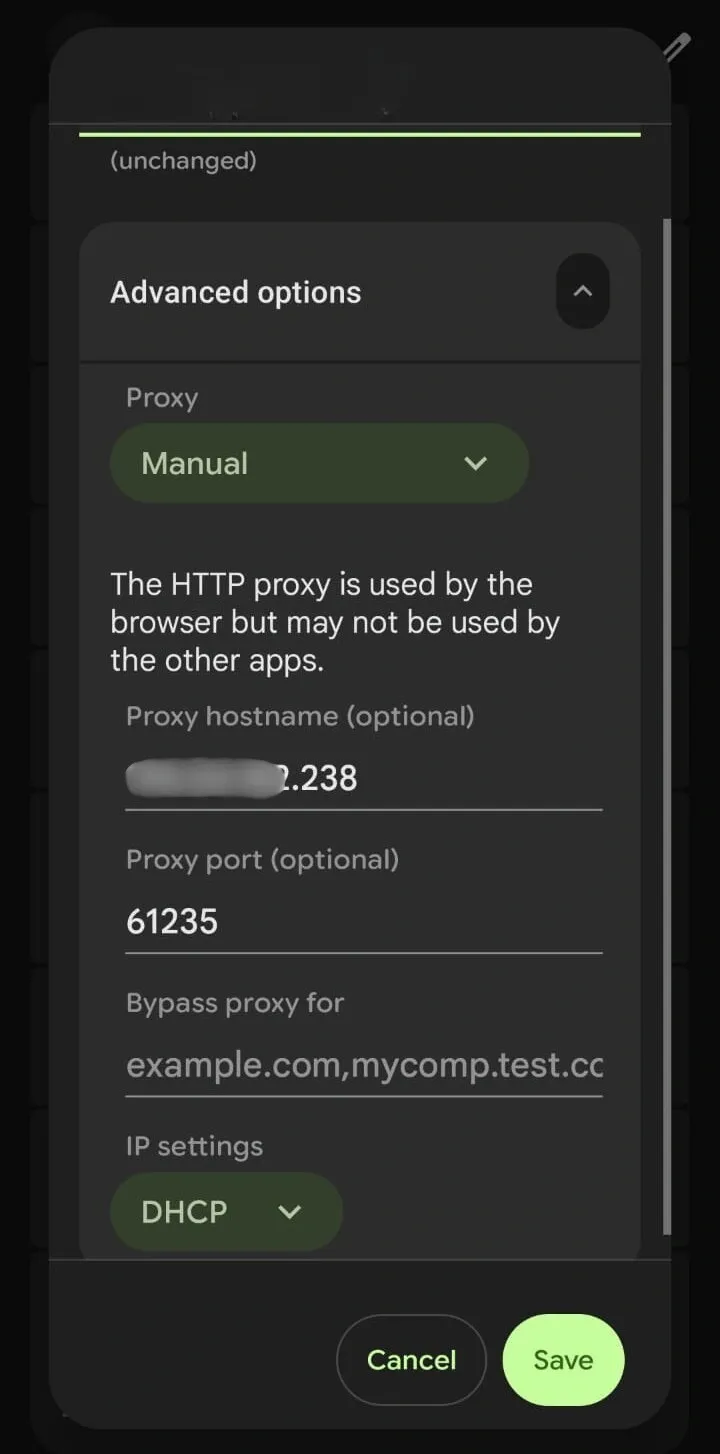
On Android Devices (Google Pixel)
Android applies proxy settings on a per-Wi-Fi network basis and mobile APNs (similar to iOS), but its native Wi-Fi menu does not support authentication fields. Instead, you must either use IP whitelisting or rely on a third-party app to handle proxies with authentication.
If the proxy is connected, you can find the proxy server address by following the steps.
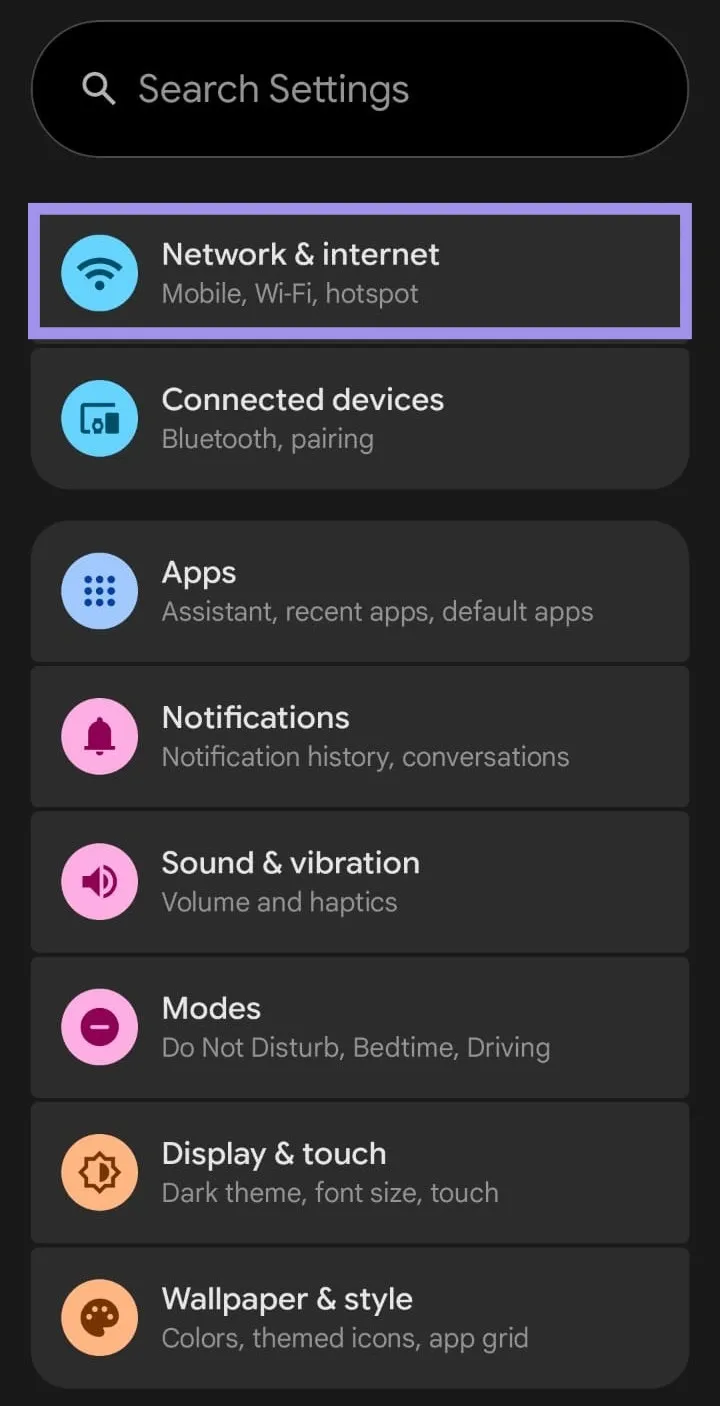
1. Start by opening Settings, then tap Network & internet.
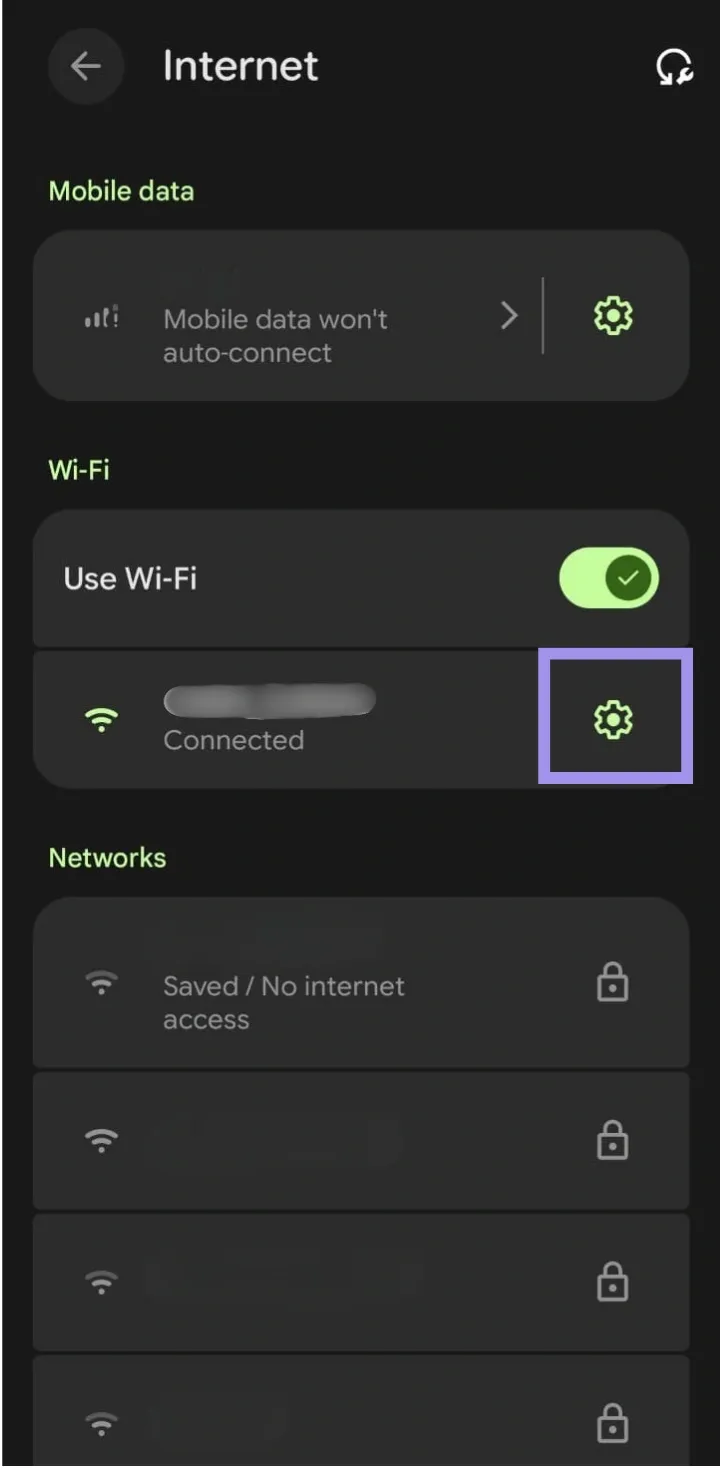
2. From the available options, tap on Internet, followed by the Gear icon, next to the network you’re currently connected to.
3. Tap on the Edit icon at the top right corner to open Wi-Fi options. Find Advanced options, then tap it to find Proxy options.
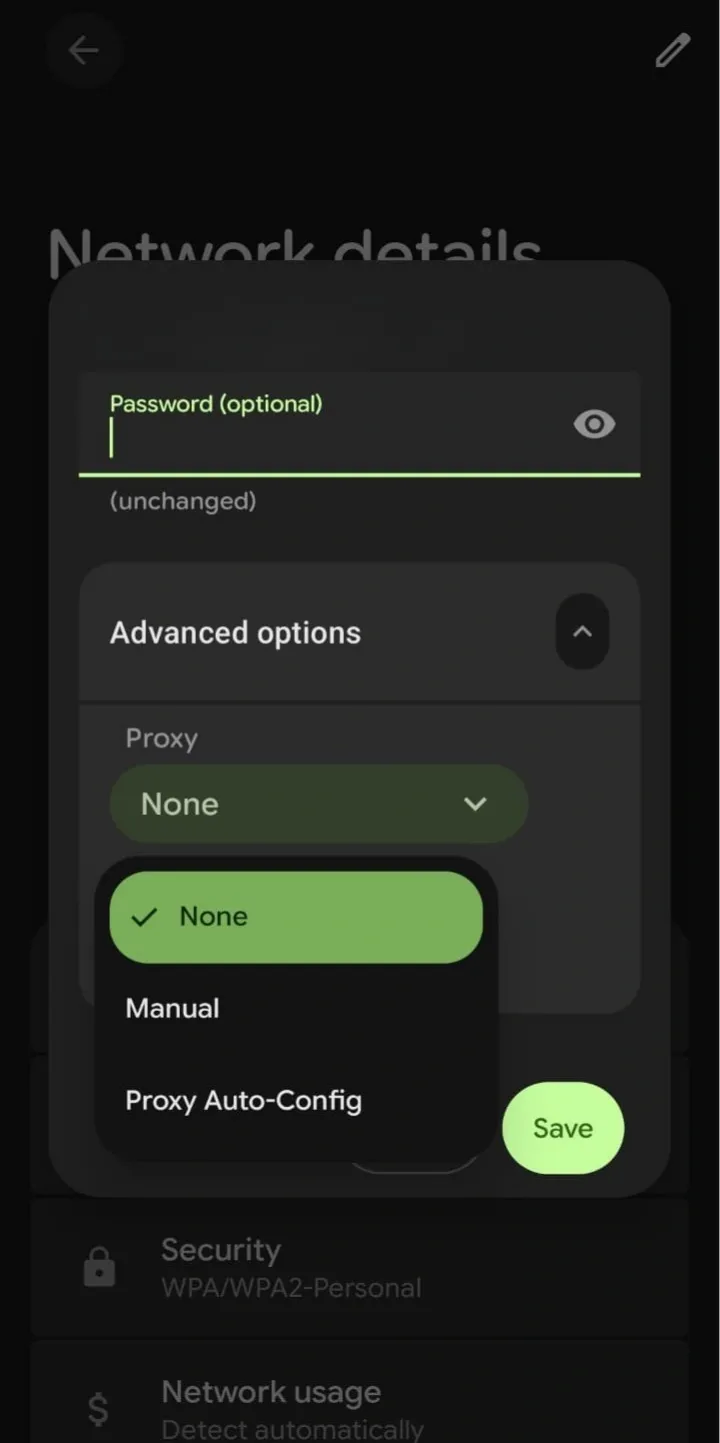
4. You can find the proxy server address and other proxy details. Proxy can still be active if the setting is set to 'Auto-config' (which uses a PAC URL) or if the network uses a transparent proxy that intercepts traffic automatically without appearing in your device's settings.
If the settings are None, there’s no proxy manually configured on the device, though some networks may still use transparent proxies that don’t appear in Android’s settings.
Troubleshooting Common Issues With Proxy Servers
When a proxy is misconfigured, it can prevent expected connections or display complex proxy error codes. These issues are often minor and can be resolved by a systematic review of the configuration.
The following steps outline how to troubleshoot common proxy problems. They also include additional checks that are frequently overlooked:
- The Internet feels slow: A proxy creates an extra point of connection between you and the Internet. Therefore, any slowdown in the connection can be attributed to distance, server congestion, network errors, and other factors. The best solution would be to switch servers. You can also temporarily disable the proxy to confirm whether it’s the bottleneck or just your network having a bad day.
- Websites refuse to load or throw connection errors: This is usually due to an incorrect address or port number. One wrong digit is enough to break everything. Double-check the details and make sure the proxy supports the traffic type you’re trying to send through it.
- Proxy server not responding at all: This often means the server is down or blocked by your current network. Testing the proxy with an external checker can tell you whether the problem is your setup or the proxy itself.
- Authentication keeps failing: Some proxies require usernames, passwords, or IP whitelisting. Maybe the logins changed (or expired), and you’re unable to connect. That is where you would enter the logins again or verify the connection with the proxy provider.
- Apps work, but browsers don’t (or vice versa): This typically means that proxy configuration is set at a system level but overridden for a particular application or only for a given type of traffic. Check each app’s proxy settings, review any bypass lists, and confirm that the proxy supports the required protocol (HTTP/HTTPS vs SOCKS5).
Best Practices for Using Proxy Servers
A proxy server, like any intermediary between your device and the internet, performs optimally when properly configured and maintained. Proper setup and regular upkeep are essential for a reliable operation.
Make the Most of Your Proxy
- Configure proxy settings carefully: Ensure your IP address, port number, and any authentication details are accurate, and that your proxy type matches your needs (HTTP, HTTPS, or SOCKS). Incorrect configurations can cause app errors nobody wants to deal with.
- Prioritize security: Not all proxies are created equal. Ideally, choose a reputable proxy provider and use authentication-based proxies at all times. Never settle for a free proxy for sensitive work, because convenience shouldn’t compromise safety.
- Test before full deployment: Prior to using a proxy for any work, test it with different sites and apps. Confirm that it’s routing traffic correctly and not causing unexpected issues.
Strengthen Your Setup With Extra Security Layers
Consider adding tools like an antivirus or an active firewall. The former scans for malware and other hidden threats that could compromise your data. The latter, on the other hand, monitors incoming and outgoing network connections.
Note that while these tools are helpful for spotting potential problems early, they’re most effective when combined with safe browsing habits. This might mean regular software updates and caution when downloading.