SessionBox Explained: Setup, Proxy Integration & Multi-Account Use

Many try to manage multiple accounts from a single device, only to get disappointed. This is because of strict platform restrictions, device-based identifiers, advanced tracking mechanisms, and more.
To get over these, most arguably consider conventional ways like incognito mode, multiple browser profiles, or virtual machines. However, these approaches are limited to the past, bringing in the constant risk of detection.
This is where SessionBox comes in. By combining with the power of proxies, you can manage multiple sessions at once from the same browser without getting detected. Feels like the right solution to your longing problem?
This guide covers everything. You'll get the needed insights into SessionBox—what it is and how it works. Plus, it explains how to choose and integrate the right proxies, so you can manage multiple accounts at once.
What is SessionBox?
SessionBox is an anti-detect multi-session browser tool. As its description suggests, it gives users the ability to manage multiple accounts on the same website without the risk of detection or session overlap.
In simpler words, SessionBox creates isolated browser profiles within a single browser. This way, it gets over browser fingerprinting. The best part is that it supports the prominent Chrome, Firefox, and Edge browsers.
SessionBox capabilities unlock possibilities for many. Soon it became one of the go-to solutions for marketing agencies, e-commerce managers, web scrapers, affiliate marketers, and many who handle multiple accounts.
How SessionBox Works
It is important to compare SessionBox with a conventional browser to better understand it. Unlike a conventional browser, which links all tabs to a single session, SessionBox considers each tab a separate entity, making it harder for websites to track and associate accounts.
Also, it helps mask crucial details like operating system, screen resolution, and installed plugins, successfully preventing browser fingerprinting. As simple as it gets, SessionBox alone can’t achieve it, and only with proxy integration it turn out as a complete solution.
Proxy Integration with SessionBox
It is clear that websites don’t just track session data—they also actively monitor IP addresses, geolocation, and behavioral patterns to detect users running multiple accounts. This is where SessionBox falls short.
To overcome this, SessionBox offers proxy integration. By combining both, all sessions hold a unique IP address, making it appear as if each account is being accessed from a different device or location.
According to the analysis aggregated by Ping Proxies, not all proxies are suitable for SessionBox. The right choice depends on the specific task. Let's say you are trying to create a consistent online presence, maintain session reliability, or minimize the risk of detection, you might have to consider residential proxies.
On the other hand, if your tasks require higher connection speeds, large-scale operations, or access to platforms that prioritize performance over identity verification, datacenter proxies are the way to go.
Choosing the Right Proxy for SessionBox
This isn’t all, there are even more factors to consider. Before we proceed with integrating proxies with SessionBox, it’s important to choose the right proxy to avoid detection and performance issues.
We recommend checking these out, as a wrong proxy often leads to undesirable outcomes. Here’s what you need to look out for when selecting a proxy.
- Unique IP Assignment: Each SessionBox session should run on a separate IP to prevent platforms from linking multiple accounts. Choose the proxies that offer dedicated or rotating IPs, so each session appears as a different user, reducing the chances of detection.
- Ethical & Legally Sourced Proxies: Proxies sourced from legitimate networks are less prone to risk of being flagged or blacklisted. Always consider ethically sourced proxies for your connections to remain secure, private, and compliant with platform policies.
- IP Rotation & Sticky Sessions: Some tasks require rotating proxies that change IPs frequently, while others need sticky sessions that keep the same IP for a longer duration. The proxy provider must be flexible based on your use case.
- Location Coverage: If you need to access accounts from specific countries, choosing a proxy provider with a wide location pool helps you bypass these restrictions. This brings the impression that you’re operating from the right region.
- Speed & Stability: Slow proxies can cause timeouts, failed logins, or session interruptions. Look for proxies with high uptime, low latency, and reliable network infrastructure. Prefer the proxy providers that are transparent about these, so you won't face issues later.
Setting Up a Proxy in SessionBox
Note: At the time of writing, the popular SessionBox extension isn’t available on Chrome, Edge, or Firefox. Hence, we proceeded with their latest offering, SessionBox One. The steps below will guide you through the SessionBox One extension installation, followed by proxy setup.

Step 1: Install SessionBox One on Chrome
1. Navigate to Chrome Web Store and search for SessionBox One. If you couldn’t find it, here is the direct link to SessionBox Chrome Extension.
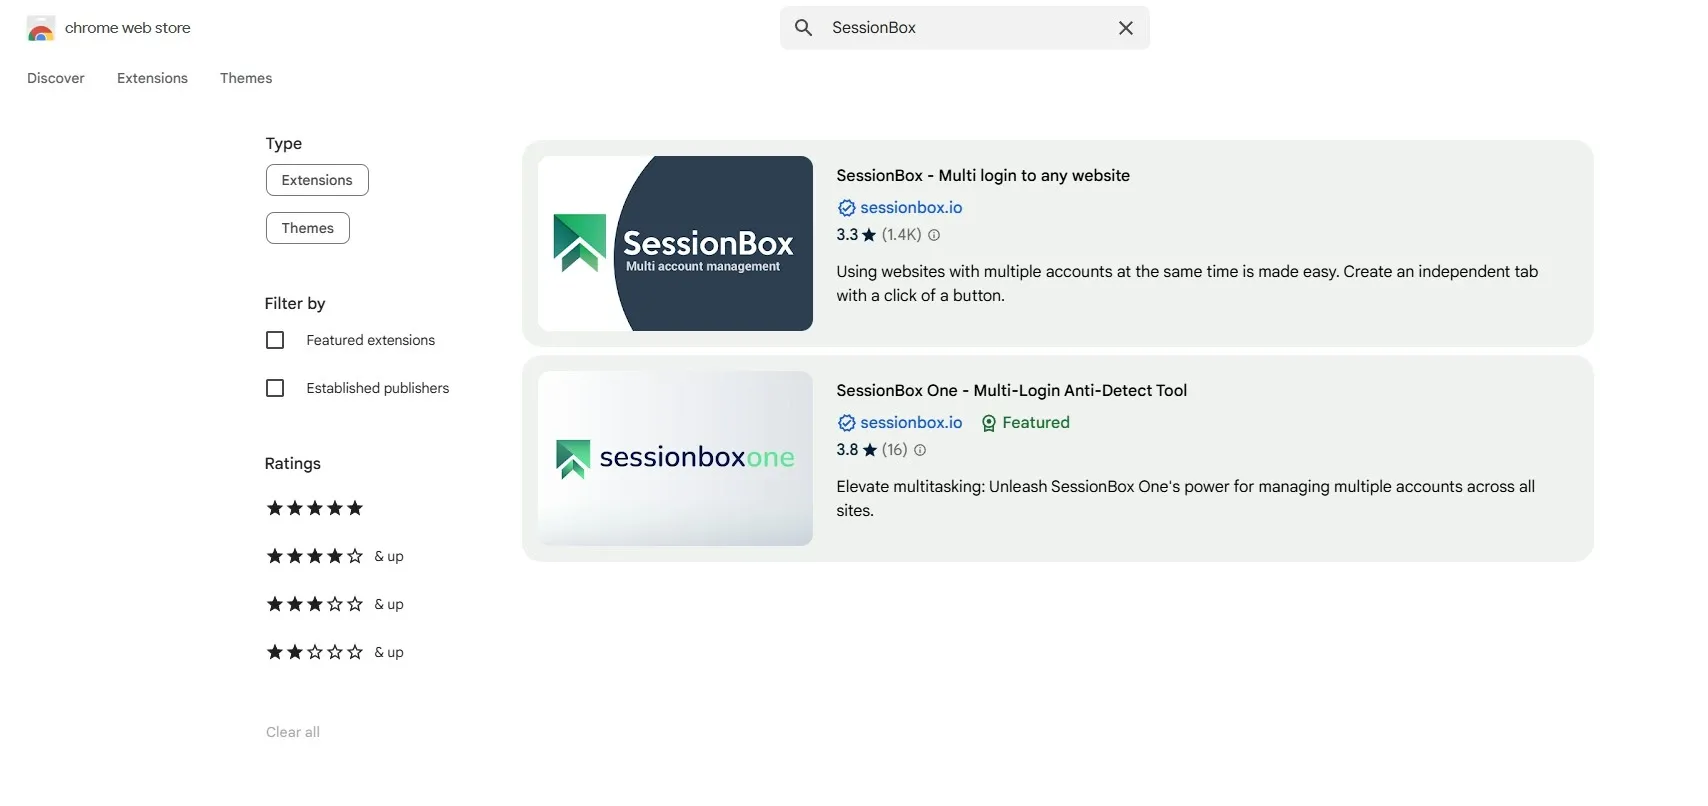
2. As explained before, SessionBox is deprecated. Hence, go with SessionBox One and proceed by clicking on “Add to Chrome”.
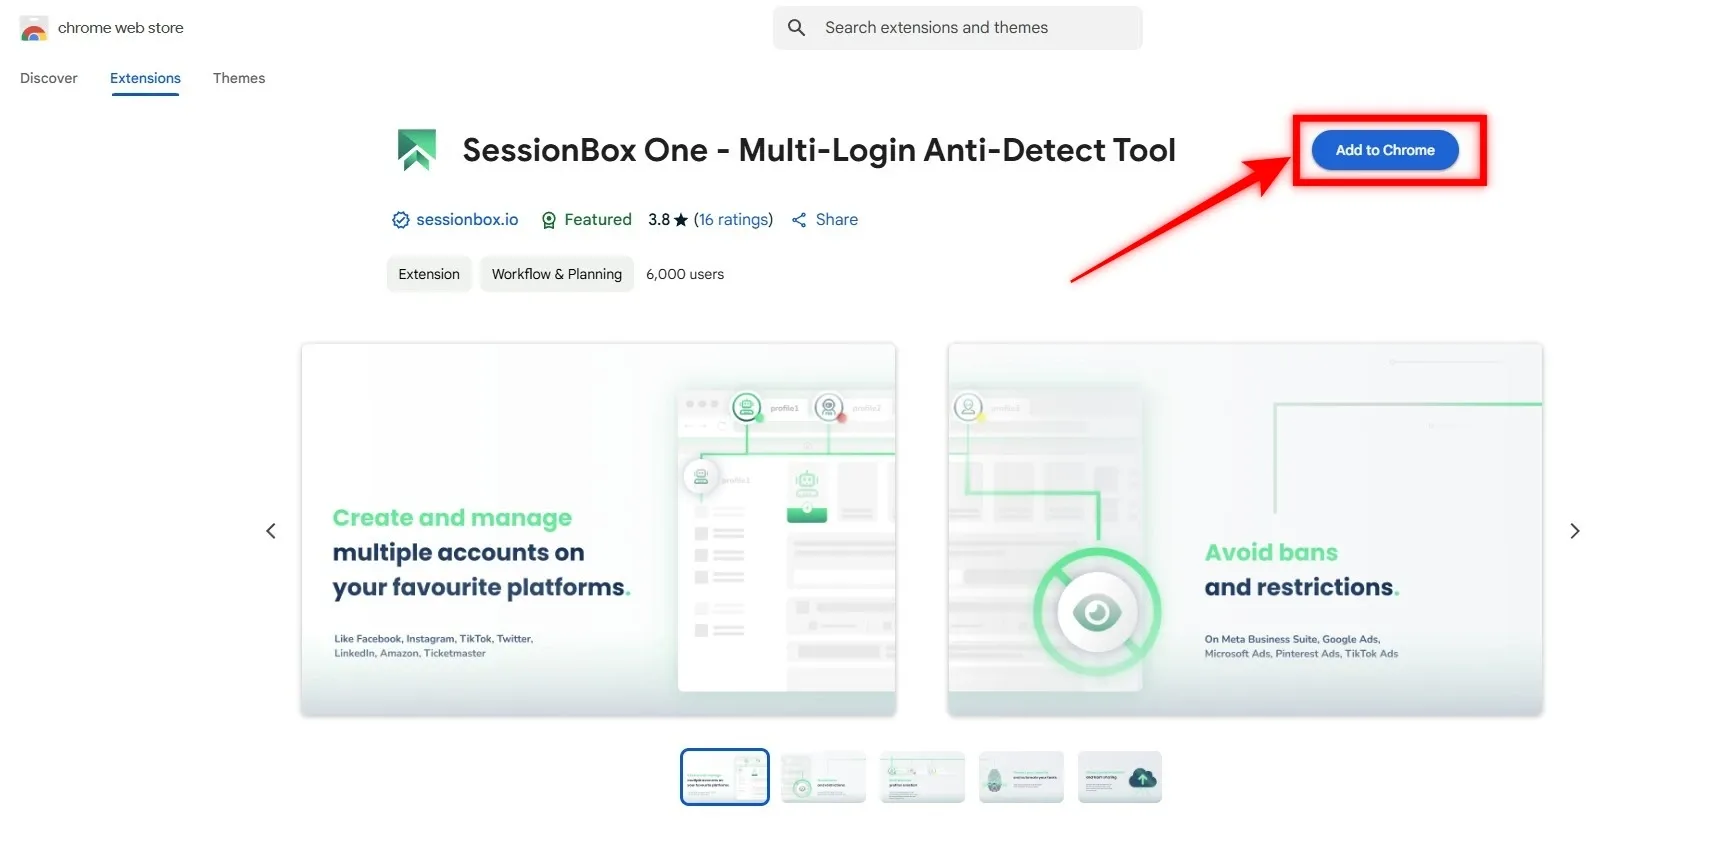
3. This step is a must and cannot be skipped - Unlike the old SessionBox extension that works with Chrome, the newer extension requires additional desktop software (SessionBox One) to be installed. You can download it from SessionBox's official website—it is available for Windows and macOS.
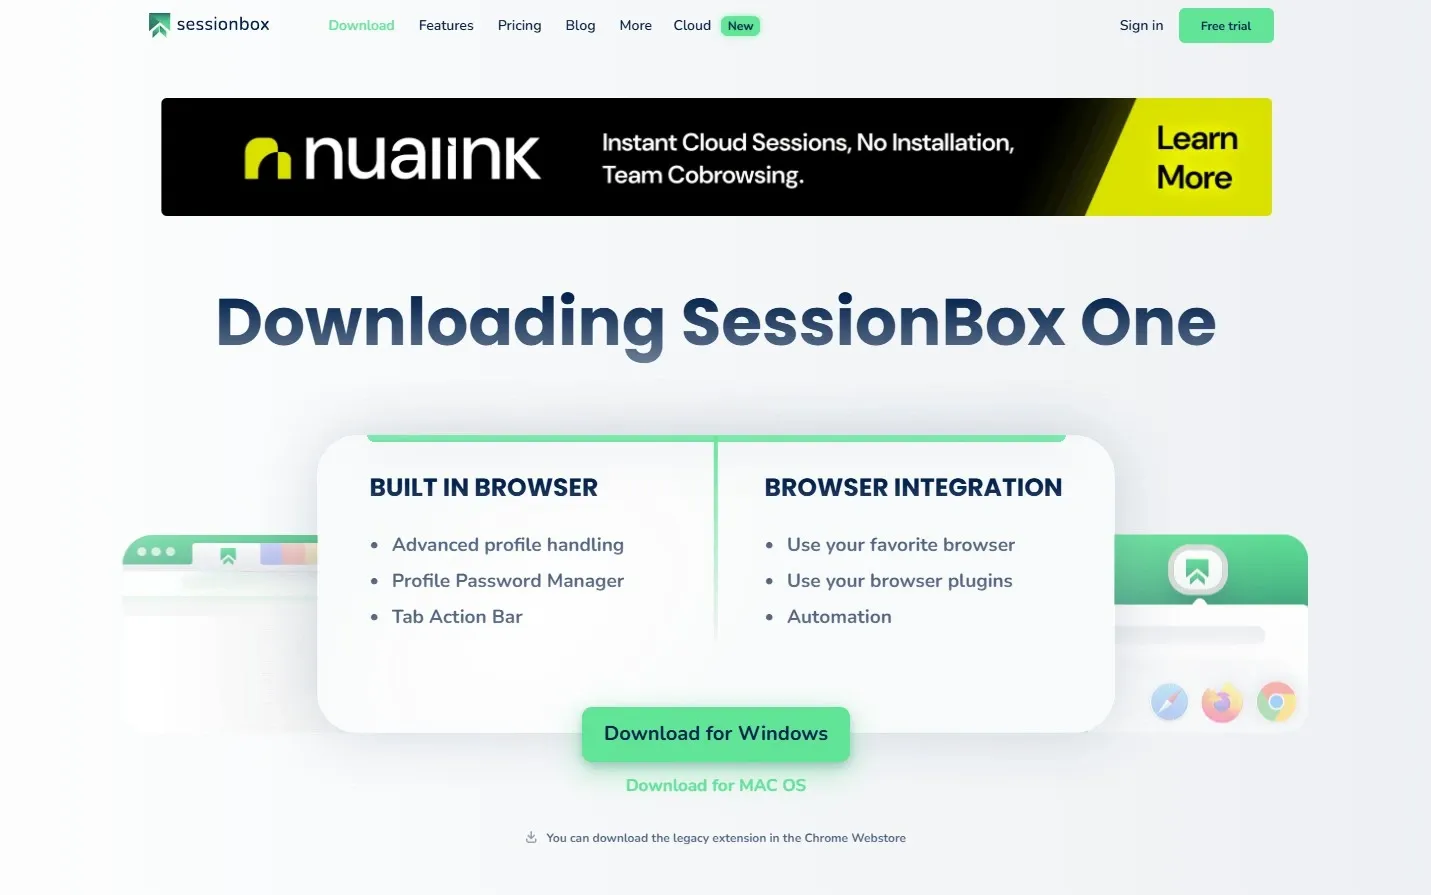
4. Once the SessionBox One setup is downloaded, proceed with the installation. Now, you will have both the extension and application installed successfully.
Step 2: Create SessionBox One Profile
Note: The rest of the guide can be explained through the SessionBox One application, as it is also a browser. However, as the old SessionBox is often used with the traditional browser, we decided to proceed with the demonstration using the SessionBox One extension on Chrome.
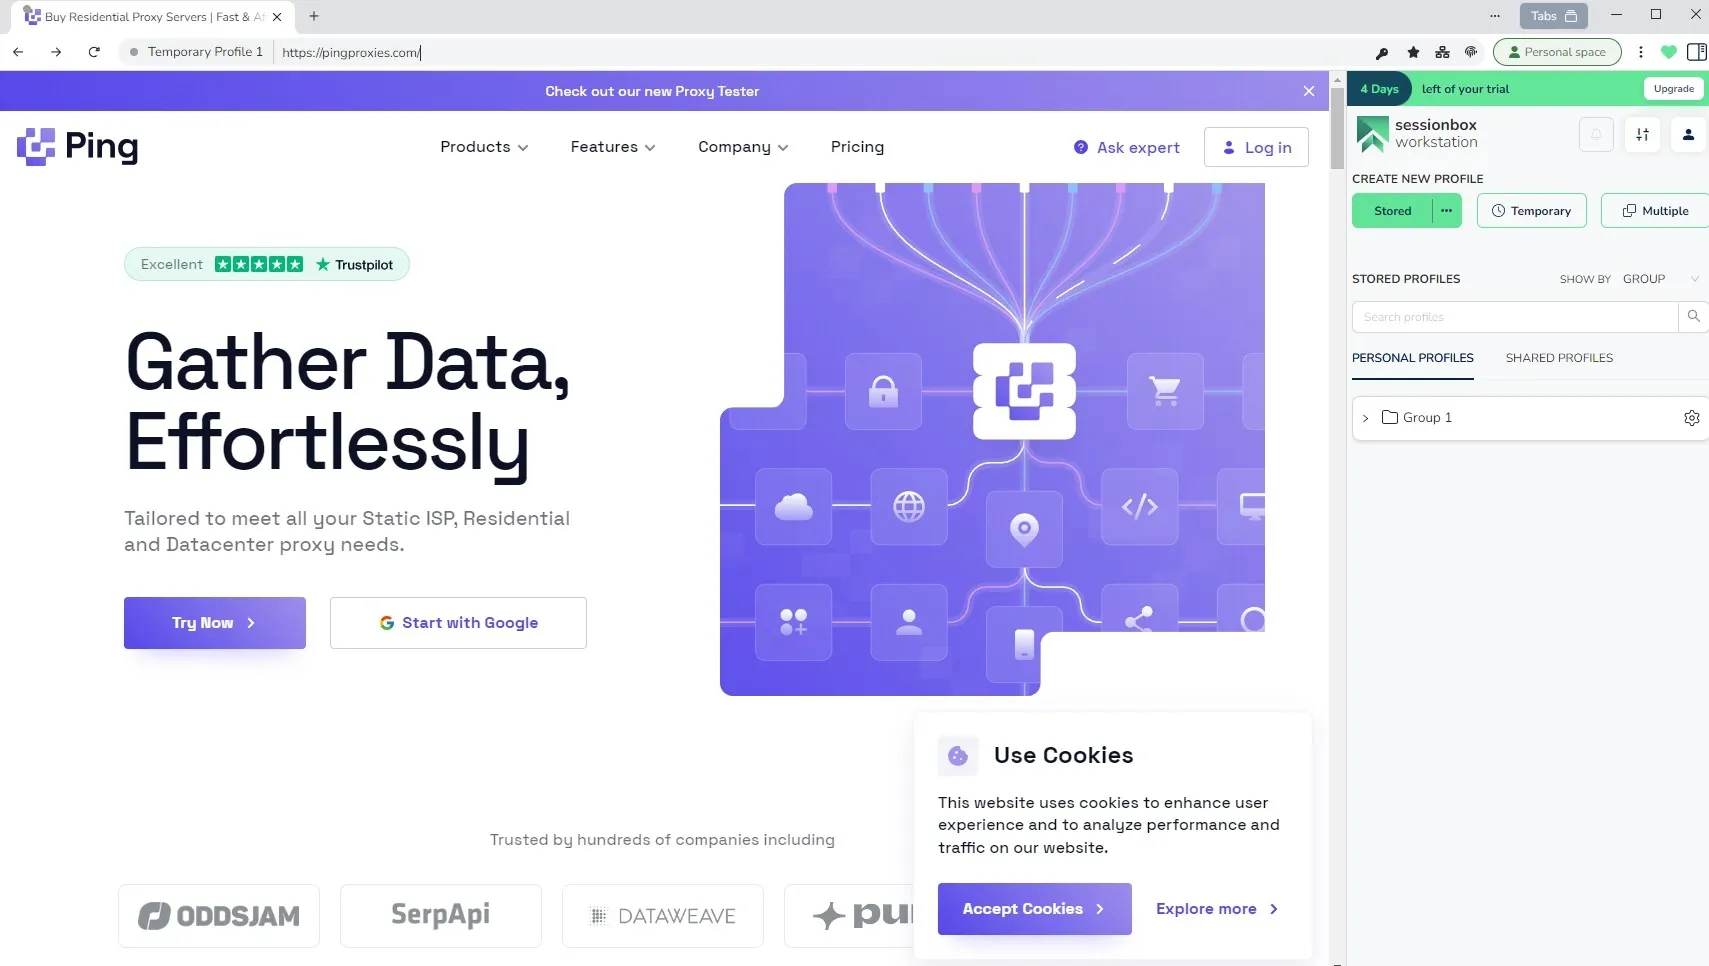
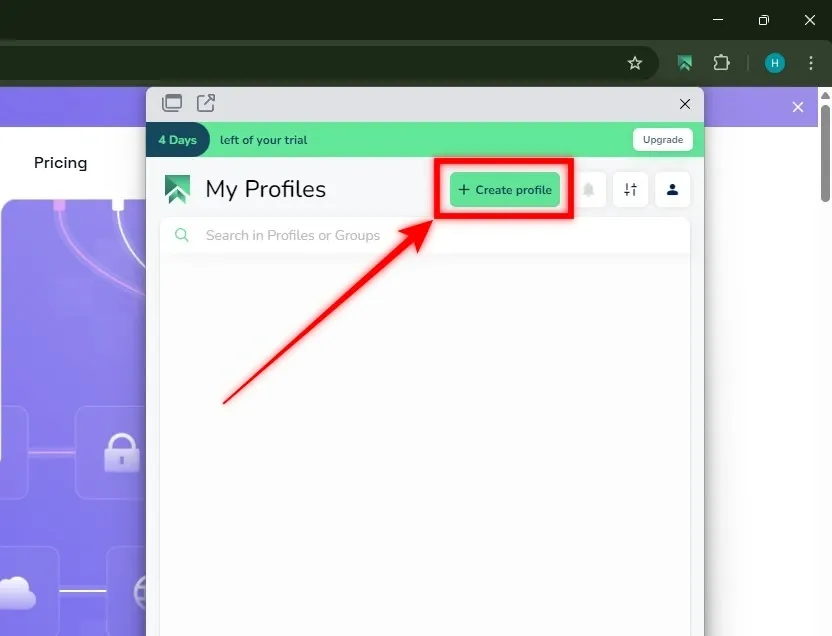
1. Open the SessionBox One extension on Chrome. Once, it is loaded, navigate to the “Create Profile” button and click on it.
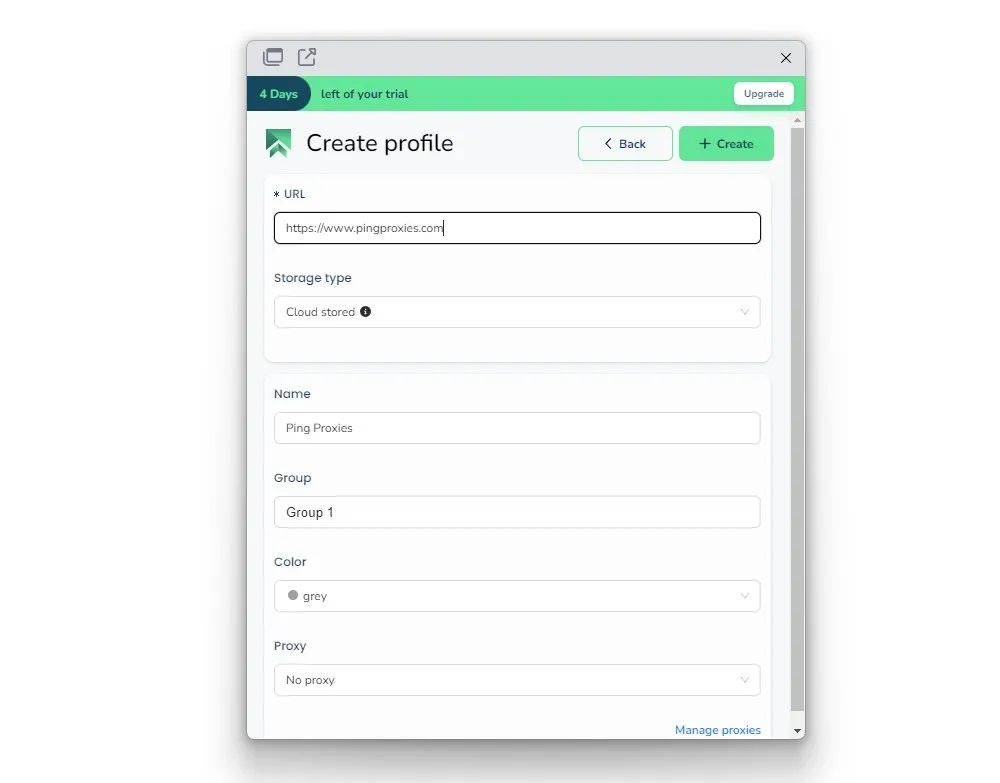
2. Now, fill in the details, and once done, click on the “Create” button. Make sure that you fill in the URL field, as it is mandatory. Don’t worry about the Manage proxies option yet, as we need to generate proxies first.
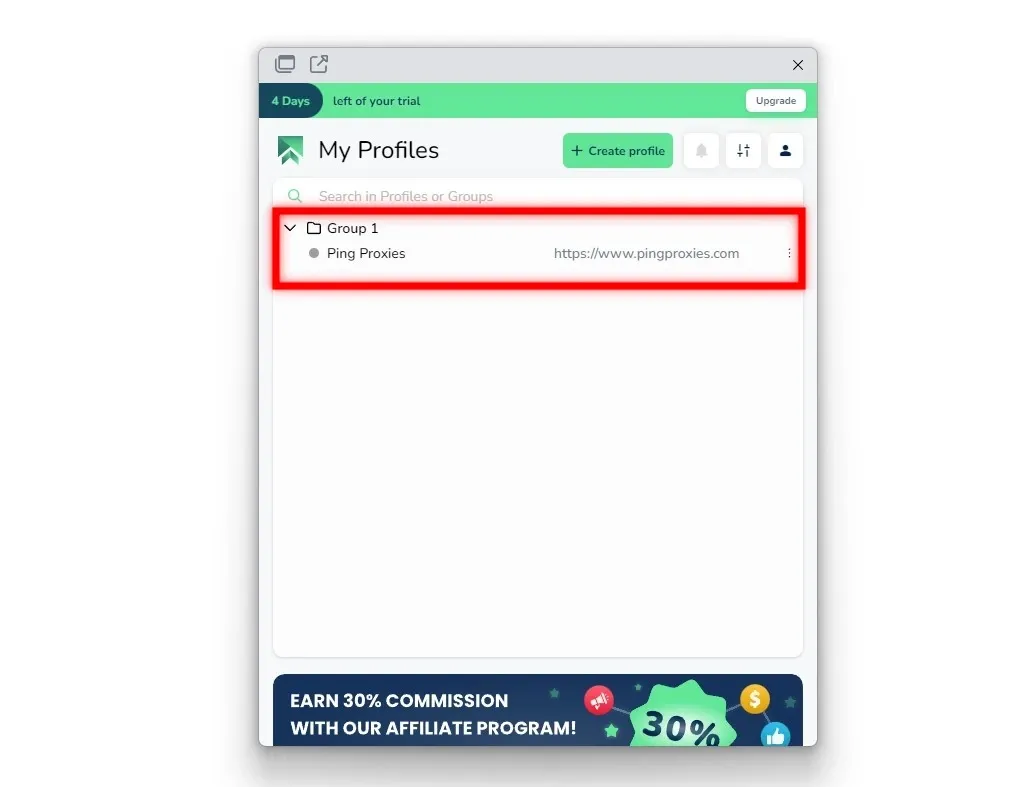
3. Doing so, you will find the profile created successfully on SessionBox One.
Step 3: Generate Proxy for SessionBox One
Note: The steps associated with this section vary depending on your proxy provider. For easy understanding, we’ve included steps for datacenter and residential (sticky/rotating/static) proxies with Ping Proxies.
Generate Residential Proxies with Ping Proxies
1. Sign in to Ping Proxies to get started. Once done and you’re on the dashboard, look for the “My Proxies” section in the left quick access tab and click on the ”Residential” option associated with it.

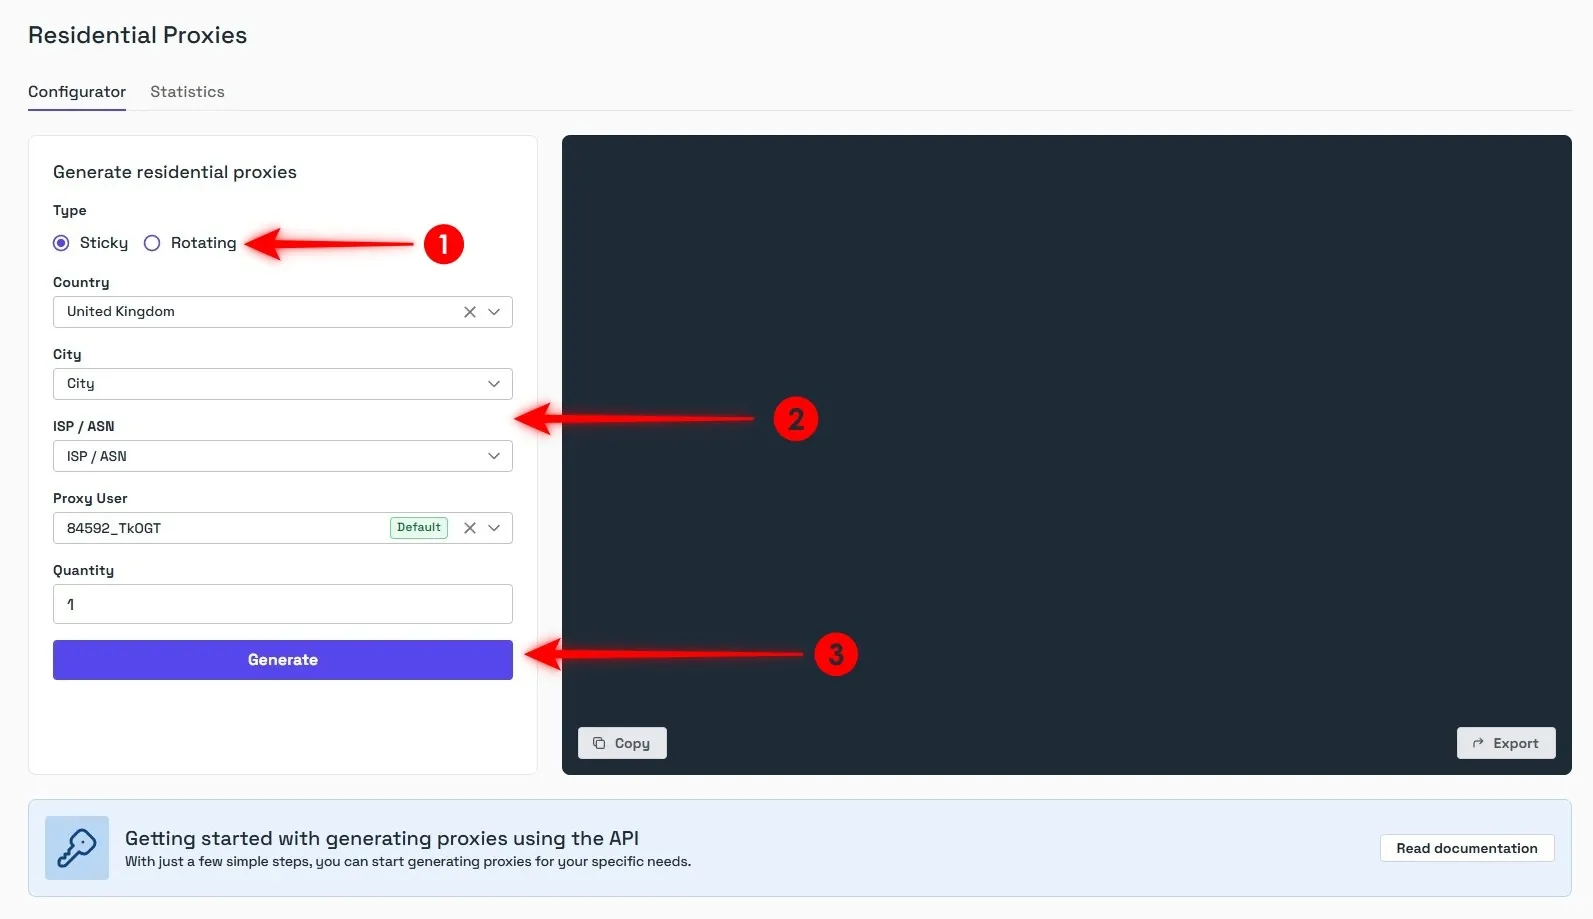
2. After the Residential Configurator is loaded, first select between rotating and sticky type. Then, select the country, city, ISP/ASN, and quantity. You can skip the city and ISP/ASN if you don’t need specific targeting, and generally, this is recommended as the less you target, the larger your available proxy pool will be. With your desired options set, click on the “Generate” button.
3. Now, the proxy list will be updated based on your choice. If you’re working with proxies for the first time, you might get confused. Hence, here is a quick breakdown with an example to help you figure it out.
Example: residential.pingproxies.com:8523:user123_c_gb_s_F74RNTYRCMCUY79T:abc123
All proxies generated follow the structure - (hostname:port_number:username_location:password)
Not clear yet? Let us make it even easier for you.
- Hostname/Address: residential.pingproxies.com
- Port number: 8523
- Username & Location: user123_c_gb_s_F74RNTYRCMCUY79T
- Password: abc123
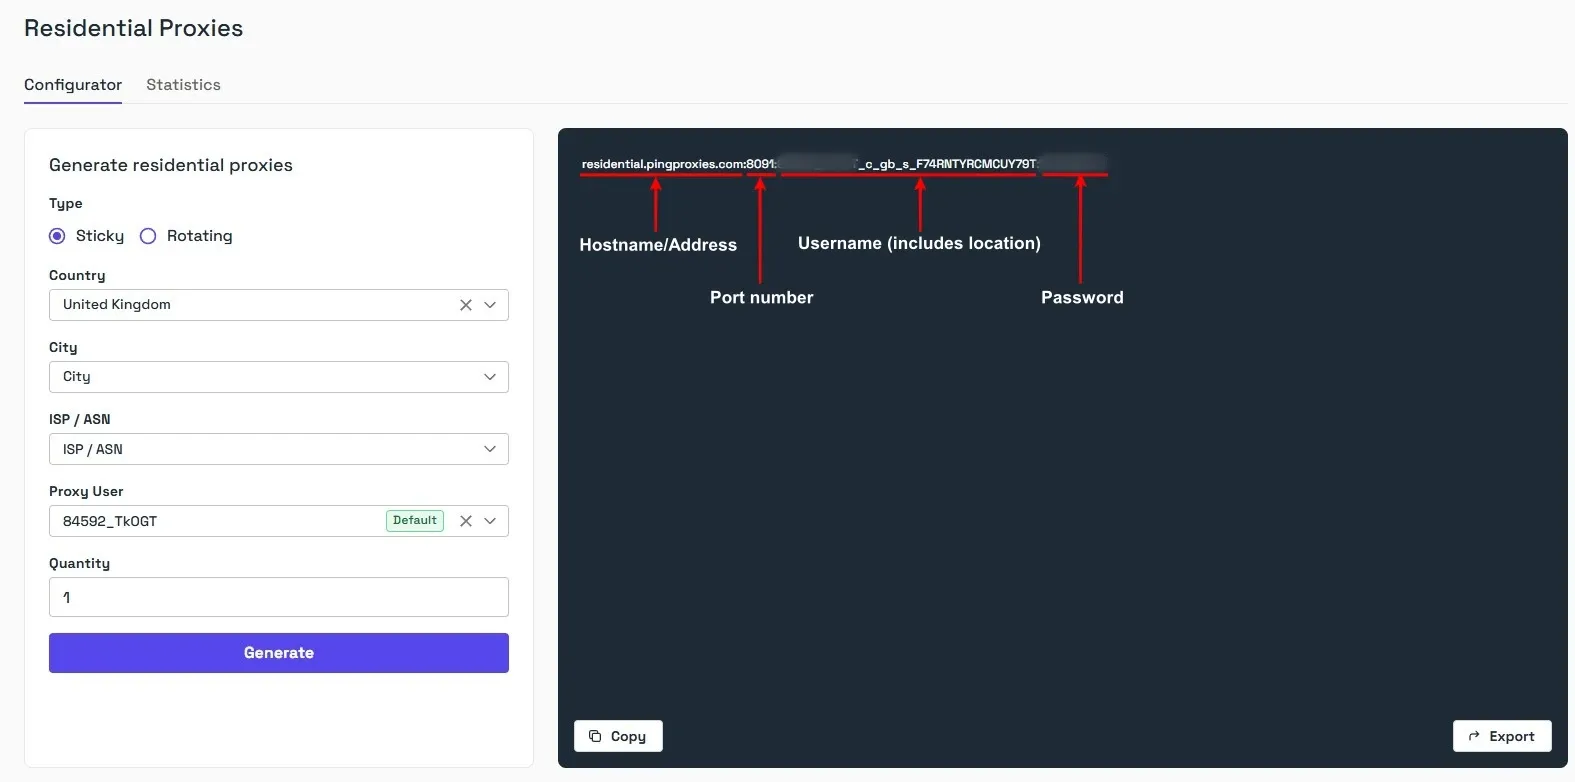
Note: For sticky proxies, don’t forget about adding the location within the username. Failing to do so, routes you to the incorrect location.
Generate Static Proxies with Ping Proxies
Unlike residential proxies, static proxies don’t need generation, making them comparatively easier to work with.
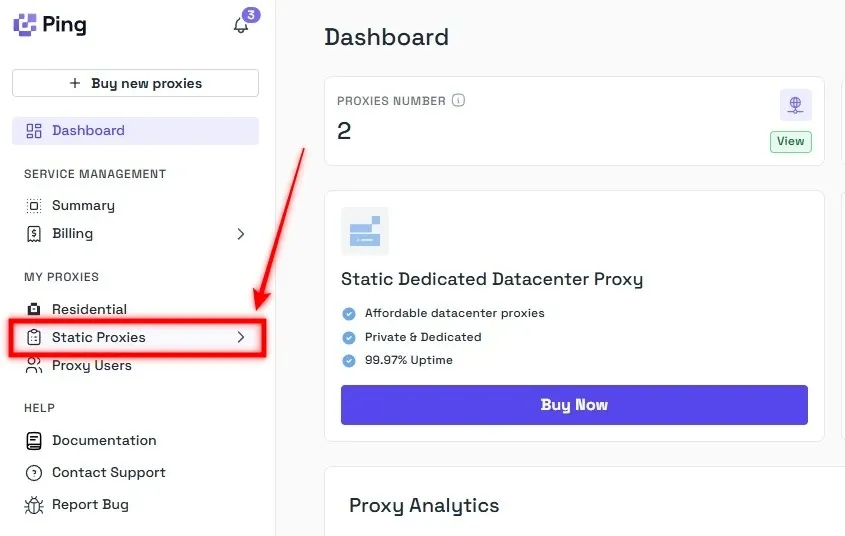
1. Navigate back to the dashboard and click the “Static Proxies” option below the Residential option.
2. The list is updated upon purchasing a static proxy. You’re displayed with your username, password, IP Address (hostname), and port. All you need to do is copy and paste them into their respective fields in SessionBox One.

Are you unsure which proxy to choose? Here is a detailed comparison between datacenter and residential proxies. Find what best fits your needs.
Step 4: Add Proxies to SessionBox One
Now that you know how to generate proxies, the next step is to integrate them with SessionBox One. Here are the steps for it.
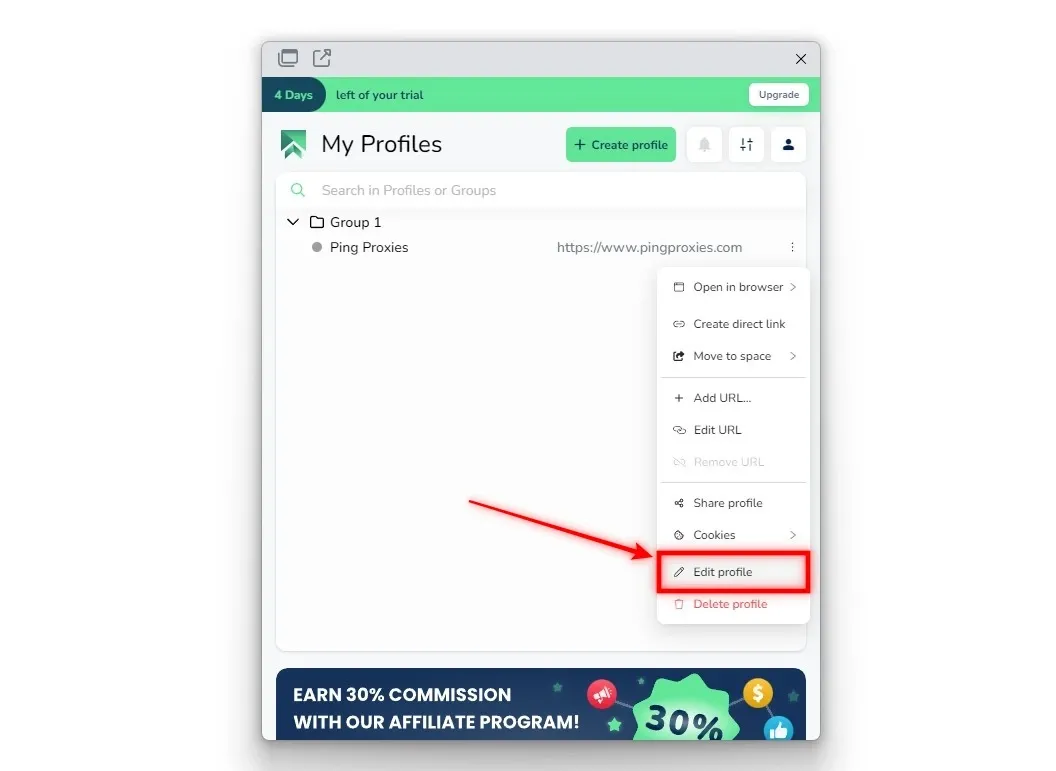
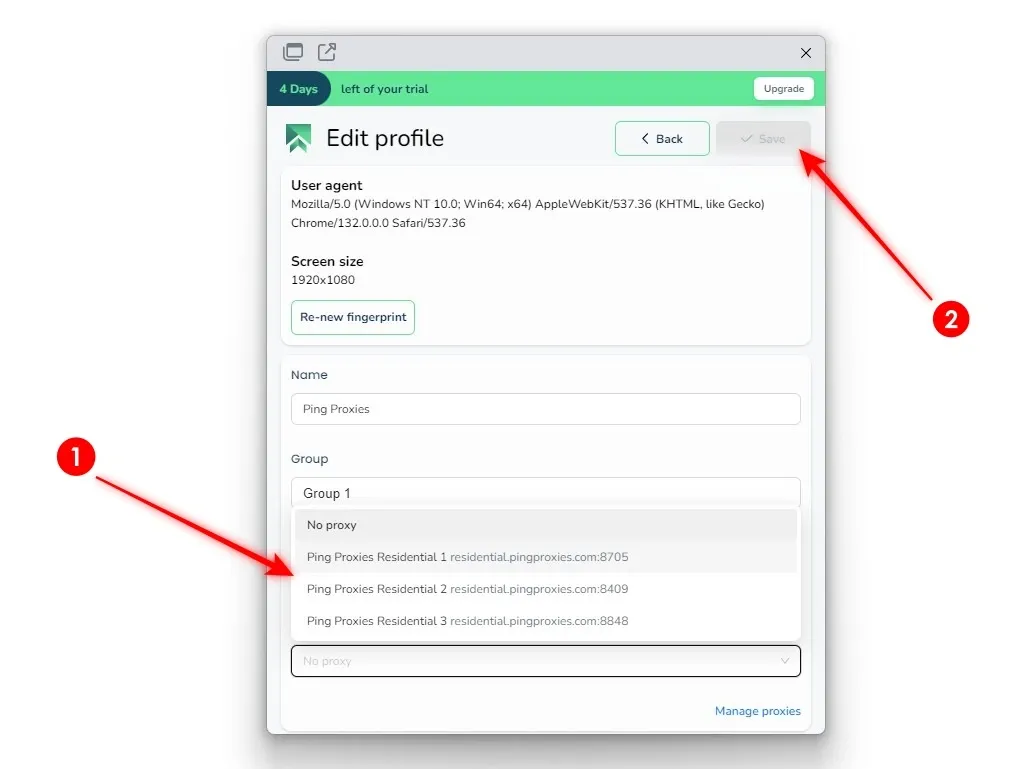
1. Picking up from where we left off, which is after creating the profile in SessionBox One. Find the three vertical dots associated with the profile and then click on it, followed by the “Edit Profile.”
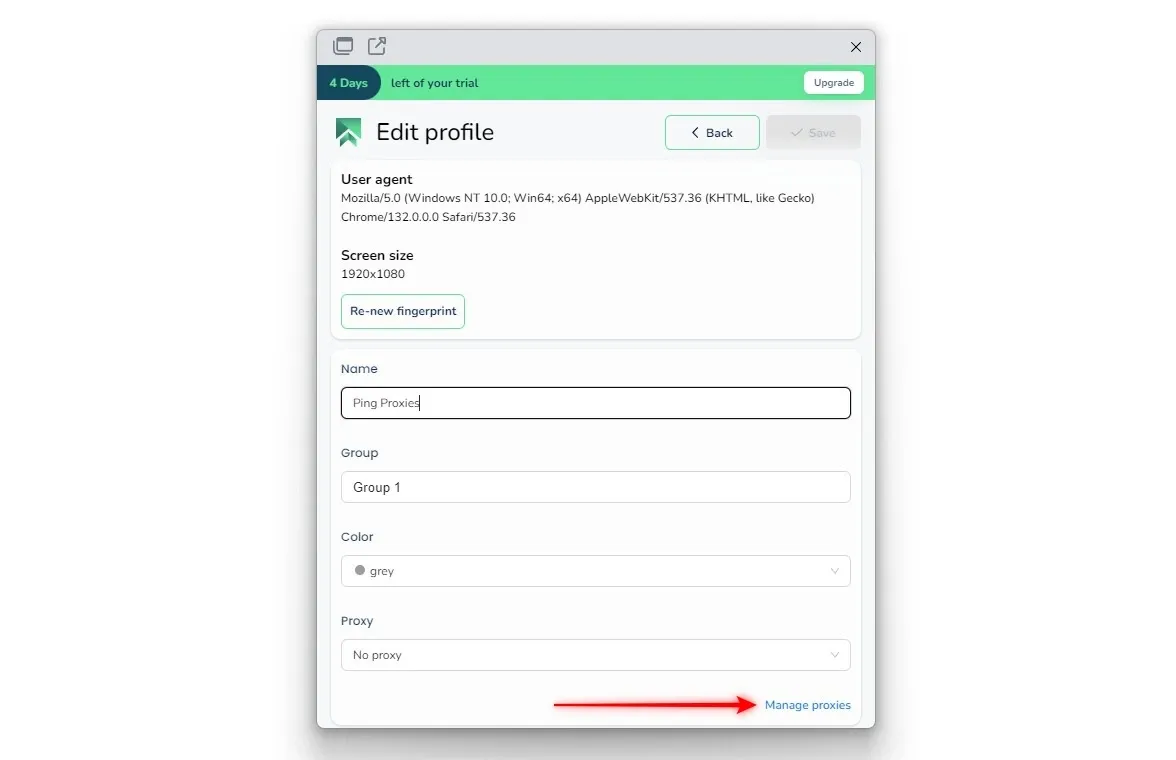
2. Doing so, lets you edit the profile. At the bottom right, you will find the “Manage proxies” option, now click on it.
3. Now, you’re left with an empty window without proxies. To add one, click the “Add proxy” button at the top right corner.

4. You’ll be displayed with multiple fields. Fill in the right values of the proxy as explained before. Making any mistake prevents the profile from using the proxy. Once you’re done, click on the “Create” button.

Step 5: Test SessionBox One Proxy Integration
Upon successfully adding the proxy, the list that was once empty is updated. Fortunately, SessionBox offers an inbuilt proxy tester, so you could check it before you proceed using it. To do this, click on three vertical dots and then “Test proxy”.
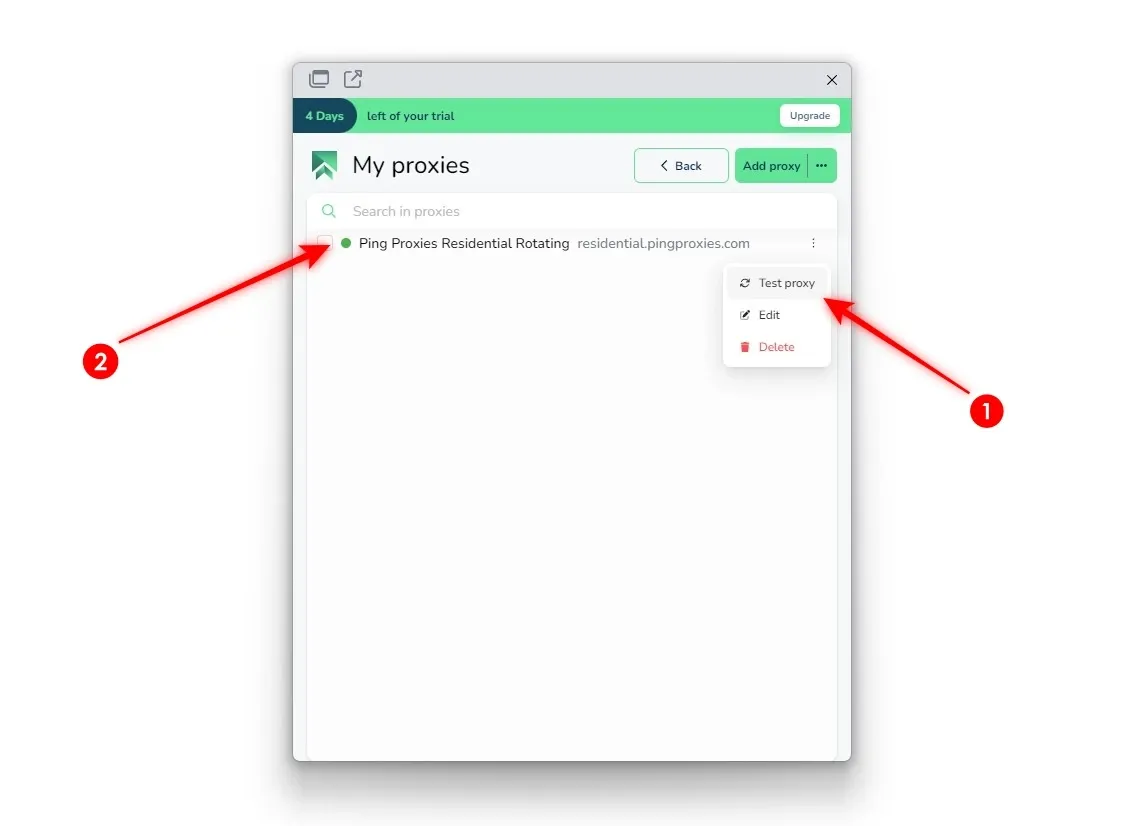
If you have done it right, the dot will turn from grey to green, meaning the SessionBox One proxy integration is successful. If it is red, make sure to check if the values are entered correctly.
Managing Multiple Accounts with SessionBox
With everything clear, adding proxies, and successfully integrating with SessionBox One—you’re all set to manage multiple accounts.
Note: For a quick demonstration, we will sign into two different Gmail accounts from the same browser in the same window. While manually signing out and adding accounts does the same, SessionBox skips any additional steps.
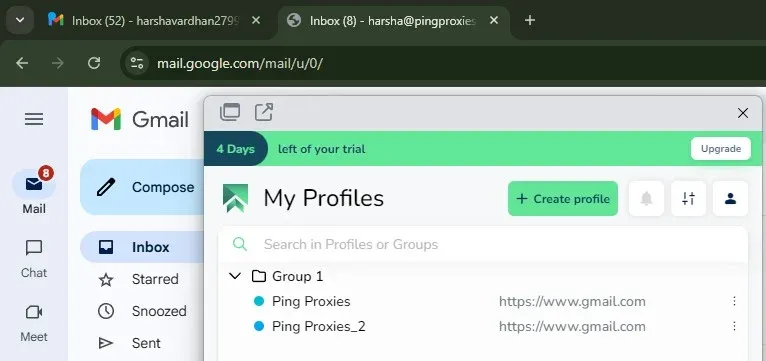
1. Start by creating multiple profiles based on the number of accounts you want to manage. Make sure that all profiles have the same URL.
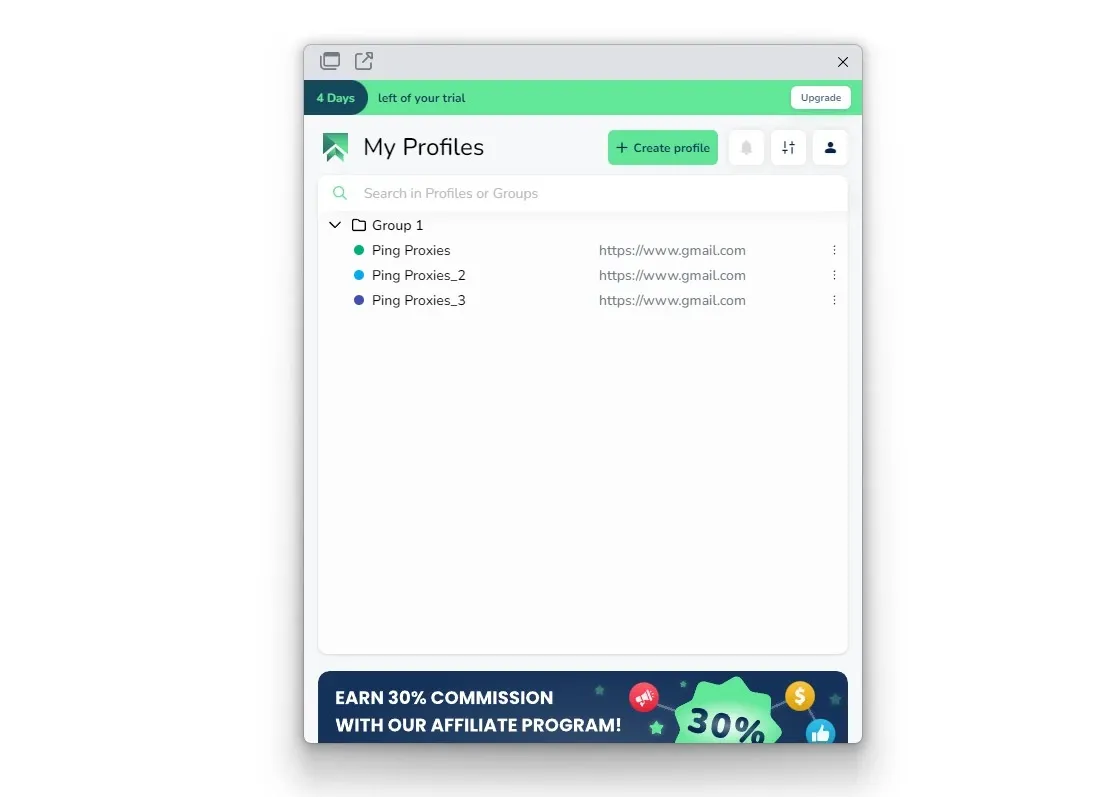
2. Now, edit the profile and assign each a different proxy server. It is important not to assign the same proxy server, as it doesn’t allow you to access multiple accounts.
3. Once the proxies are assigned to the profiles, click on the profile name. Doing so, open the URL added.
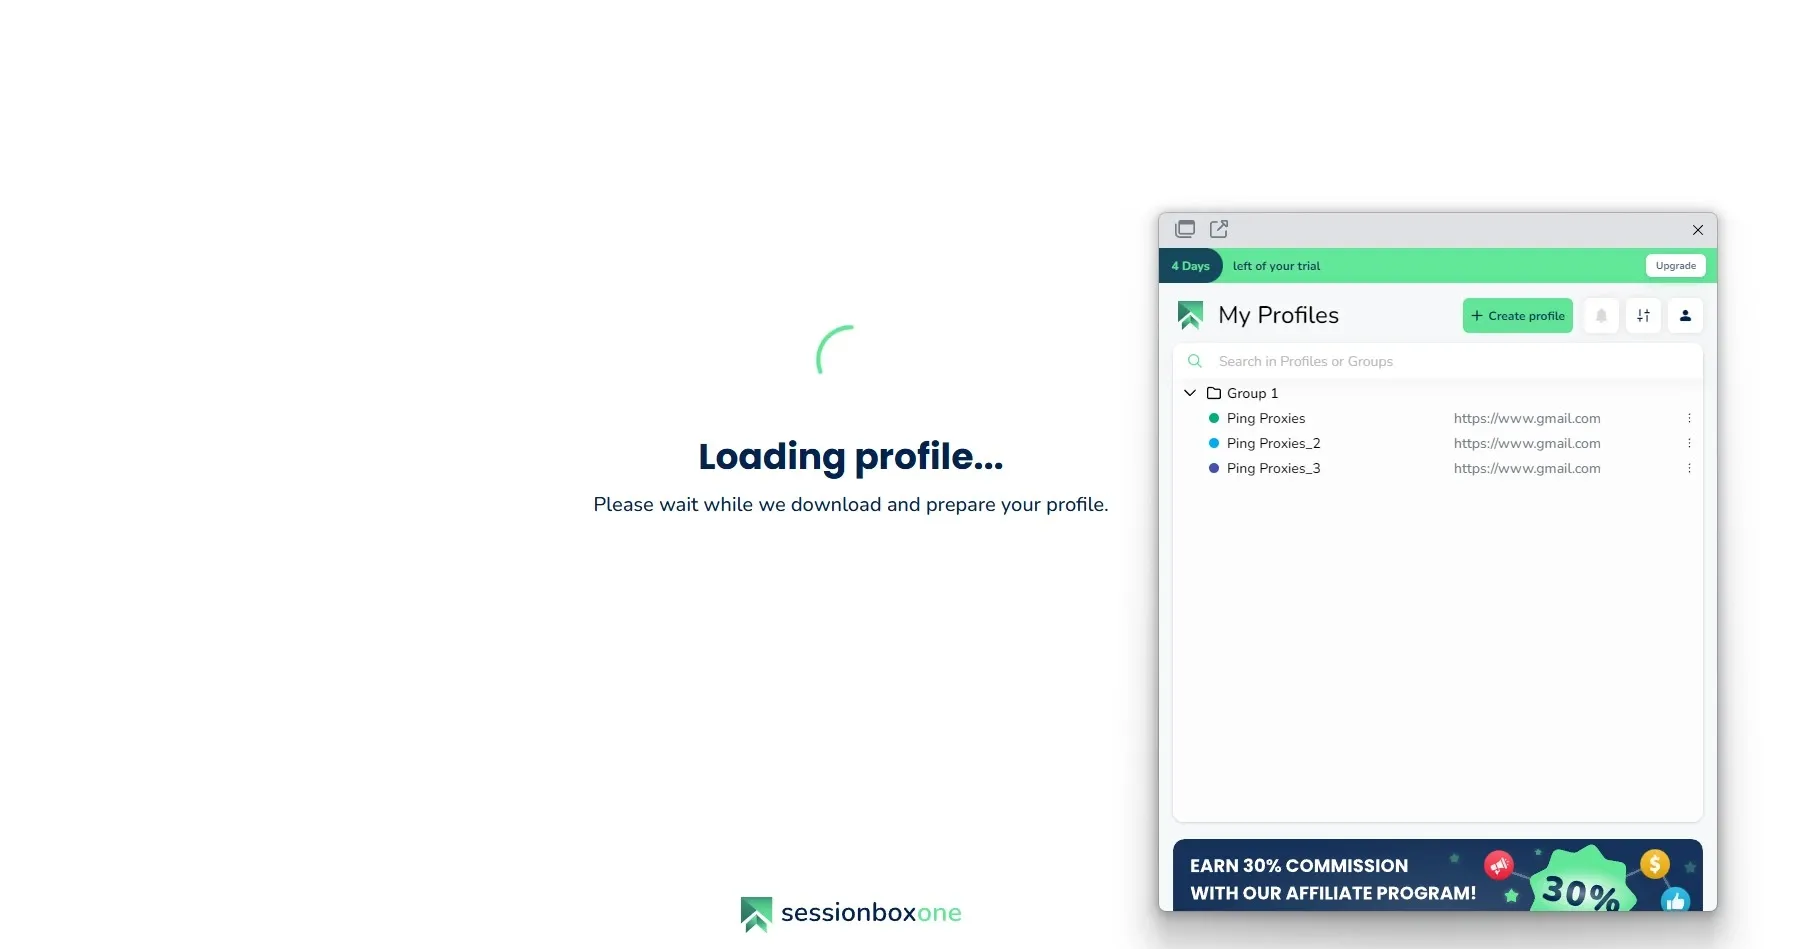
4. Continue opening all the profiles, and you get to use different accounts on different tabs. That’s it—you have successfully achieved multi-account management with SessionBox One by integrating with proxies.
Wrapping Up
SessionBox has been a go-to solution for managing multiple accounts, but it hasn’t been the same as before. Not only has its extension been removed, but the legacy version is no longer available and deprecated.
As presented in this guide, we recommend you use SessionBox One, an enhanced version. Plus, it brings in additional features, offering you better chances of managing multiple accounts without being detected.
While using SessionBox isn’t considered illegal, it is important to respect the terms and conditions of the platforms you operate on and use it responsibly. To further reduce detection risks, slow speeds, and login failures, choosing the right proxy provider (Ping Proxies) is your best bet.